Family & Friends
Handmade Decor: The Hidden Thermostat
 I showed you my TV wall last week along with my solution for making the television disappear: The Great TV Cover-up. Before we even placed the TV on the wall, though, there was another eyesore to deal with.
  Who put that thing there and why? There are so many more appropriate places for the thermostat. How about the stairway wall right across from here or maybe one of the hallways or almost anywhere else? Ray and I did discuss cutting holes in the wall and dragging the thermostat closer to the edge of the wall to make it a little less noticeable, but late one evening, inspiration struck!
We have this little box that is designed to hang on the wall and hold your keys. I didn’t take a picture of the inside, but inside there were little knobs mounted to a solid back. I enlisted Ray’s help to remove the back while I headed down to my sewing studio.
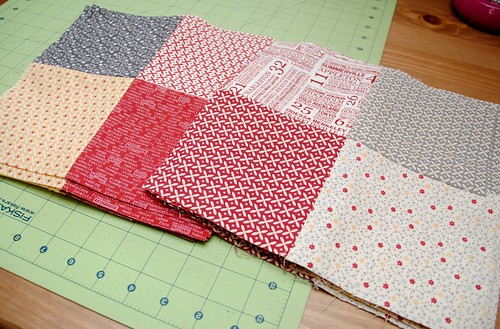
 First, I removed the glass and the print from the box, then I took a few minutes to paint the box red. While the paint was drying, I dug through my stash and pulled out a pile of red and white fabrics. In no time at all, I had pieced together a wonky house block, just the right size for the frame on the front of the box. (How is it that sewing something so small, can result in a mess this big?)
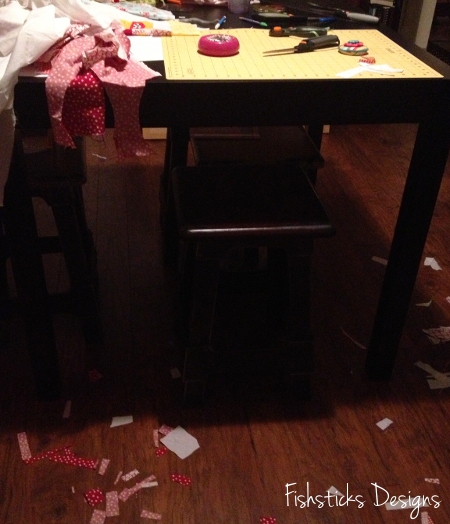 What do you think? Oh, how I love re-purposing something old into something beautiful with purpose!
 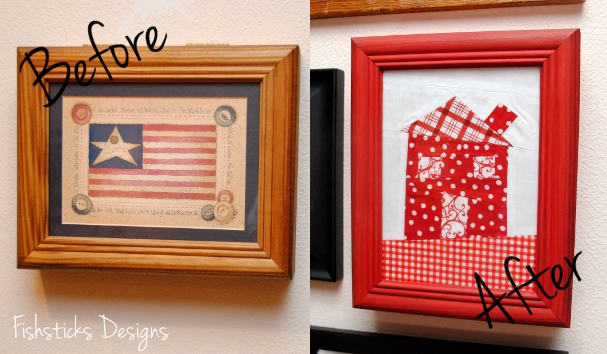 With the back removed, I simply placed a few screws right above the thermostat for the top of the box to sit on, and the door allows us to access the thermostat whenever necessary.
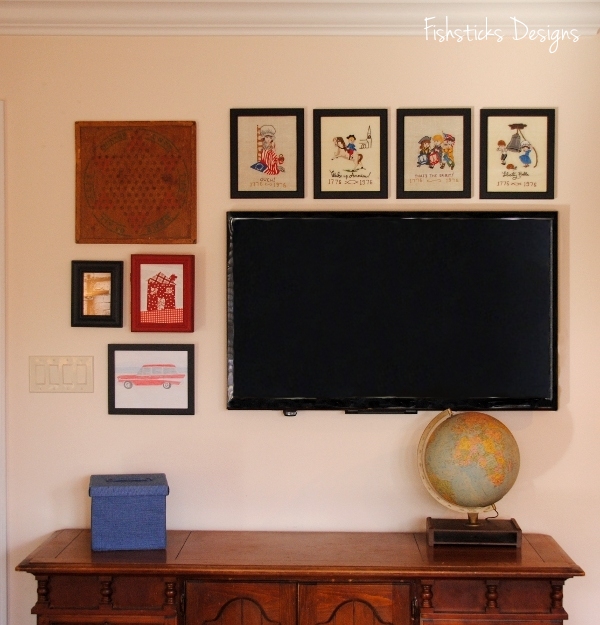
 Here’s one more look at our TV wall with the television and the thermostat hidden away. (Next week, I’ll share a little about the framed embroidery pieces above the television!)
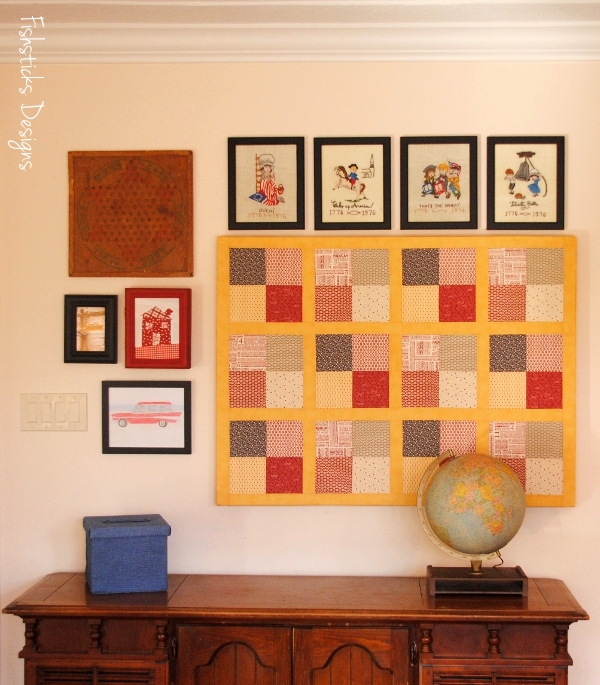
Handmade Decor: The Great TV Coverup!
 This might be my favorite home decor project ever, and I can’t wait to share it with you! As many of you know already, we moved into a new-to-us house this past fall, and we’ve been working since then on decorating it to make it truly ours. We have a very limited decorating budget, so I’m doing my best to create decor as much as possible. I love handmade things, so handmade decor works perfectly for us! I thought I’d try to start sharing a handmade decor idea here on my blog once a week . . . at least until I run out of house to decorate.
That’s our TV wall above. It’s one of the first things you see when you walk in our front door, and while my family enjoys owning and watching television, I don’t like having it on display when we have guests over. I knew that we couldn’t really purchase a piece of furniture to hide the TV, so I went hunting for ideas to cover it up when we wanted to do so. I found some great ideas on Pinterest, including several that balanced a canvas print on the television using brackets attached to the print. I liked that idea because it’s simple and cheap, but I thought maybe I could take it a few steps further.
We started by mounting our television and pulling the cords into the wall so that they’re all hidden. (I say “we”, but really, Ray did all of that work while I stayed out of the way!) Once the TV was mounted, I checked all the measurements: length, width and depth from wall. With measurements in hand, I went hunting for the perfect canvas. I found that when you’re looking for a larger canvas, it’s usually less expensive to purchase one with a print on it rather than a plain white canvas. The canvas that worked for us started out as an alphabet print from Hobby Lobby. (I promise I took a before picture, but I have hunted everywhere and cannot find it.) On clearance, I paid $25 for the canvas.
 I had this stack of quilt blocks that I pieced early last year during a quilt-along, a quilt-along that I failed to completely quilt along with. That’s okay, though, because these blocks were ready and waiting and perfect for this project. I measured everything out to determine the width that I needed for my sashing and a border wide enough to wrap all the way around the back of the canvas. Once the quilt top was pieced together, I was ready to to assemble my “canvas quilt”. Because the canvas print was pretty bright, I covered the canvas with white cotton fabric then stretched my quilt top over it and stapled it in place.
  I wanted the canvas to slide completely over the television, but the back had some braces that needed to come out for that to be possible. I called in Ray’s help again. (I feel like I should add here that he was worried the frame might not hold it’s angles well without the support, but he was willing to saw out the supports as long as I knew that was a possibility. Thankfully, the frame held together beautifully!)
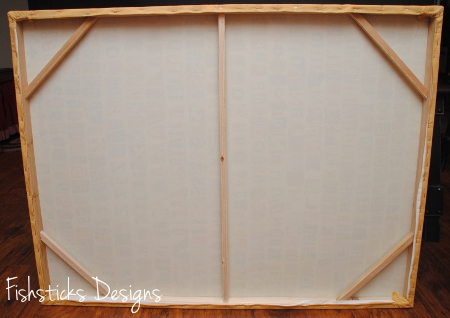
 With that, this project was done! Because you can see the TV from all sides in our home, I love that this cover mounts all the way over the TV. It’s also really lightweight, so I don’t worry that it will cause any harm to the television.
 We had friends over last week, and late in the evening, someone asked me, “Do you own a television?” She happened to be standing right next to it and had no idea! Exactly what I was hoping for!
Hopeful Threads, Dinner for Two & Big Kid Bibs for Hidden Treasures
 Woohoo! It’s February! I have been bubbling over with excitement about today for weeks now! Not only do I have the magnificent privilege of getting to work with Kristy and all of the incredibly giving Hopeful Threads followers this month, but I get to be involved in a project that I know is going to be a huge blessing to everyone involved, from those who contribute their sewing talents to the beautiful children and caregivers who receive these handmade gifts.
 I was visiting with my friend, Heather, several weeks ago, and she mentioned that she was getting ready to sew some waterproof bibs to send to China with her daughter, Ransley. Actually, I think she simply asked me if I thought diaper-making PUL would work as a waterproof backing for the bibs that she was making. I thought it would be perfect and offered her some scraps that I had in a box in my garage. A few days later, she texted me about the PUL, and I called her to ask some more questions. The more I heard, the more I was sure that this was a great project for all you sewists who are so kind and generous about offering your time and talents each month to give to those in need! A quick email to Kristy and an even quicker response from her, and I was busy at work putting together everything that you would need to start sewing!
 First, though, a little bit about the children who will be receiving your gifts. This is Ransley, above, on her last visit to the Hidden Treasures Home just outside of Fuzhou, China. Ransley is leaving in the next few months to go serve on staff at Hidden Treasures for the next few years. She shared with me that God showed her such peace, love and joy on her last journey there. The home is filled with children, many of whom have special needs, but it’s also filled with love and fun and hope. You can read many of the children’s stories and browse through photos on the homes’ official website right here: Loaves and Fishes International and the Hidden Treasures Foster Home. I urge you to take a few minutes to read about these sweet little ones.
 When I asked Heather to tell me about the bibs she was sewing, she shared that she’d been asked to sew some when Ransley last journeyed to China. The older special needs children often need bibs to keep their clothing clean and dry, but larger bibs are harder to come by, especially in China. The staff at Hidden Treasures actually sent her a pattern drawn up on a paper bag and suggested that she sew them with cotton fronts and vinyl shower curtain backing.
 Heather sent over about a dozen sewn that way, but she heard they didn’t hold up as well as she’d hoped. I was so excited to jump in and offer suggestions that I hope will produce bibs they will be able to use for years to come! And, after reading this inscription on the original paper bag pattern, I feel so incredibly blessed to have the opportunity to offer my experience!
 Are you ready to get sewing?
 I have two different bib options for you, but let’s start with a little about fabrics and notions. For the waterproof backing, I highly recommend diaper-making polyurethane laminate. You’ll find it labeled PUL in most fabric shops. (Natures Fabrics is offering a 10% discount on PUL for participants. Just type in the code loavesfishes1 when you checkout. You must only have PUL in your cart to check out with the code.) Rip-stop nylon is an alternative waterproof backing.
These bibs will be packed into spare suitcases for the trip to China, so they need to be absorbent, but not too thick. I’m suggesting sewing them with cotton woven quilting fabric or flannel on the front and a hidden flannel layer for a little extra absorbency without too much thickness. Please pre-wash all cotton fabrics.
One last thing, the staff at Hidden Treasures has specifically asked for bibs with no Velcro (or other hook and loop) because the children tend to rub their heads against it, and it can be irritating. The first bib pattern is a traditional tie bib. These work really well for the needs of the children at Hidden Treasures. (Now that this project has ended, this tie bib tutorial is no longer available, but be sure to grab my tutorial for the snap bib in four sizes here: The Bibs in All Sizes Tutorial.)
 The second bib pattern is a snapped bib with a wrap-around back. These are very quick to make and great for both the needs of the children at Hidden Treasures and perfect for your little ones at home, too. (My favorite tool for attaching metal snaps is The Snap Source Snapsetter. It’s what I use for campshirts, pajamas, overalls, anything that needs metal snaps, and at only $9, it’s quite economical, too!) Just click this picture for the Snap Bib PDF pattern download.
 Be sure to add pictures of your bibs to the Flickr album: Dinner for 2 Album. Thank you so much for giving your talents, your time, your stash, yourselves for these little ones!
Love at First Sight

Have you ever walked into a vintage store, or thrift store, or yard sale, and had something demand that you take it home? I had a lovely afternoon of shopping this past Friday with my two girls, my granddaughter and my oldest daughter’s best friend. There’s this amazing little downtown area not too far from here where all of the shops are locally-owned small businesses, and there is a huge array of things to browse through . . . lots of it handmade! It’s one of my favorite places to spend an afternoon.

Late in the day, it started to rain, so we ducked into a little strip of stores that all open into a shared indoor breezeway and wandered into Anchors and Acorns. The owner, Karen, was friendly and welcoming, and the whole shop is full of beautiful and whimsical vintage items. I happened to glance down as I walked around a table in the center of the room, and instantly fell in love. This sweet old girl looked like she was sitting there just waiting for me.
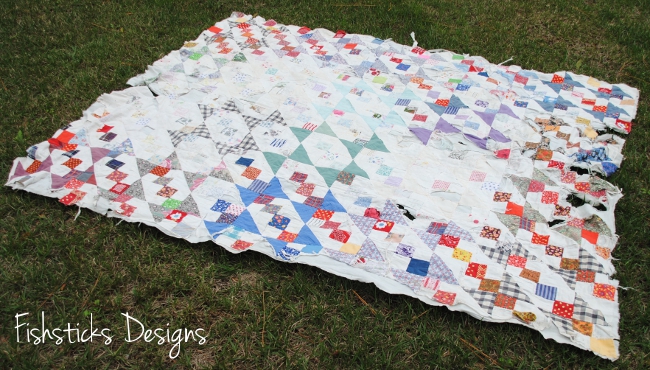
Yes, she is quite tattered. She’s got plenty of wear and tear and some random age spots. It even looks as if someone has cut pieces from her and ripped her binding off completely. One day in the past, though, she was fresh and new and loved by someone. Maybe I was a little affected by something that the kids and I had read in our history lesson earlier in the week. “Katherine of Aragon is forty-four years old. The freshness has faded from her cheeks.” I’m only a few years shy of that! I like to think that the freshness is far from fading from my cheeks, but the truth is, we all get a little “tattered” with age. That doesn’t change the fact that there’s beauty in all of us, though.
Can you just imagine the stories that she could tell of the hands that created her, of the fabrics used to piece her together, perhaps of little ones that she covered and comforted through sickness or scary dreams, maybe stories of picnics in meadows and days at the beach on the sand?

She’s long past her prime now (another wash or two might be the end of her), but she’ll do a beautiful job of decorating my sewing studio, and I hope that she’ll remind me on a regular basis that beauty is about far more than appearance. There’s an unmatched beauty that emerges with age and experience. You just have to look past what you see with your eyes.

Project Run & Play: Polka Dots & Stripes

This week’s Project Run & Play Challenge is Polka Dots and Stripes. (Have you sewn anything? You should give it a try!) Sunday was my Jamie’s sixth birthday, and he wanted to go bowling. I knew that I wanted to sew a shirt for him, since his birthday is this week, but the idea for a bowling shirt didn’t actually come to me until Sunday morning! Am I the only one who occasionally overlooks the totally obvious?

I printed a new copy of the pdf version of my Everyday Camp Shirt pattern and started drawing lines and chopping it apart where I knew I wanted the color-blocking on the front and the back. Color-blocking is really simple to add to any pattern. Just draw lines where you want your new fabric to begin and end, then add lines on either side for seam allowance. I use 1/2″ seam allowance, and then I just fold the pattern to get the right portion of it when I’m tracing on to the fabric. You could also print two copies of the pattern, though, and actually cut out the separate pieces of the pattern before tracing. Does that make sense? (Maybe I need to do a tutorial with pictures. It’s such a great way to take a pattern that you already love and give it a new look.)

I sort of wish that I’d made the stripe on the sides of the front a little wider. It’s easy to see in real life when Jamie moves around, but it was really hard to get in pictures. This picture does show it well, though!
In addition to the color-blocking on the front, I added a yoke on the back and simply turned the fabric on the bias. When you’re working with stripes, that’s an easy way to add some interest without using a second fabric. I also cut the pocket on the bias and added a strip of the polka dots as trim on the top.

I promise he does smile. He was so excited to go bowling! He just isn’t interested in smiling for the camera lately. Too much pattern cover photography, maybe? Poor kid.

I did the raw-edge applique on the back of the shirt using the method that I explained in my Christmas Tee in a Twinkling Tutorial in November. In case you’d like to make your own Everyday-Camp-Shirt-turned-Bowling-Shirt, here’s a pdf of the applique pattern for you: Bowling Applique. Be sure to link to me if you use it. I’d love to see what you create!
Christmas Bags for My Nieces with a Little Extra Love Sewn In
 I’ve established this really fun annual tradition of sewing new bags for my three nieces each Christmas. I think I’ve shared before that I’ve heard that one of the things they enjoy most about using them is being able to tell their friends that they’re bags are “one of a kind”. This year, I decided to sew something a little extra special into all three bags.
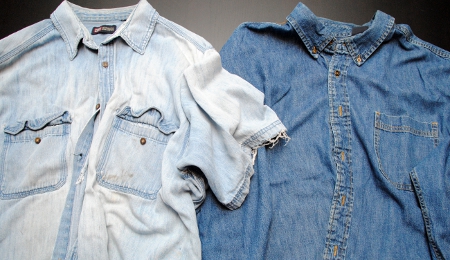 While I was at my mom’s for my step-dad’s memorial service back in October, I asked if I could take home some of the chambray shirts that he wore almost everyday. I had plans to incorporate patches from them into a quilted throw, and I probably still will at some point. My nieces shared a very close bond with their Papa, though, and I knew they would love having a little something of his to carry with them everyday. With that thought in mind, I worked scraps from Papa’s shirts into each of the girls’ bags.
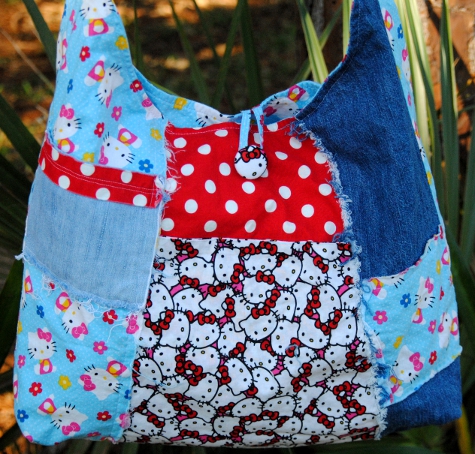
 I used the pattern that I created for Samantha’s “No Bully Zone” bag with a few minor updates including a little cell phone pocket on the front. The girls loved the easy, fun style of the bag, and the incorporation of Papa’s shirts meant so much to them! I hope they enjoy them all year long!
Christmas PJs 12 Days of Handmade Christmas Projects: Day 12
 Yep. This post is a few days late. I finished up Christmas PJs for my two youngest early on Monday morning using the Lazy Days Lounge Set pattern. I had grand plans for adorable Christmas Eve PJ pictures, but this little guy came down with a fever and didn’t want to move from this comfy chair:
 And, this little guy had a long, hard day that knocked him out on the couch:
 They were really cute in real life! I tried to snap some action shots on Christmas Day, but there was just too much fun to be had to slow down for photos. I did get this cute picture of the two of them with their new stuffies, and then they were off again!
 Thanks so much for following along with my 12 Days (That Took 16 Days) of Handmade Christmas Projects! I hope that you all had beautiful Christmas celebrations packed full of joy and plenty of handmade goodness shared with your loved ones!
Lee Lee the Lion & Ronny the Robot 12 Days of Handmade Christmas Projects:Day 11
 I was afraid that these two little guys were going to be the finishing-at-midnight-on-Christmas-Eve-when-I-should-be-sleeping project! I am so thankful that the raw-edge style finishing on these lends itself well to slightly (or not so slightly) messy stitching. With time running out quickly, I moved through as fast as humanly possible.
 Lee Lee and Ronny are Freddie’s Friends patterns. (I sewed Olive the Owl for Katie’s first birthday several months ago.) These are definitely not quick projects, but the end result is well worth the extra time. I love the cute little details! Seriously? Look at this adorable tail!
 Lee Lee the Lion is going into Jamie’s stocking tonight, and Ronny the Robot into Charlie’s. Only a few hours left until Santa comes! I better be off!
Handmade by Samantha12 Days of Handmade Christmas Projects:Day 10
 My kids are all pretty crafty. (I think they come by it naturally.) My 14-year-old, Samantha, is particularly talented at both knitting and drawing, and it’s really exciting for me to see that she’s learned the value in creating one-of-a-kind handmade gifts for her family and her friends. This year, she is knitting quite a few of her gifts, but she also used her drawing skills to create this trio of sketches for her niece, Katie.

 Katie’s a little too young to really appreciate these now, but someday, she’ll love them both for their beauty and for the love that went in to them! Are your children giving any handmade gifts this year? How do you encourage them to develop their creative talents and share them with others? I’d be thrilled to hear your suggestions!
Making Memories 12 Days of Handmade Christmas Projects: Day 9
 This may be stretching the meaning of “handmade” just a little because you can’t really hand-make memories, but you can make plans for things that will help to make memories. For the last several years, we’ve made a point to do something to help make memories each day of Advent. A few Christmases ago, I sewed this quilted Advent calendar, and we use it to hold our planned activities for each day. Our kids get really excited about pulling out the activity and reading it each morning. We try to balance activities that focus on helping others, activities that remind us of the real meaning of Christmas and activities that are just fun! Here’s a little peek at a few of the things we’ve done so far this year:
We took a walk through Bethlehem at a local church.
We took our youngest four Christmas shopping for each other at Barnes & Noble.  We picked up Starbucks hot cocoa and went for a drive to find our favorite Christmas light displays.
 We went Christmas caroling and visited at an assisted living home with our homeschool group.
 We baked cookies . . . lots of cookies!

We attended a Cookie Exchange at a friend’s home. We invited friends over for dinner.
We did a little grocery shopping for a local food bank. We had a family game night.
 We watched the local Christmas light parade.
 What are some of your favorite ways to make memories during the Christmas season?


