Handmade Christmas
Handmade Christmas Projects 2, 3 & 4 are in the bag!
Adding three more handmade Christmas projects on my way to a full dozen. Today’s projects are all handmade bags!

This is my mom’s new Christmas bag. She asked me to make her one like the one that I made for her when she visited a few years ago only in black and red. I used my now out-of-print Sammi Grace Bag pattern and modified it just a little by adding a button closure with a fabric-covered button and piecing the outside in strips. Inside, there’s a divider and several pockets for cell phone, pen or pencil and business cards.

Next up is my sister’s gift. She didn’t offer any suggestions for what she’d like, but she does love green, and everyone can use a nice tote bag, right? I had a picture in my head of how I wanted this bag to look, but I really made the pattern up as I went along. I love that it’s really a simple tote, but it has a much dressier look to it!

Finally, my middle niece, asked me to sew her a messenger bag like the one that I did for her older sister a few years ago. I pulled out my messenger bag tutorial and went to work. I added a machine-applique penguin and a magnetic snap to the flap. About 3/4 of the way through assembly, at the point where I was ready to sew the flap to the outer section of the bag, I realized that I had sewn the body layers together sideways. I sort of liked the longer, narrower look . . . and I really didn’t want to rip the whole thing apart so I trimmed down the sides of the flap to match the new width and went with it.

I have to end with a few fun pictures. (My apologies that they are icky flash pictures. There was an incident this same night involving my 18-55mm camera lens, so I’m currently operating with just the 70-300mm which doesn’t work with my light scoop.) Our oldest son, Sean, and his friend, Josh, spent a few minutes frosting, decorating and eating sugar cookies with us on Sunday night. They were on their way out to an Ugly Christmas Sweater party, so they were dressed in sweaters that they tell me were borrowed from Josh’s grandmother. (Adding a note here that I am not saying these are ugly sweaters at all! Loud and very Christmas-y? Very much! But, ugly? I’ve seen uglier.)


Handmade Christmas Project #1

On the first day of Christmas, a seamstress made for me . . . No, really, I’m not going to sing a new version of the twelve days of Christmas, but I do have twelve handmade projects that I’d like to share between now and Christmas Eve! (Most of them are done already, but I do have few projects that have made it to the last minute scramble)
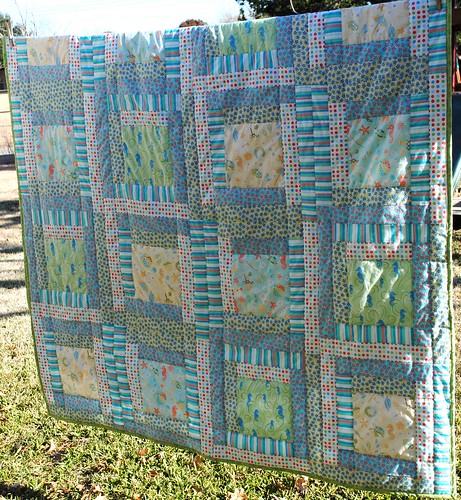
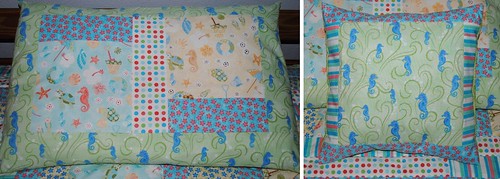
First up is this simple quilt for my youngest niece. She is a big fan of anything giraffe related, and I think she’ll love these!

Because I didn’t have a lot of time to put this together, I pieced the quilt top together from solid 10″ blocks, alternating the four block fabrics. Then I put a quick border around it, backed it with minky, quilted it in diagonal lines and machine-bound it. The final quilt is about 50″x60″.

I love these minky-backed, no-batting quilts for little ones because they’re warm and soft, but they don’t take up a lot of storage space in your closet when you store them or in a bag when you travel.
One Week ’til Christmas!

Is it really only a week until Christmas?! I still have a few things left on my to-do list. How is yours coming along? For me, last week is a blur of shipping the last of my Market orders (with the new Everyday Camp Shirt pattern!), sewing the last of the handmade gifts that I have to ship away, two days of a miserable cold virus, one day of homeschool field trip and Christmas party fun and several days of updates to my website and blog! (I was so busy, in fact, that I totally forgot to blog about my giveaway at Create Hope Designs! I hope you all got a chance to enter!) Cynthia of Webwurkz has been working on some pretty major updates to my website, and it’s looking so nice. (She’s amazing, by the way! If you ever need web design work done–I wholeheartedly recommend her!) I spent most of the day yesterday redecorating my little blog home here. What do you think of the new look?
Last night we had a little family Christmas fun. We started with the local Christmas light parade, which conveniently passes right in front of our home. Then after dinner, we had a blast decorating a gingerbread house with our youngest four children. It’s certainly not going to win any grand decorating awards, but I think it turned out quite lovely! Everyone helped, too. Ray assembled the house. Jamie shingled the roof with chocolate chips. Samantha, Allen and I handled the walls, walkway and “lights”. And, Charlie shoved candy into his mouth as fast as he could while he thought no one was watching!


Be sure to check back tomorrow for the first of my 12 Handmade Gifts for Christmas posts! (All relatives are hereby warned that if you peek over the next week, you just might spoil your Christmas surprise.)
The Joy-Nicole Bag Tutorial

Each year, I sew new bags for my nieces and daughters for Christmas. Last year, with my Messenger Bag Tutorial, I started a tradition of designing a bag for them and sharing it in a tutorial here for all of you to use, too. I’m a little behind on Christmas sewing this year. (There was this wedding . . . and it took up just a tiny bit of my time . . . ) I wasn’t ready to give up on the bag or the tutorial, though, so I made some time for finishing up both over the last week.
The first two versions of this bag weren’t quite what I wanted, but I’m thrilled with this final version! I can’t wait to hear what you think of it, too. This one is Samantha’s–as soon as she saw it, she begged for it to be hers. I’m so happy with the piping around the flap. It gives the bag a great finished look. If you’ve never worked with piping before (or if you have without great results) don’t fret–I’ve included my suggestions for perfect piping in the tutorial.

My nieces were here for the wedding, so I had the opportunity to have them visit my sewing studio and share with me their fabric preferences. My oldest niece, Tristen, asked for a bag made with her school colors: green and orange. I had my doubts about how those two colors would work together, but I love the result. I can’t wait to hear what her friends at school have to say about it!

Allie loves polka dots. She showed me a fabric in my stash that she really liked, but there wasn’t enough of it to work with for a bag. These polka dotted fabrics jumped out at me at the fabric store, though, and then I found the button that looks like it was made just for this bag. (The button is just decorative–there’s a magnetic snap under the flap.)

Finally, this is Kristen’s bag. When Kristen walked into my sewing studio, she saw this Michael Miller Dino Dudes and immediately said, “I want the dinosaurs!” I can honestly say that it never would have occurred to me to sew up a handbag with this fabric, but I think it might be my favorite of the bunch. Seriously? How often do you see someone walking around with a dinosaur purse? It’s definitely one of a kind!

I really like how each of the bags that I made this year showcase so much personality. Ready to sew up one or two in your favorite fabrics? You can find the pdf tutorial complete with pattern pieces right here: Joy-Nicole Bag Tutorial. If you use the tutorial, I’d love to see your bag!
Handmade Christmas – A Trio of Stockings

Just finished up these stockings for Morgan and her fiance, Chad, and his little guy, Austin. I used my own Stocking Tutorial which you can find here. I’m excited to give them these to enjoy on their first Christmas as a family!

Handmade Christmas: Birdies for Little Hands

My idea for decorating the bottom of the tree with something safe for little hands is . . . stuffed fabric birds! I love these! They take a tiny bit of fabric and only a few minutes of time to sew. The pattern is from Laura over at Spool. You can find the pdf pattern here: Bird Pattern. I sewed up a total of eight to group around the bottom of our tree.

You can add a ribbon or a loop of some sort to hang the birds, but since I want Charlie to be able to pull these off and play with them, I just nestled them between the branches. My friend, Ann, makes these as baby shower gifts because they’re the perfect size for little hands and make great chew toys. Even if you don’t have little ones playing around your tree, though, they’re a great way to show off some favorite fabrics in your decorating!

Handmade Christmas: Fabric Garland Tutorial

Looking for a simple project to add some handmade beauty to your holiday decorating? I was really tired of our old tinsel garland, and we’ve been working towards decorating with mostly handmade Christmas decorations. I played around with a few different ideas for making a garland and this one is the one that turned out the best for the least amount of work. (I am really short on decorating time this year because, in case you haven’t heard, my daughter is getting married in just over TWO weeks!) This project took me an evening of cutting plus an afternoon of gluing with my two middle schoolers.

Here’s our tree all decorated with our new garland and mostly handmade ornaments.

It’s definitely not department-store perfect, but I wouldn’t want it any other way. I love all the memories that all of those ornaments bring back . . . our children when they were tiny, our former homes, all the foster children that we loved years ago when we were fostering, our past pets, our old neighbors . . . I try to steal a few quiet moments during the Christmas season to sit in the rocking chair with a hot cup of tea and admire the tree while enjoying those sweet memories.
Oh, you noticed that the tree ornaments almost disappear about 2/3 of the way down, huh? That would be because of this little tree-admirer:

I’m working on a project right now that I think will decorate that area very nicely while still keeping the tree safe for our little guy.
Oh, I almost forgot, the link to the tutorial: Fabric Christmas Garland Tutorial. If you make one, I’d love to see it!
Handmade Christmas – Christmas Pajamas
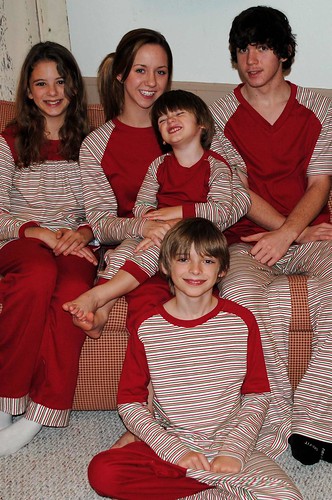
Just one more Christmas post before I move on to other things. It has become a tradition for me to make our kids new Christmas pajamas every year. I love having the kids in matching pjs on Christmas morning, and since my kids range in age from almost 20 to 2, I really have no choice, but to make them! I used several different patterns this year, some of my own and some purchased.


For my youngest two boys, I used my Patrick Curved Raglan top. I did modify Jamie’s to add cuffs to the arms. For Jamie’s pants, I used my AJ Bottoms pattern with cuffs added the same way I did the shirt. Allen’s and Samantha’s pants were both just traced from a ready-to-wear pair of PJ pants. (Knit pajama pants are very forgiving and tracing a pair that you know fits well works great!) Samantha’s top is my Emmy pattern which is her favorite.


For Morgan and Sean, I used Kwik Sew 3144. Morgan asked for a long nightshirt, and Sean wanted the v-neck style top. (I did modify the top a bit to make it more masculine for Sean. I just made the sleeves a little wider and longer and squared off the bottom and hemmed it.)
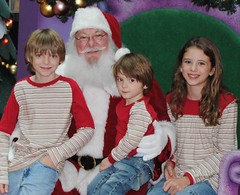
I always try to get the tops done as early as possible so the kids can get as much wear as possible out of them. They wear them with jeans to Christmas parties, get-togethers and, of course, to visit with Santa.
Handmade Christmas – Quilts for My Big Kids
Morgan asked me to make a new twin-size quilt this year for her bed in her college dorm. The flip-flop quilt that I made her many years ago has seen it’s better days, and she needed something a little more grown up. She loves the beach and the ocean, and her favorite colors are blue and green. I set out hunting for the perfect fabric many months ago and had about given up when I ran across Hoffman’s Beach Babes fabric. I knew it was just right, but because it was a popular, discontinued fabric, it was hard to find. Fabrics by the Sea came to my rescue! I saw that they had a few sets of the various fabrics, so I contacted the owner, Barb, and she worked with me to put together exactly what I needed to get this quilt done! (She even included great goodies in the package–a quilted coaster kit and salt water taffy!)
Morgan loves her new quilt, and I was even able to squeeze enough extra squares out of the leftovers to piece together a pillow sham and toss pillow for her.
I made a new twin-size quilt for Sean last year, but he needed a smaller, easy to drag around lapquilt. Like most teenage boys, he loves football, and I was able to find some really cool realistic cotton football prints to put this quilt together for him.
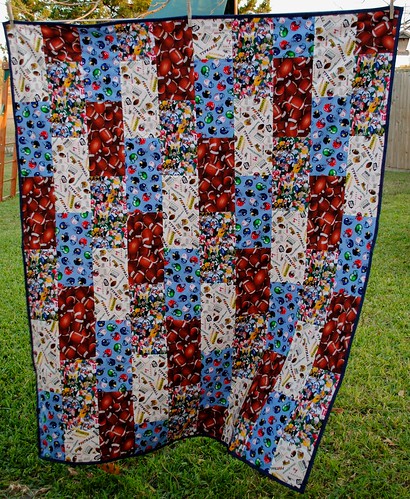
I like to make my lapquilts without batting and back them with minky. It makes for a nice warm, comfy quilt that folds up compactly, so it’s great for travel. I think Sean really likes his!
Now that Christmas is over, I’m looking forward to our new baby arriving in about a month, and doing lots of baby sewing. Pictures are coming!
Handmade Christmas – The Play Kitchen
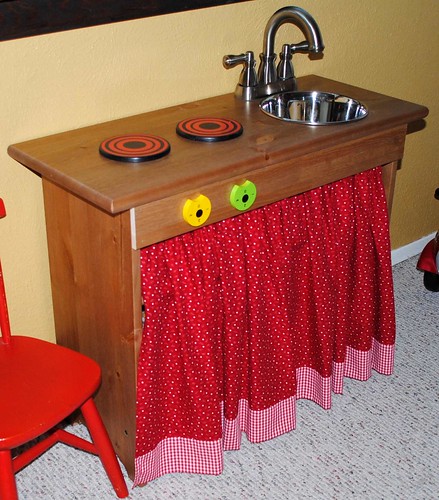
Our almost three-year-old, Jamie, has developed a love of helping in the kitchen lately, so we thought we’d put together a play kitchen for him for Christmas. A quick google search turned up hundreds of handmade kitchens with idea after idea for how to create one. We knew we wanted something simple, gender neutral and not too complicated to put together.
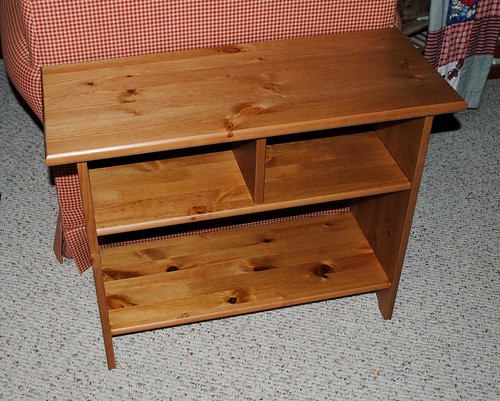
The kitchen’s home would be our family room which is decorated almost entirely in Ikea’s Leksvik line of furniture, so that was an obvious starting point. We picked up this Leksvik side table just before Thanksgiving and started brainstorming ideas for the kitchen “parts”.

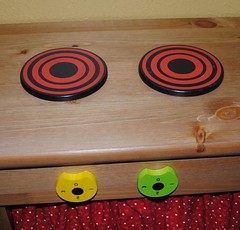
We drove out to our local Habitat for Humanity Restore one Saturday to hunt for a faucet and stove knobs. We were really excited to find this bathroom faucet, brand new in the package, for under $20. We didn’t find any knobs, though, and the ones that we found online cost more than we really wanted to pay. Samantha, our 11-year-old daughter, reminded us that we had an old wood tabletop play kitchen that we had originally purchased at a thrift shop put away in the storage closet because it had lost a knob. We pulled it out and quickly made use of the remaining knobs and the burners.
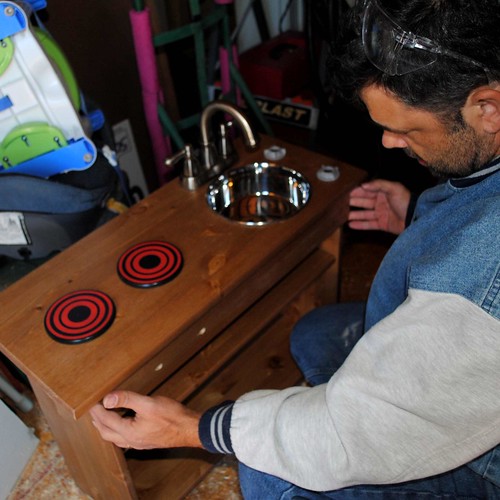
Ray was even able to install the knobs so that they turn. Finding a sink then became a problem because the space on the top of the side table is fairly narrow. All the stainless steel bowls in the kitchen section were either too wide to fit or too small to work properly. Walking around our local thrift store for inspiration, though, Ray ran across a stainless steel dog bowl that proved to be the perfect solution. We did, however, end up purchasing a new dog bowl from Walmart for the sink.
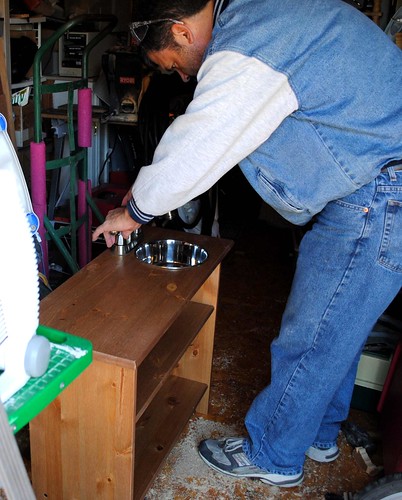
Ray put the kitchen together in the shed so that Jamie would be surprised on Christmas morning. Most of the construction was pretty straight-forward. He did add an additional piece of wood to the front of the kitchen for the knobs. (The wood came from a stack of extra pieces in the “As-Is” section at Ikea.)
Once Ray’s work putting the kitchen together was complete, I just needed to sew up a curtain for the front to hide the play kitchen accessories, and it was ready for Christmas morning.
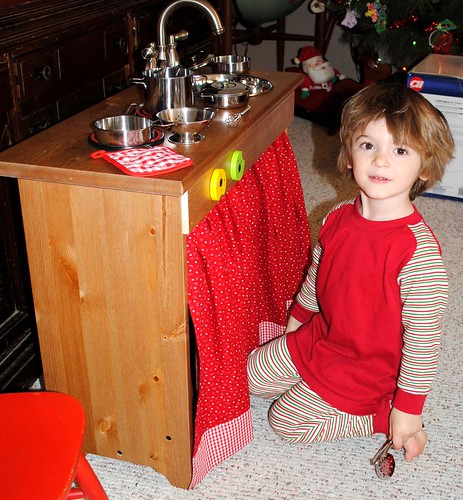
(Don’t you just love the bedhead?)

Cooking pancakes for Daddy.
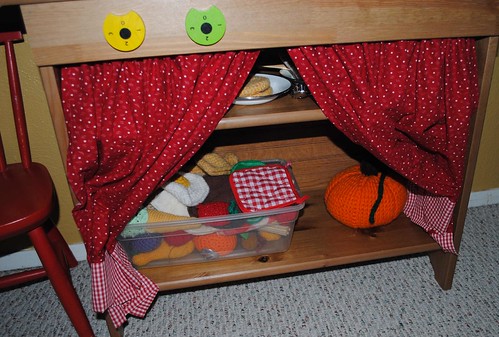
And, last a peek inside to see part our massive collection of felt and crocheted play food!
I’m sure that this kitchen will see a lot of attention in the coming years. I love that it fits in nicely with our decor and that it’s not overwhelming in size. I am so appreciative to all the other moms and dads who shared their play kitchen ideas that inspired this one!


