My Patterns
Introducing the Sand & Sidewalk Boardshorts and Skate Pants!
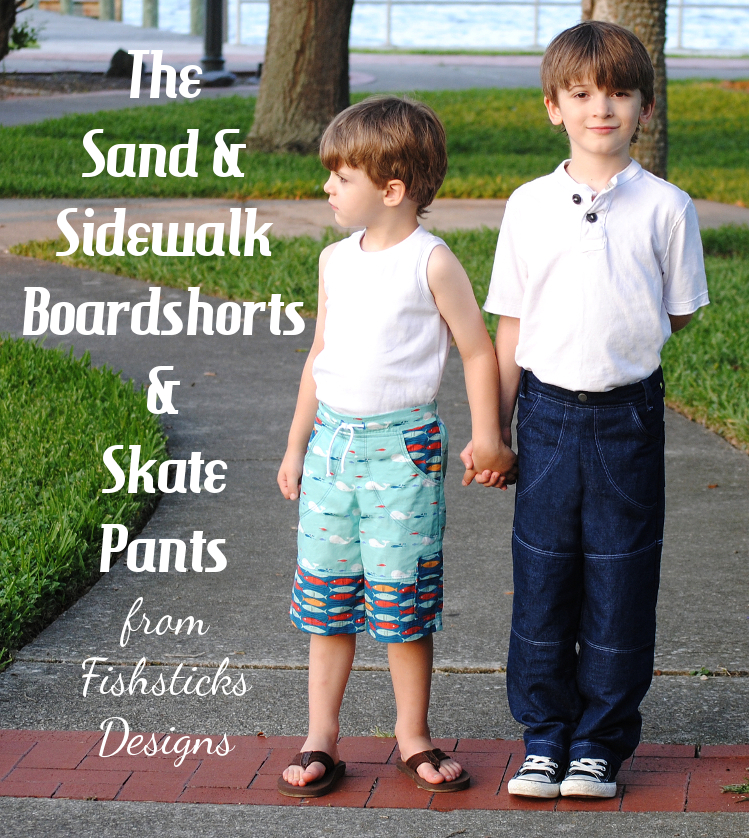 I can’t wait for you guys to read all about my latest pattern release! This one has already become a wardrobe staple for my two little guys, and I hope it will do the same for you! Allow me to introduce the Sand & Sidewalk Boardshorts and Skate Pants pattern! (As you go through, be sure to click on the images for larger pop-up versions.)
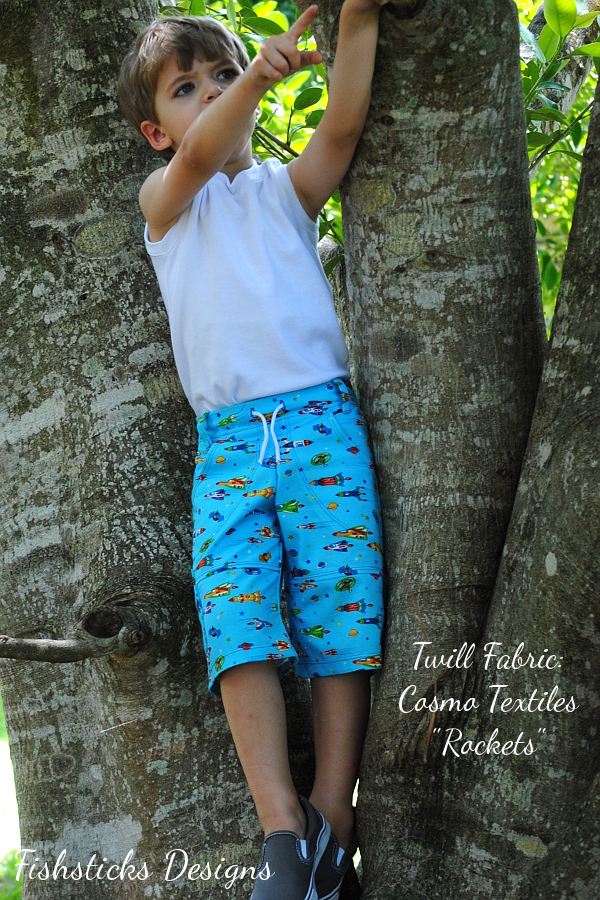 You can sew this pattern in both pants length and boardshort length. The boardshorts are designed to fall just below the knee, and the front of the leg is done in two parts for a stylish, modern look.
 Both the boardshorts and the skate pants feature an abundance of detailing provided by topstitching! It’s like ruffles and rick rack, only for boys! When you’re sewing for boys, it’s those little details that give your sewing that beautifully finished look. Don’t be worried that it’s hard, though. I’ll walk you through each step. (If you need a little extra help using a twin needle, be sure to check out my tutorial here: Using a Twin Needle.)
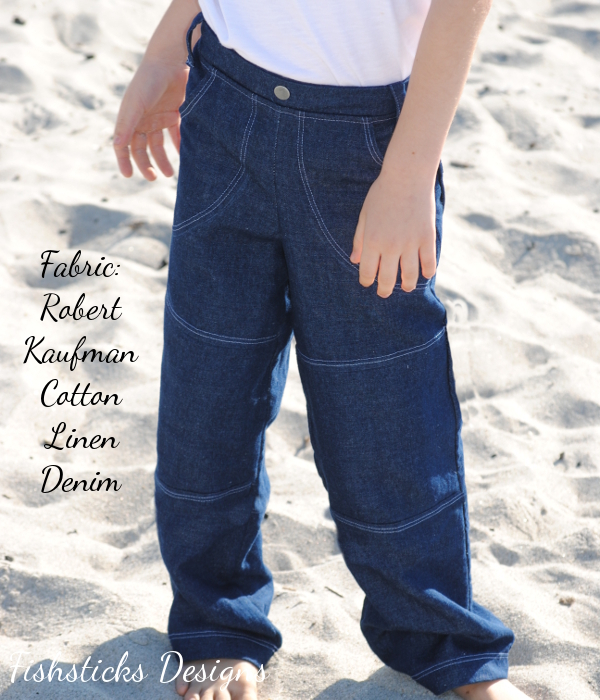 This pattern has a slimmer fit through the hips than traditional elastic-waist pants for a more updated look. The fit is slightly wider than a skinny jean fit but narrower than a straight jean. A measurement chart and multiple suggestions are included to help you choose the perfect size!
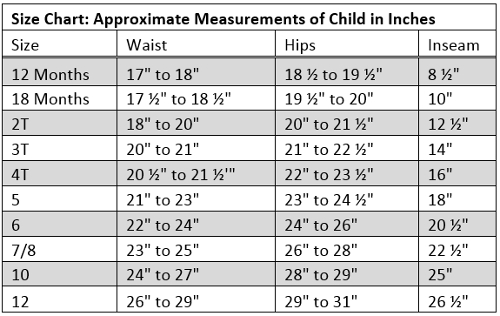 The skate pants include a double-knee panel which is great for making pants more durable for little boys.
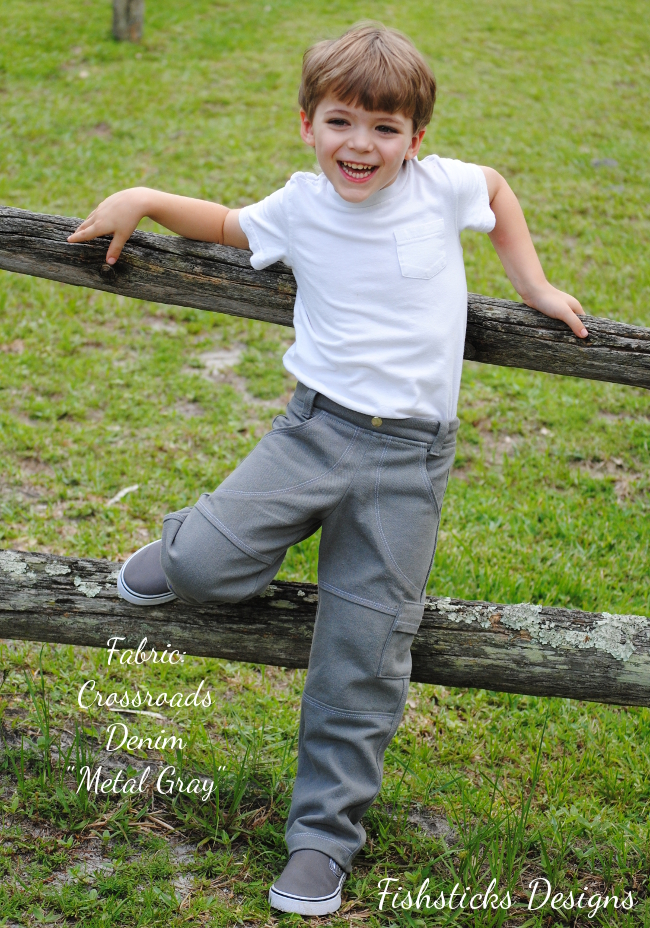 The pants pattern has two leg-width options.
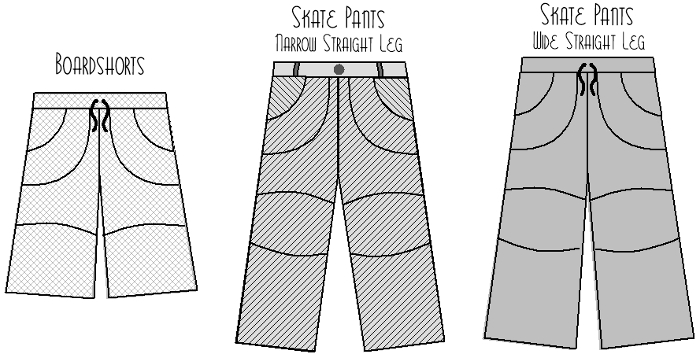 While both are straight legs, the narrower option tapers in slightly at the thigh for a closer fit through the leg, and the the wider option falls straight down through the thigh and the leg for a looser fit in the leg.
 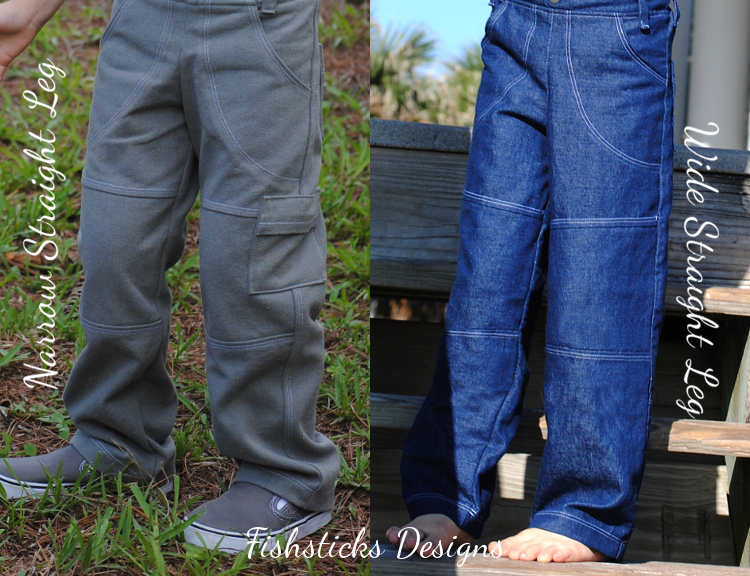 These pants and shorts have a whole list of mix-and-match features so that you can customize them just the way you like, and so that you can sew the pattern over and over, getting a different look each time. For the waistband, you can choose belt loops and a faux snap or a drawstring pulled through buttonholes or eyelets.
 The unique one-piece cargo pocket can be used for back pockets …
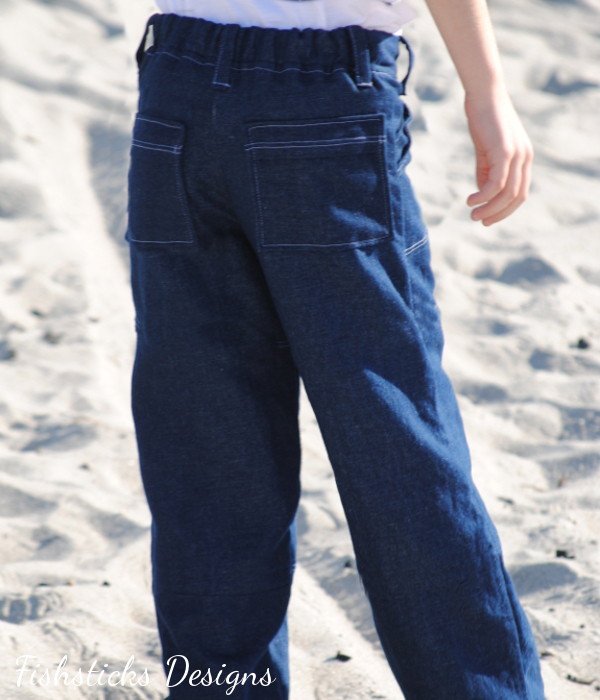 …or placed on the side seam.
 For even more interest, you can mix and match fabrics or try cutting the knee panel across the grain.
 Finally, the flat front/elastic-back waistband gives these bottoms a clean look and a comfortable fit.
 Where will your little guy wear his Sand & Sidewalk Boardshorts or Skate Pants first? Will he spend the day on the beach or perhaps take off to the local skate park? Maybe, like my little guys, he’ll hang out in the trees or spend the day exploring his own backyard. You can grab your own copy of the PDF pattern right here: The Sand & Sidewalk Boardshorts and Skate Pants or visit your local quilt shop for the paper version of the pattern!
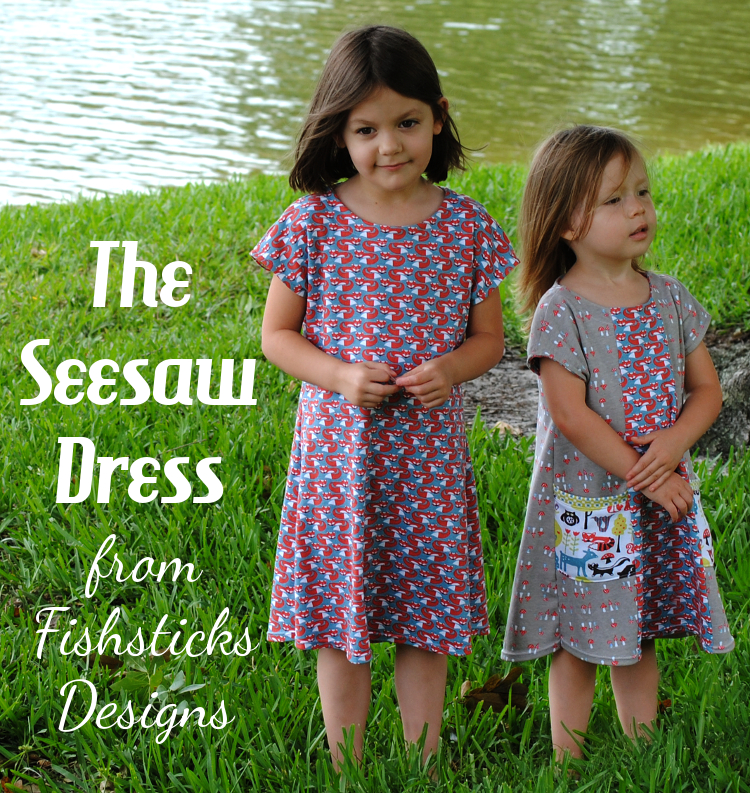
The Seesaw Dress Is Coming Tomorrow!
 There’s a new Fishsticks Designs pattern
 coming tomorrow! Update: It’s available now, right here: The Seesaw Dress! The Seesaw Dress in sizes 12 months to 7/8 is an all-knit dress that is a great choice for those of you who are new to sewing knits, as well as those who already love knit sewing. This casual, modern dress features two options: the Basic Dress and the Pocket Dress. Because of the dolman-sleeve styling the basic dress has only four pattern pieces and a quick, easy finish. It’s a comfortable dress that can go from the classroom to the playground with ease.
 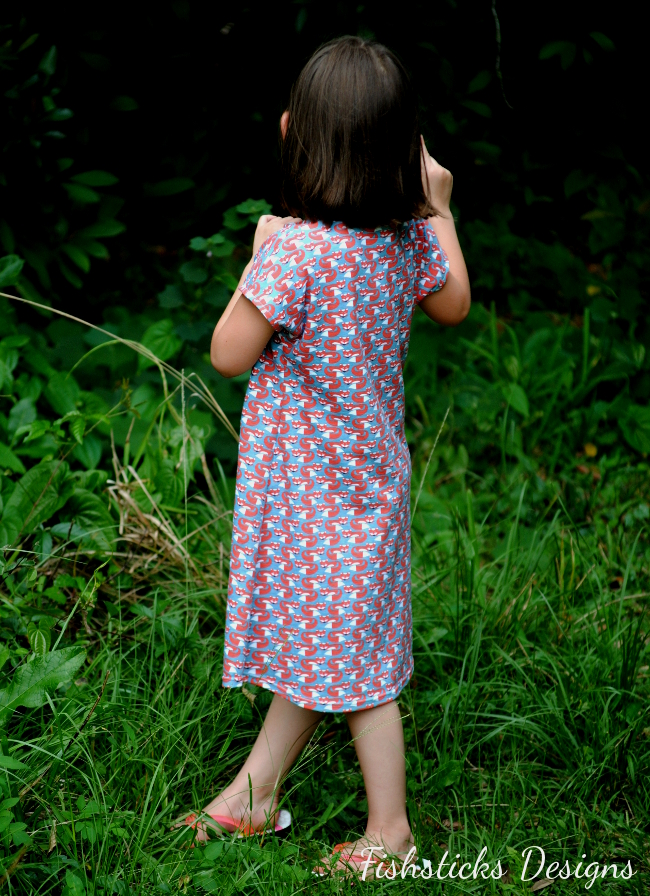 With just a little bit of extra work, you can add interest and POCKETS to this sweet dress!
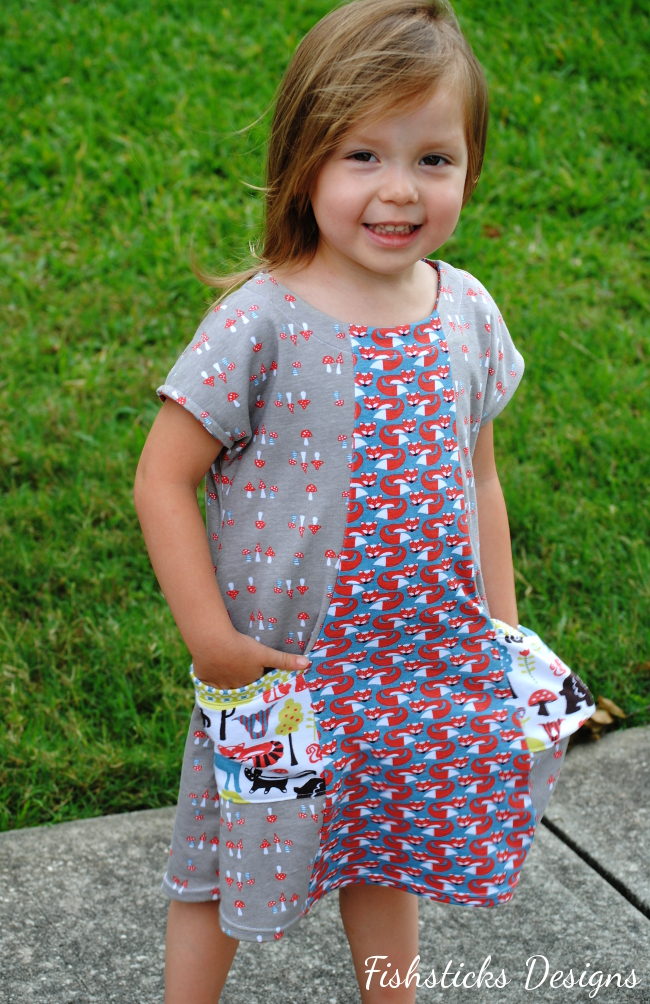 The pockets and inset are perfect spots to feature small pieces of favorite fabrics, and what little girl doesn’t need a place to keep the treasures she collects through the day?
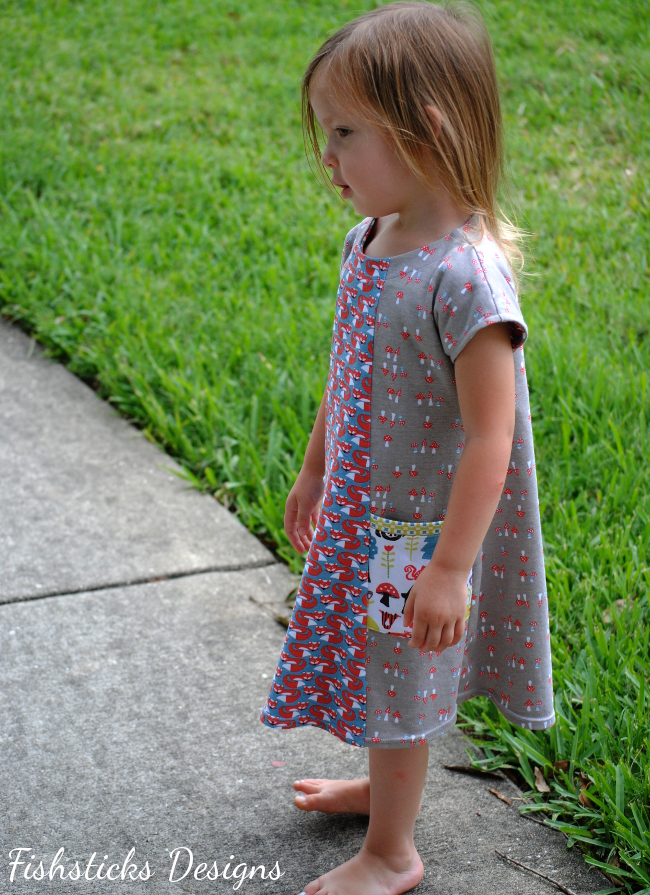 The instructions for the Seesaw Dress walk you through two different options for putting the dress together. Each method has different advantages, but both teach you a simple way to get a finished edge on the neckline and sleeves. The PDF version of this pattern includes all the latest Fishsticks Designs updates – nested sizes, individual sizes and a full-size pattern option.
 The PDF version of this pattern will be available tomorrow at noon eastern in the Fishsticks Designs pattern shop. Look for the paper version at your favorite local quilt shop beginning next week!
The Winner of the Spring 2014 Go Fish Six Pack Is ….
 Thank you so much to everyone who commented on my Spring Market Booth post! Random.org chose comment #61 as the winner.

And, comment #61 was made by Marie-Aude!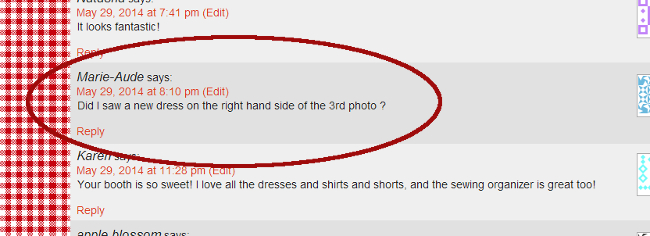 Marie-Aude asked in her comment if there was a new dress on the right-hand side in the third picture. There is! And, it’s pretty cool that she asked because that pattern is set to be released later this week! More pictures are coming soon.
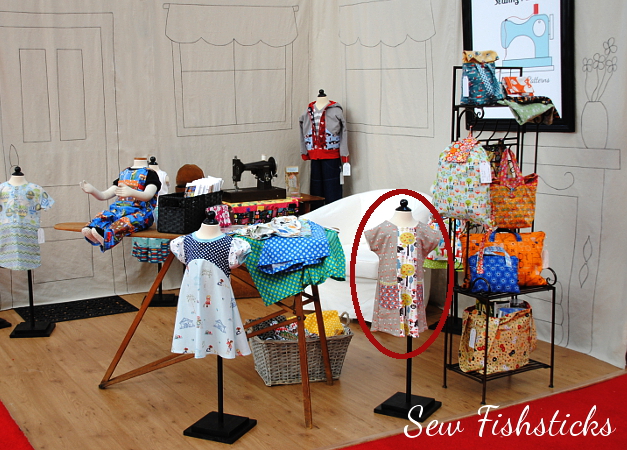 While you’re waiting, though, don’t forget that you can get your own Spring 2014 Go Fish Six Pack for only $15 through this Thursday: GF Six Pack Special.
Spring 2014 Go Fish Patterns
I introduced the Go Fish Series last fall, and I’m thrilled that all of you seem to enjoy these “instant gratification” projects as much as I do! They’re definitely my favorite type of sewing. In case you’re not familiar with them, these quick-to-finish projects are also eco-friendly with no pattern pieces to print. You just measure and cut using your quilting mat and rotary cutter following the included measurements or instructions. They are easy projects, but they aren’t completely “no frills” projects. Each one has something new to learn or a way to challenge yourself if you’re still learning. They are great for beginners, though! These little patterns are available as PDFs on my site and as tri-fold sewing cards in your favorite local quilt shop. Both are priced at $4.25 each.
For just one week, in celebration of the release of these six new Go Fish Patterns, I’m offering a six-pack bundle of the PDF versions of all six new GF patterns for just $15. That’s more than a 40% discount, and it’s only available for one week! You can find it right here: The Spring 2014 Go Fish Six Pack. Also, don’t miss your chance to win all six of the newest Go Fish patterns by commenting on yesterday’s Quilt Market post! (If you buy the six pack and then win them, I’ll be happy to send you a refund!)
Without further ado, here they are!
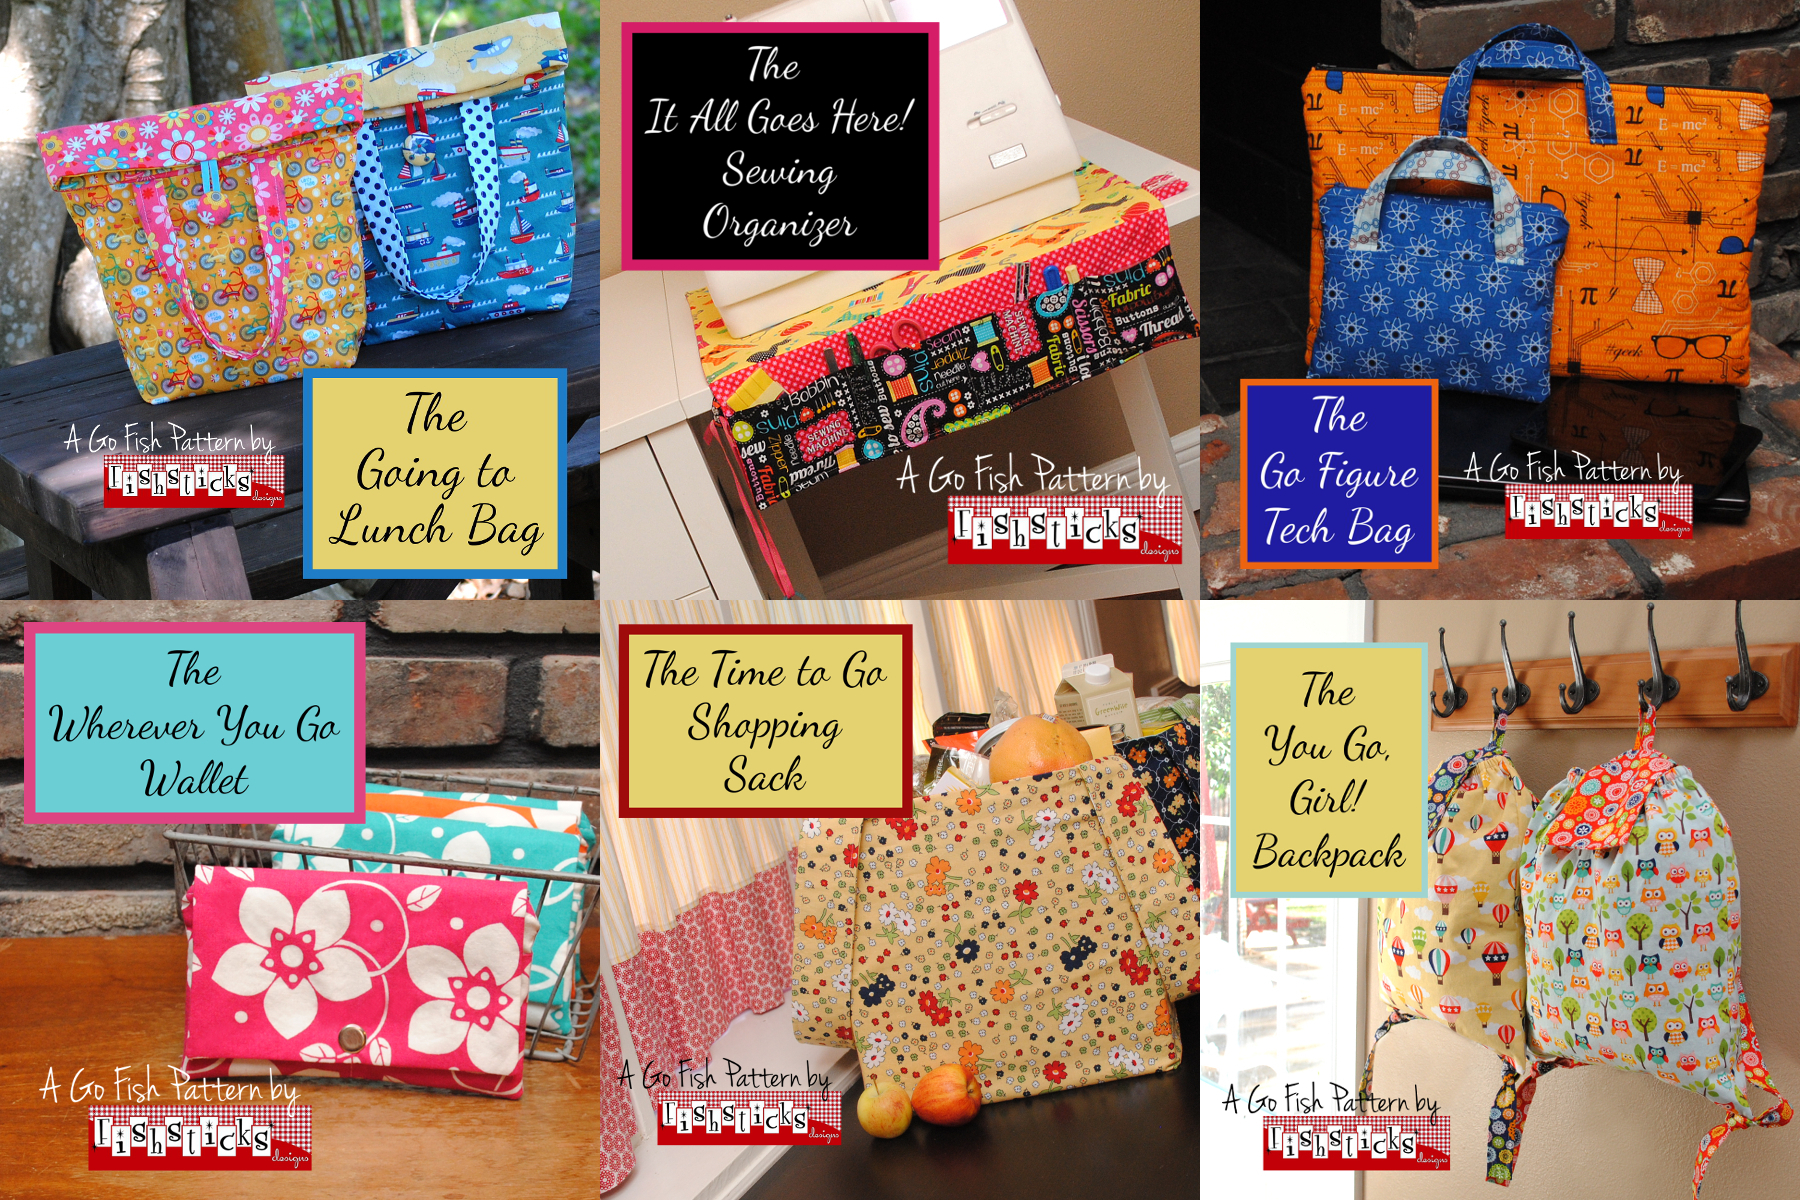
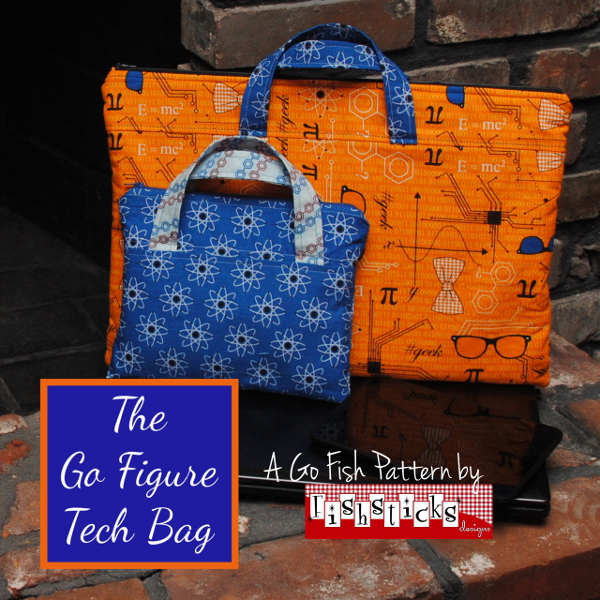 First on the list is the Go Figure Tech Bag. This bag has a zippered top, and it’s padded with fusible fleece to give a bit of extra protection to your electronic devices. This pattern is designed to fit any device from e-reader size to laptop size with customized measurements. The instructions for measuring and figuring are really simple — I promise!
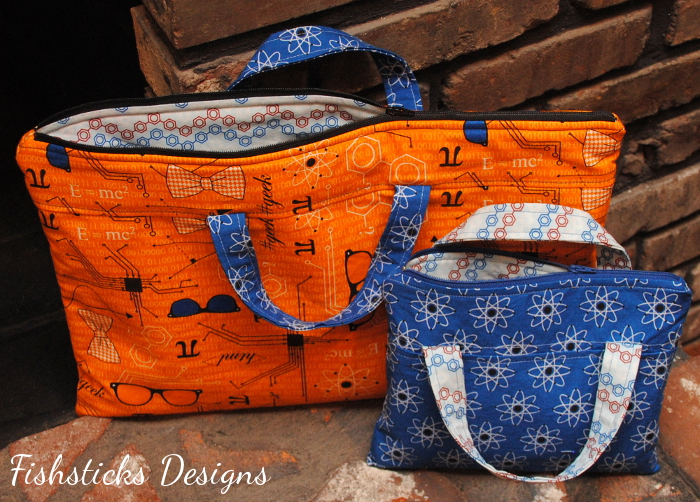
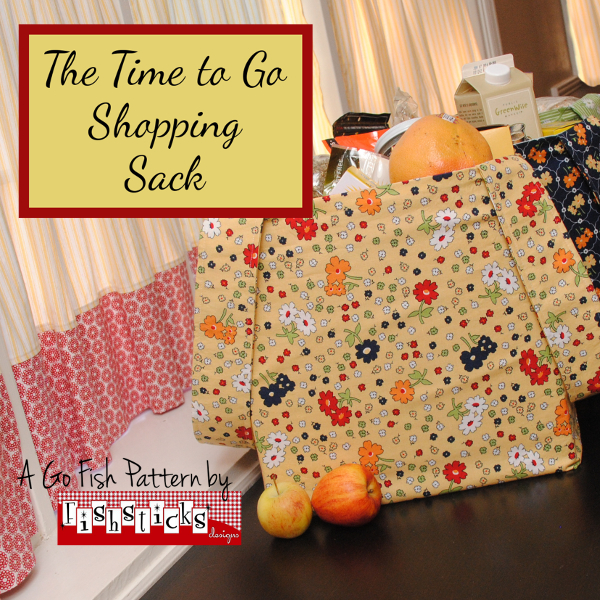 Next up is the Time to Go Shopping Sack. I’ll admit that I really wrote this pattern for myself! I love having pretty reusable grocery bags to use for shopping, but I’d never found a pattern that was just what I wanted. These bags are super roomy with wide handles.
 The gusset allows them to lay flat for easy storage and open up to a full 4″ wide for holding big boxes. They’re also finished with a french seam at the bottom to keep your produce and canned goods safely inside!
 The It All Goes Here Sewing Organizer is perfect for keeping things right where you need them while you’re at your sewing table. (It also folds up nicely with your sewing notions in the pockets in case your sewing space is one that comes and goes with breakfast and dinner!) This organizer has four large pockets and four small pockets to hold your trimming scissors, seam ripper, screw driver … whatever you need on hand.
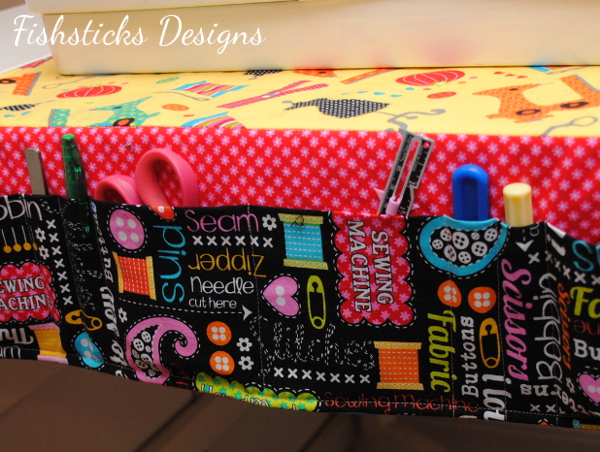 There’s a small loop on one side that you can use to tie a pair of scissors where they won’t walk away.
 And, my favorite feature of the Sewing Organizer is this little magnetic pin holder! I love that I have far fewer pins landing on the floor these days. The magnet is removable so the whole organizer can be thrown into the wash whenever it needs to be.
 The Wherever You Go Wallet is quick and easy to sew, but it still offers plenty of storage and organization space. It has a zippered top, a flap closure with a snap and four credit-card sized pockets.
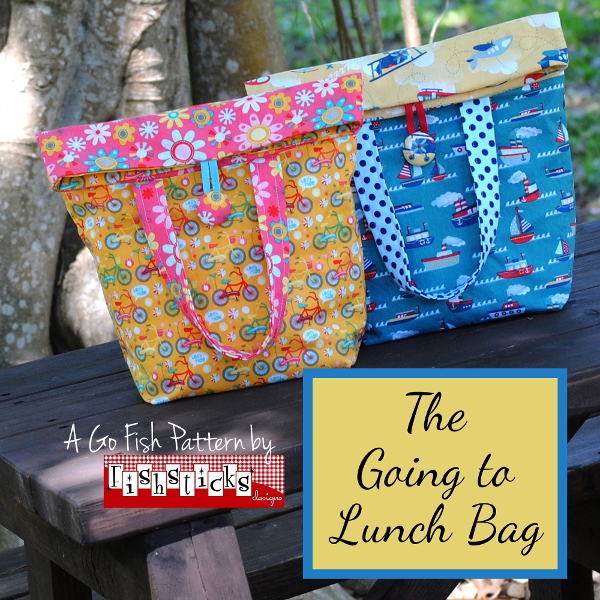 The Going to Lunch Bag is sized just right for grown-ups and kids alike, and it’s the perfect take-along for lunch at school, work or a day at the zoo!
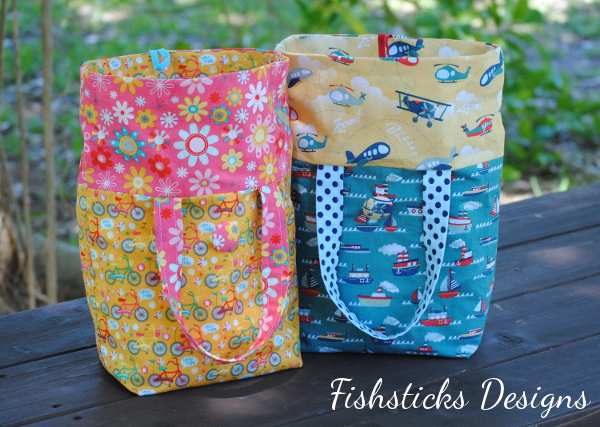 The roll-down top stays open on it’s own when rolled up to make filling the bag easy, and when it’s packed and ready, it rolls down and fastens easily for both adults and children alike. You can make it with your choice of fabrics and interfacing to add insulation or water resistance, too.
 Finally, the You Go, Girl! Backpack is the perfect carry-along for teens and preteens. The tie-on straps are my favorite feature of this bag. They add a bit of modern detail and fun, and they make it much faster to sew than if you were adding hardware. This backpack also features an elasticized top and a fold-over flap with a magnetic snap closure.
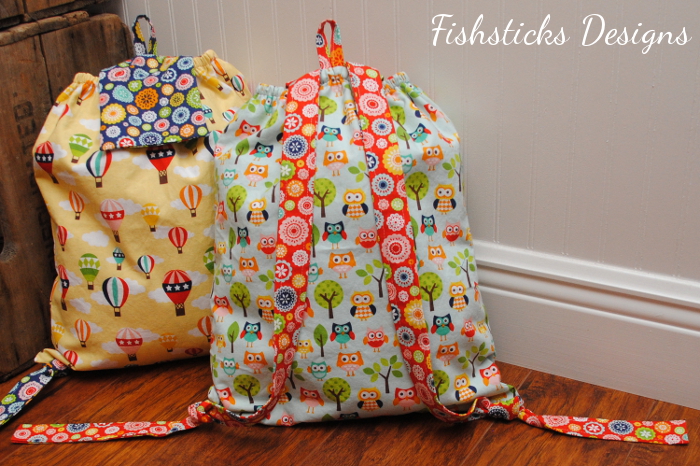
Kids Clothes Week April 2014: The Second Half
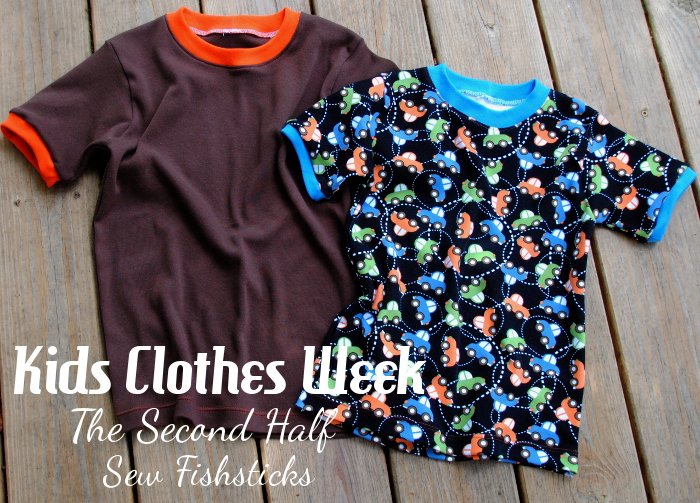 My spare sewing time ran really short over the weekend, so I cheated a bit and wrapped up my Kids Clothes Week sewing this morning! Shhhh … I didn’t do the Easter sewing that I mentioned in my last post. Instead, I opted for two really quick Charlie Ringer Tees! I finished shorts for my two little guys to go with these a few weeks ago, but since the shorts are from a not-yet-released pattern, modeled pictures will have to wait just a little bit.
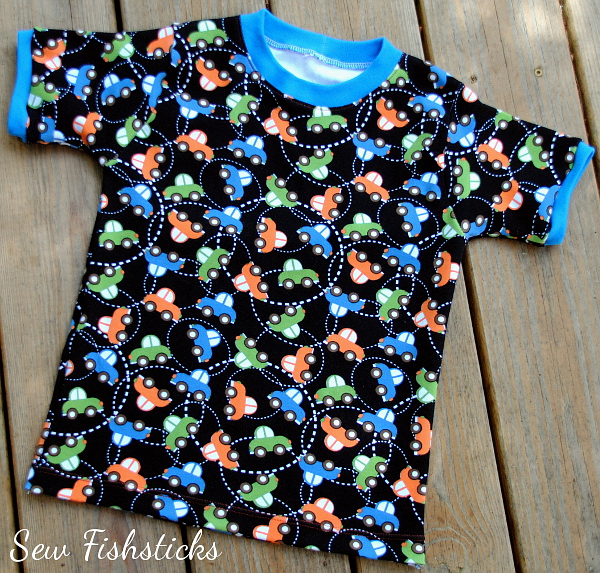 The Ringer Tee from the Charlie pattern is my go-to when I’m in a hurry. Because I serge most of it, it’s so fast! I only pop over to my sewing machine to hem the bottom of the front and back and topstitch the neckline. Everything else is done on the serger. (Of course, you don’t have to have a serger to sew this pattern. You can totally make it using your regular sewing machine!)
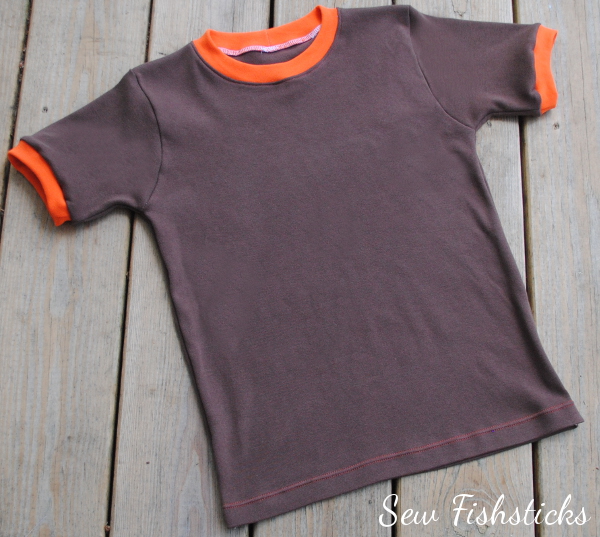 Kids Clothes Week netted us five pairs of boxer briefs and two tees. That’s not too bad for seven-ish hours of work, is it?
Kids Clothes Week April 2014: Tuesday & Wednesday
 I’m squeezing in time this week for Kids Clothes Week! Usually, when I join in, I plan what I want to sew and just do it, but this time, I’m working on new patterns and prepping for Quilt Market so I’m really just doing the suggested hour a day. I’m excited, too, to see how much I can do in just that much time! Tuesday’s and Wednesday’s hours combined were enough time for me to sew up all five pairs of the Undercover Bottoms Boxer Briefs that I cut out on Monday.
I had a little company this morning while I was working. I posted this picture on Instagram of Charlie and his “guys” hanging out on my sewing table: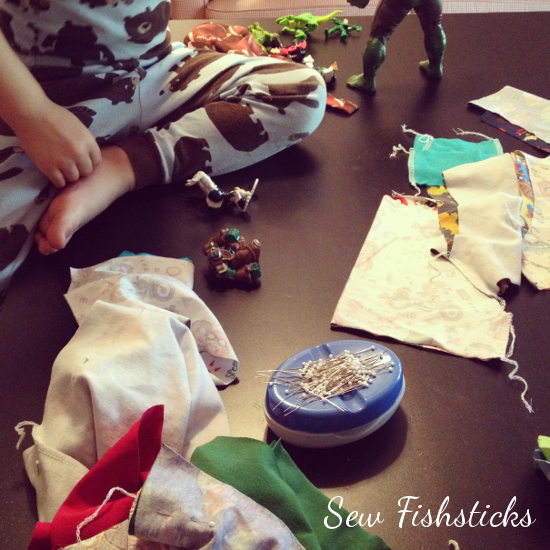 My kids don’t just have to be in the same room with me. They need to be as close as possible to me! It’s a good thing that it’s a big table.
I used the plain front option without a fly opening on these. It’s not as cute, but it’s faster and my boys don’t use the opening anyway. I also did the no-elastic waistband following the instructions that I added when I updated this pattern last month. Basically, you use a cotton/spandex blend fabric and cut the waistband a size smaller, then just stretch it to fit when you attach it. Voila! Super comfy undies that stay put – easy peasy!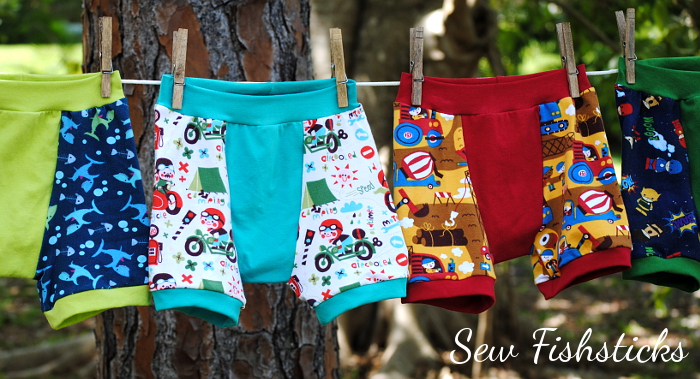 I was going to do a couple of tees for the boys with my remaining time, but since Easter is in less than two weeks, I think I might change my mind and sew up some Easter clothes instead!
Kids Clothes Week April 2014: Monday’s Prep Work
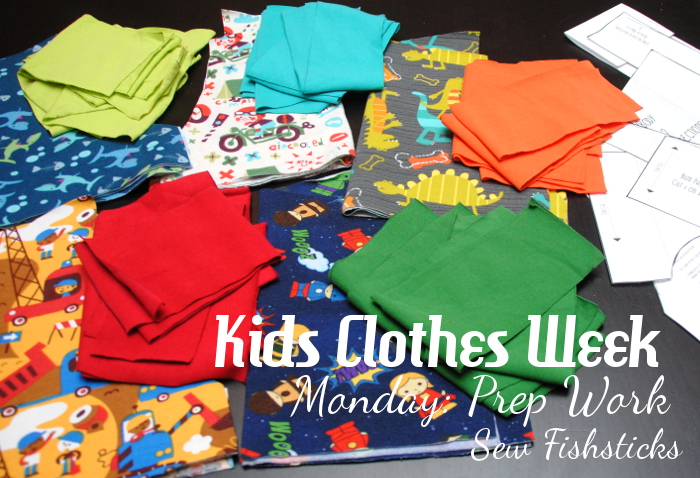 Kids Clothes Week starts today! Are you sewing along? There’s a theme this time, but you don’t have to follow the theme. My creative juices are all tied up in new pattern work right now, so my boys are getting some handmade basics this week, starting with Undercover Bottoms Boxer Briefs for Jamie. My first KCW hour was spent cutting out five new pairs!
If you’ve followed me for a little bit, you’ll probably recognize these fabrics from PJs and tank tops. I love how easily underwear uses up all those little knit pieces in my scrap pile!
Huge PDF Pattern Updates are on the Way!
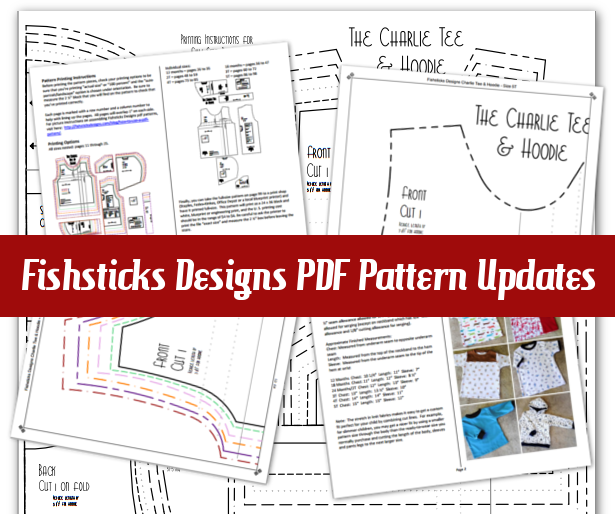 Some huge Fishsticks Designs PDF pattern updates are on the way! If you already love your Fishsticks Designs patterns, though, don’t worry! I’m not taking away anything that you’re already using. I’m just adding a list of things that I think will add to your enjoyment and do away with some frustrations.
I’ll be working through all of my patterns over the next six weeks or so. (It’s a really involved process, and I still need to work on new patterns, so it’s going to take a bit of time!) If you’ve already purchased the pattern, you will receive a free update. If you purchased through the main Fishsticks Designs Pattern Store, Fishsticks on Etsy or Fishsticks at Craftsy, you’ll receive your updated pattern automatically. If you purchased from another retailer, you may have to email us with your proof of purchase, but I’m hoping to be able to work with each of them to get you the update automatically, too. You’ll be able to find a regularly-updated list of all the completed patterns, as well as details about when you can expect your pattern right here: Fishsticks Designs PDF Pattern Updates.
On to the changes! I’ve been listening to your feedback, and I hope that you appreciate everything that I’ve done. The first thing that you’ll likely notice is that while I didn’t change the instruction layout for my patterns, I did add a simple line separating the columns. Many first-time users told me that the layout was a bit confusing because they weren’t sure whether they were supposed to go up and down the columns or across. This little change helps your eye to fall exactly where it should as you go through each step.
Also, in the directions section, just before the sewing instructions, you’ll find a note that directs you to the page that contains your printing instructions.
And, once you flip to that page, here’s what you’ll see: Here’s where you’ll find the biggest change! First, you’ll see that you still have the option of printing all of the sizes nested on 8 1/2″ x 11″ (or A4) pages which you’ll continue to assemble and cut out according to my directions page: How to Assemble a Fishsticks Designs PDF Pattern.
 There are two changes that you’ll see in the nested patterns. First is that I’ve added color-coding to the original coding which uses dots and dashes. The dots and dashes are still there, though, so that you can choose to print in color or in black and white.
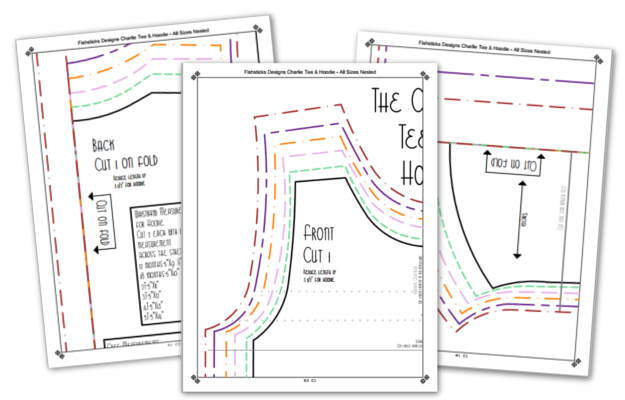 The second change is that I’ve increased the size of that original 1″ test block to 2 1/2″. This gives you a more consistent measurement, and it’s easier to find!
 The next printing option is where my testers have been most excited — individual sizes! Here, you’ll find the page numbers that you need to print for just the size that you want to sew.
 These patterns print black and white with a series of dots and dashes, and go together in the same manner as the nested pattern. In some cases, when a pattern contains multiple designs, those will be separated out, as well.
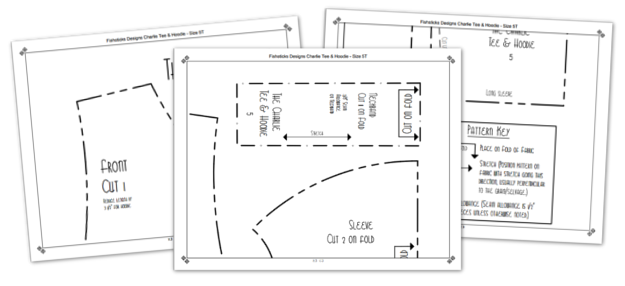 To make it simple for you to double-check that you have the right pages, each pattern page has a header at the top which contains the pattern name, the size you’re printing, and the design within that pattern, if applicable.
 You’ll also find that each of the pattern pieces in the individual sizes have the name of the pattern and the size printed on them — a really good thing for when pieces get mixed up or misplaced!
 The final printing option (and the last big change) is one that will allow you to take the file to a local print shop and print the whole pattern sheet, just like the one that you would receive if you ordered a paper pattern.
 This option is great for those of you who hate cutting and taping, especially for those of you overseas who don’t want to have to wait for a paper pattern! At the top of the full-size pattern, you’ll find permission to print individual copies, along with basic printing instructions.
  Several of my testers volunteered to take The Tank pattern to local print shops in their area last week, and they all had a really easy time when they were armed with a little bit of information. First, it’s best to download the whole pattern to a flash drive, take it into the print shop and ask them to print the page number that you need. Be sure to let them know the finished size, ask for it to be black and white and be emphatic about printing the file 100% or actual size. Also, double-check that 2 1/2″ block before you leave the print shop, just in case. The cost for most patterns should run between $3 and $7, based on the size. Everyone who tested it out was able to have their pattern printed while they waited. Good choices for printing included Staples, Office Depot, Fedex-Kinkos and local blueprint printers.
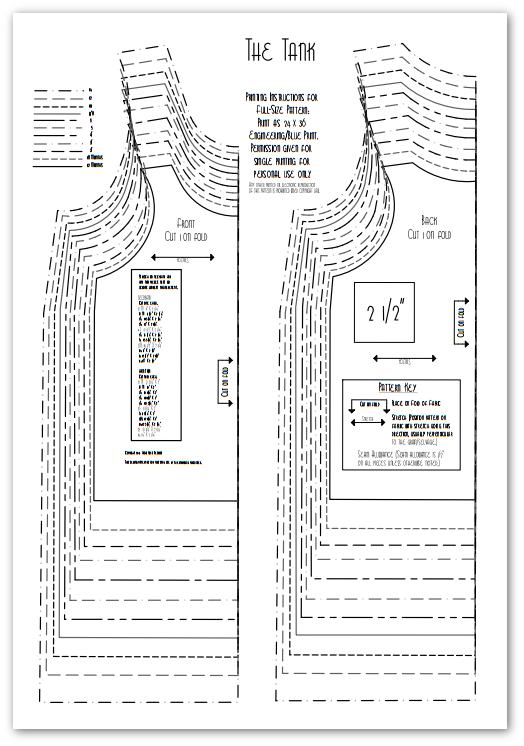 Whew! I think that’s all for right now. I can’t wait to hear what you think of all the updates! I want you to continue loving my patterns, and I want to do everything I can to help you sew beautiful, practical things for you and your children, whether you’re brand new to sewing or have a lifetime of experience!
The Updated FREE Tank & The Red Carpet Awards!
 I’m nearly bubbling over with excitement here! I have several new things to share with you over the next week or so, and I can’t wait to hear what you think about each of them! Today brings the first two announcements on the list: the re-release of the FREE Fishsticks Designs The Tank pattern (now in sizes 12 months to 14) and two nominations for Fishsticks patterns in the PDF Pattern Designers Red Carpet Awards!
If you’ve never joined the PDF Pattern Promotion and Sales Group on Facebook, I encourage you to take a few minutes to head over right now and check it out. You’ll find over 10,000 sewists who are devoted to supporting independent pattern designers and encouraging each other in their sewing endeavors. Many of your favorite designers are there, too, joining in the discussion, sharing their latest patterns, promoting their sales, helping out with questions and more! This week, the group moderators have announced nominees for the first ever PDF Pattern Designers Red Carpet Awards in conjunction with a HUGE giveaway, and all you have to do to have a chance of winning is go vote!
Two of my patterns were nominated: the Charlie Tee & Hoodie and the Runaround Pants, and I’d love if you’d vote for them! To read more about the giveaway and to vote, just click the banner below:
 As my little way of joining in the celebration, I’ve revised my free The Tank pattern, adding big kid sizes and incorporating a big change that is coming soon to all of my PDF patterns.
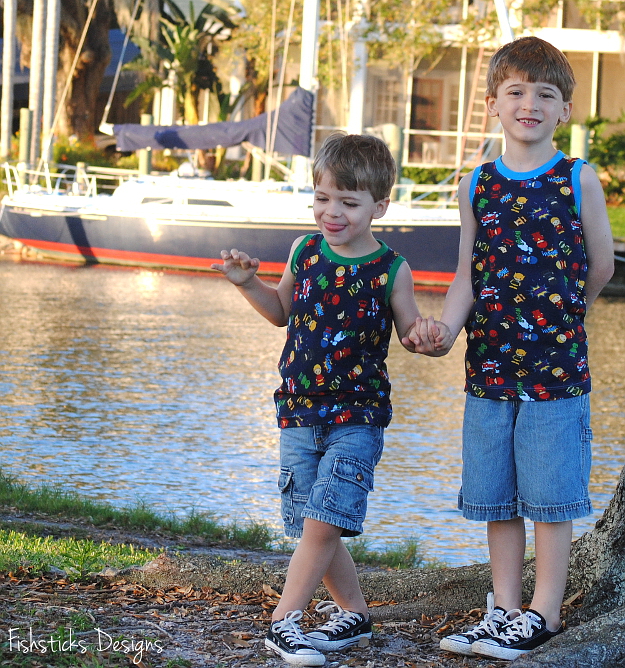 The Tank pattern is designed to be sewn with cotton and cotton blend knits — jersey, interlock or ribbed knits in the body and interlock or ribbing for the neckband and armholes.
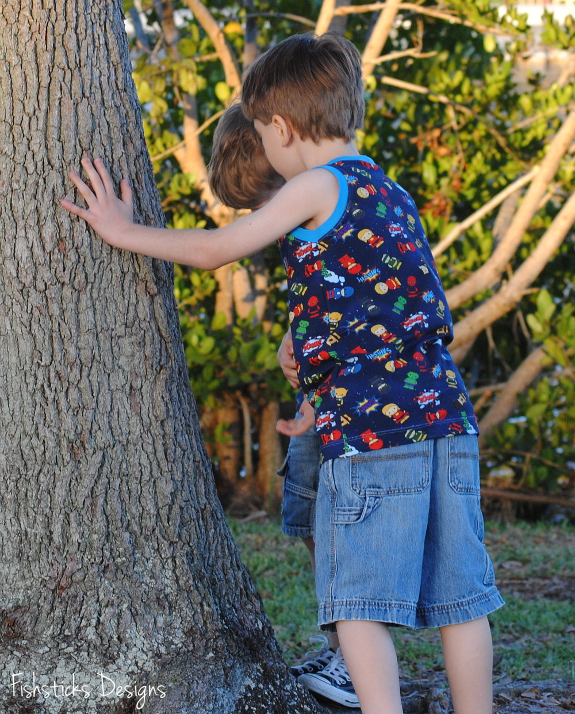 The fit is narrower and longer than a standard tee, making it great for layering, but still perfect for wearing on its own. It also makes a great PJ top when paired with woven or knit lounge pants. (If you haven’t already, be sure to check out the appliqued tanks that I made for my seven-year-old last month!) Or, you can match it up with Undercover Bottoms Boxer Briefs for the perfect little boys’ undies set.
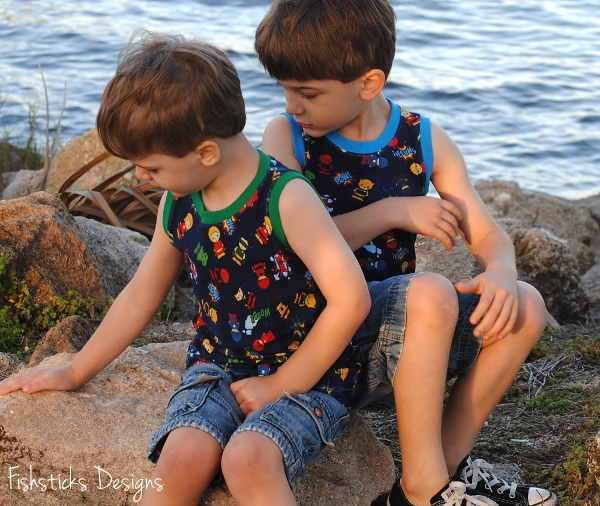 A little aside from the pattern itself, isn’t that the cutest fabric? My boys LOVE it! It came from a custom fabric group that you can find right here: Fabric Stache. If you’re looking for great knits with prints that you can’t find just anywhere, go visit! (They’re doing sew-alongs every other week right now with my knit patterns, too.)
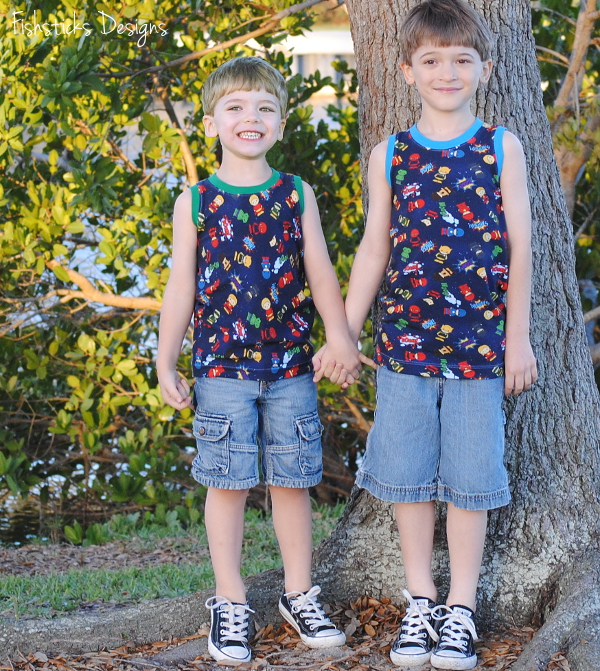 Back to the subject at hand, to download the pattern, just click right here: The Tank Pattern. I’ll be back tomorrow with my next announcement, but if you’re already familiar with my PDF patterns, you’ll figure it out really quickly by scrolling through The Tank pattern!
I just have one, no, two last pictures to share before I wrap up this post. Because we live in Florida, tanks work well for us almost year-round. My little Florida babies, though, thought that they were going to freeze to death when I dragged them out to take pictures last week . . . in 65 degree weather!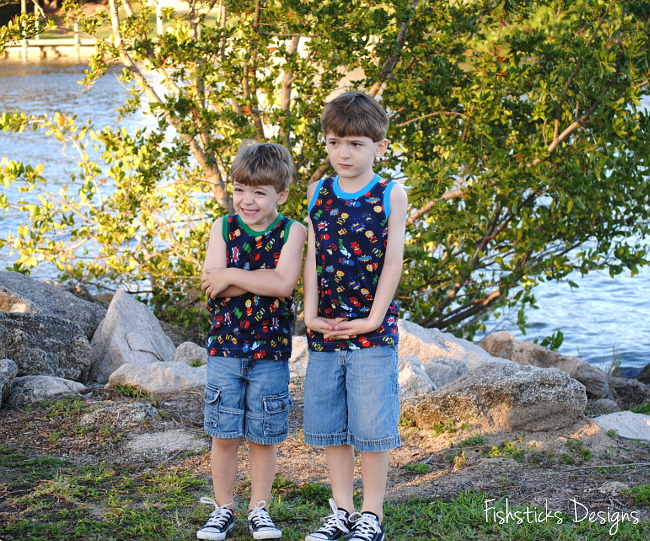 The “freezing cold” weather, however, did not stop them from insisting that I follow through with the promise of frozen yogurt after our photo session!
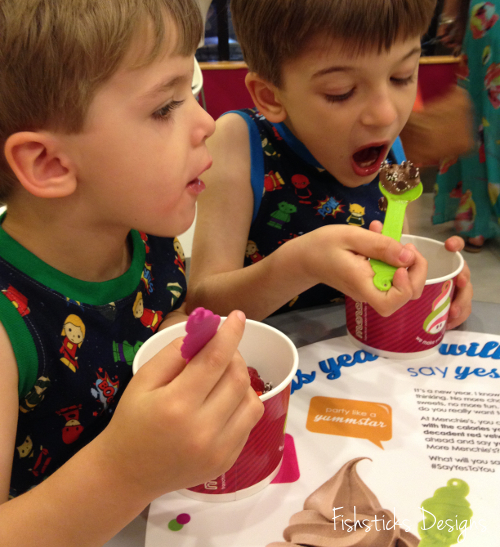
Operation Pajama Drawer: Wrap Up & Winner!
I had such a great time sewing pajamas for my boys last month, and I love that they get to wear mama-made jammies every night now! Here’s what I accomplished (just click on the images for more information):
For Charlie:


For Jamie:
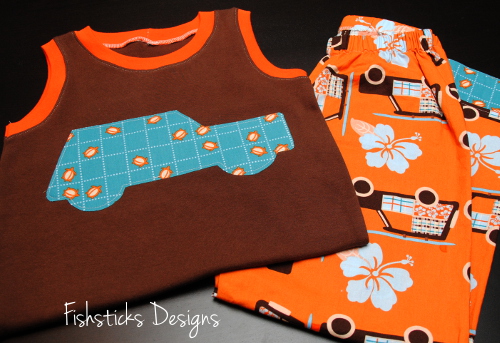
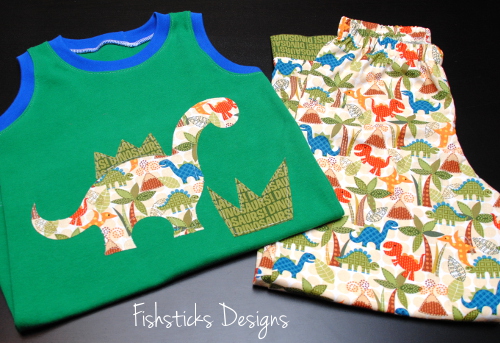
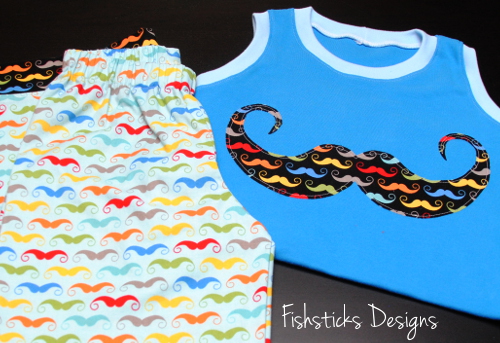
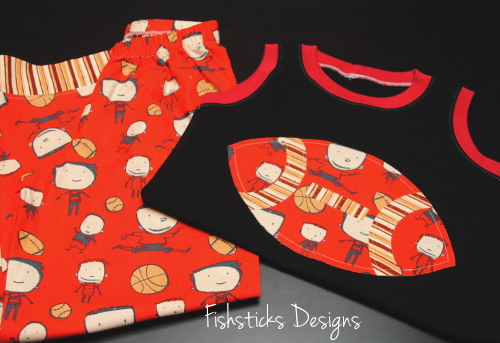
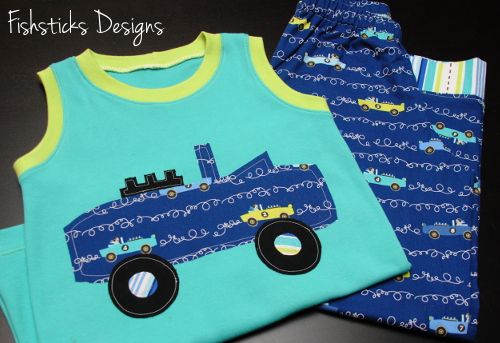
For both boys:

Ten pairs of pajamas done! Woo-hoo! And, you guys accomplished some great PJ-sewing, too. Be sure to click over to the Fishsticks Designs Flickr Group and check out the jammies.
On to the winner! There were a total of 17 entries, and random.org chose Entry #3 as the winner:
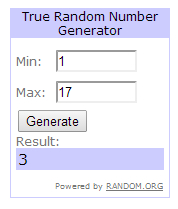
Huge congratulations to Ann who modified Rockin’ the Raglan into a Valentine’s nightgown for her granddaughter, Matilda! Is she not the sweetest?


