Quilting
Around the Block with Patchwork Posse: Block #1
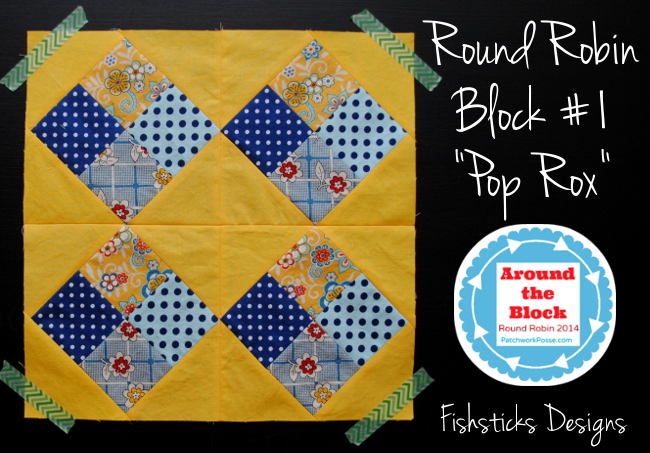 One of my goals this year is to improve my quilting skills … and to actually finish a quilt-along! I’m excited about the new round robin quilt-along that started yesterday at Patchwork Posse, not only because some amazing quilter/bloggers are offering tutorials of their favorite blocks, but also because I get to do my first quilt block tutorial as part of it! (My block is scheduled for next month.) “Pop Rox”, the first block in the Around the Block Round Robin, was designed by my friend, Caroline, from Sew Can She. It’s a fun one that has just enough complexity that there’s a little bit of a challenge in it, but I was able to finish it easily after dinner last night. I struggled a little with getting my points to line up, but I found that increasing my seam allowance to right at 1/4″, rather than the suggested scant 1/4″, when attaching the triangles solved that problem for me. I think that may have been a cutting issue, rather than a problem with the pattern, though. Quilting requires much more exact cutting than sewing clothing!
A new block tutorial will be posted at Patchwork Posse every Wednesday through April. Once all 12 blocks are finished, Becky will walk everyone through adding borders, machine quilting and binding. Oh, and there are prizes! Every week, a great new prize will be given away to one of the participants who posts their quilt block pictures to Becky’s Flickr group. If you’re ready to give quilting a try or looking to build your quilting skills, come join in the fun!
It’s a New Year Sew-along at Sew Can She: My Finished Pillow
 I am so excited to share my finished It’s a New Year Sew-along pillow. I adore it! This is definitely one of those projects that I needed the motivation of a sew-along to finish, though. I am so not one to tackle sewing anything that requires lots of tiny pieces. There was a bit of grumbling in my sewing studio over how teeny these finished blocks were, but I am so glad to have done it. I’m in awe of the ladies in this sew-along who made whole quilts!
Once I had all of my blocks finished, I started playing around with the layout, and I was amazed at how much the whole look changed when the blocks were arranged differently.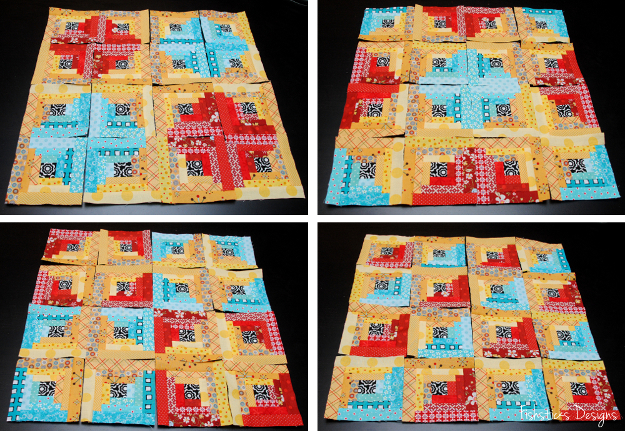 Isn’t that cool? In the end, I went with the top right layout.
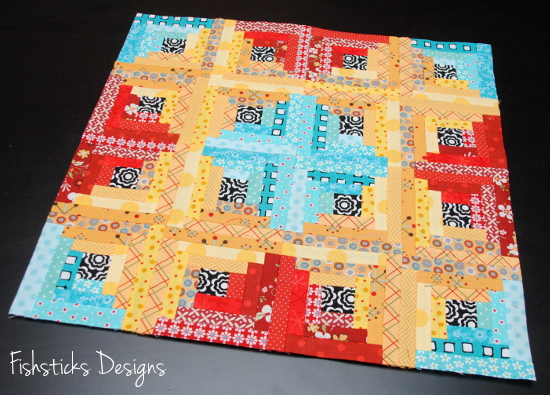 Once my blocks were all pieced together, I added a piece of cotton batting and quilted down the middles of the outside strip in each block.
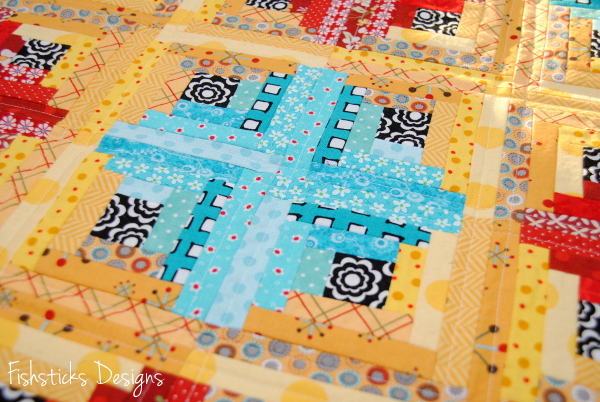 After spending so much time on the front of the pillow, I felt like I had to do something exciting with the back, so I went hunting on Pinterest where I found this tutorial from Pile o’ Fabric: Adding a Zipper to a Quilted Pillow Sham. I generally just do cross-over sham-style closings, but this seemed easy enough to try out, and I loved the finished look that it gave the pillow.
 Seriously? This was so simple, I feel a little foolish that I haven’t been making pillow shams this way all along! (Feel free to ignore the fact that my top row does not line up with the rows under the zipper.)
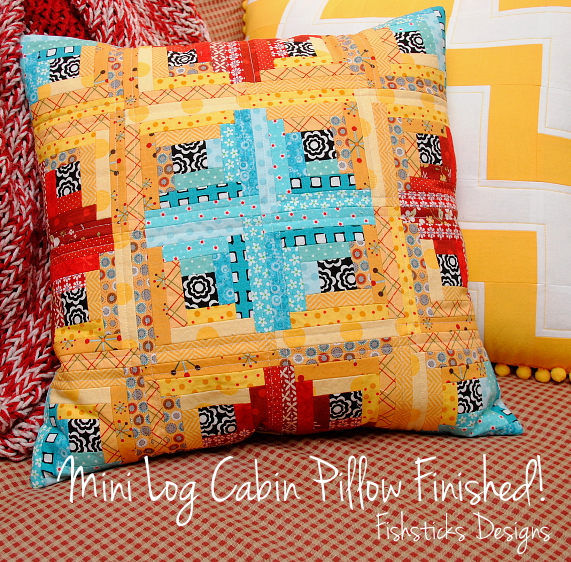
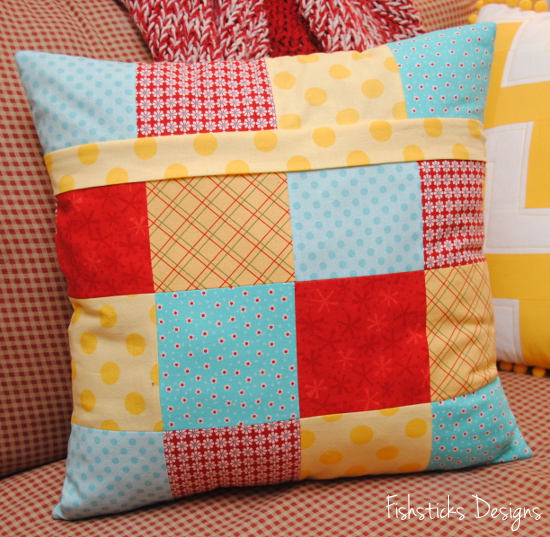 Here’s my finished mini-log cabin pillow doing a beautiful job of decorating the loveseat in my sewing studio.
 She has a few friends that I was inspired to stitch up, too! I’ll be sharing more about them next week.
It’s a New Year Sew-along at Sew Can She: Blocks in Progress
 Sorry it’s been so quiet here this week! My oldest two children and our granddaughter are here from California and Georgia to celebrate a late Christmas with us. I managed to sneak away for a few minutes to make sure that I met this week’s goal in the It’s a New Year Sew-along, though!
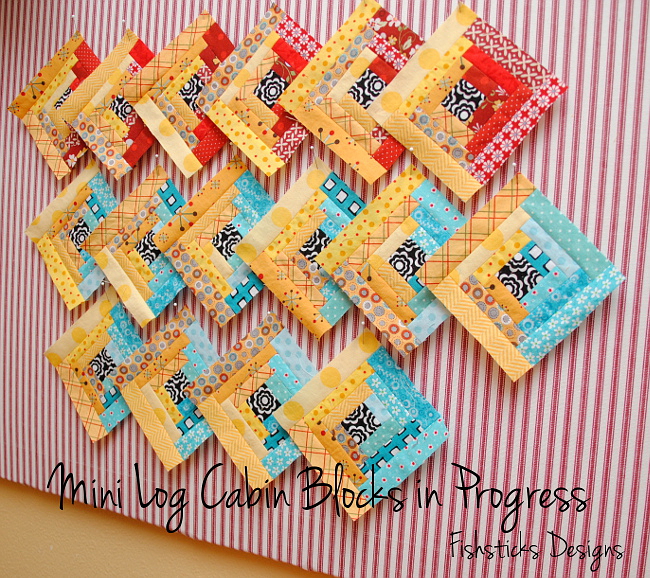
Here’s a quick preview of my mini log cabin blocks. I’m making 20 blocks total — 16 for a toss pillow and four for a mug rug — I think. As you can see above, I have four more to go, but those last ones are going to have to wait until our family visitors have gone home on Monday.  In spite of their tiny size and the fact that I’m not generally one to sew projects that involve itty-bitty pieces, I’m really enjoying sewing these! (I’m not sure I could muster the patience for a whole quilt made from blocks this small, but these small projects are just fine.) You do really have to be super careful to square up each side as you’re piecing these, though. Because they’re so small, every little wiggle shows up! Caroline has some great tips for beautiful finished blocks over on the Sew Can She Blog: Week 3 – Sewing.
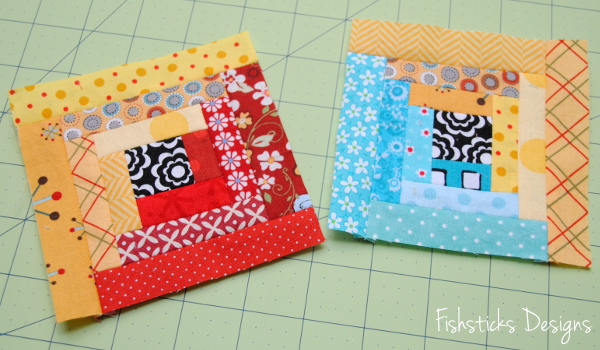
It’s a New Year Sew-along at Sew Can She: Prepping the Fabric
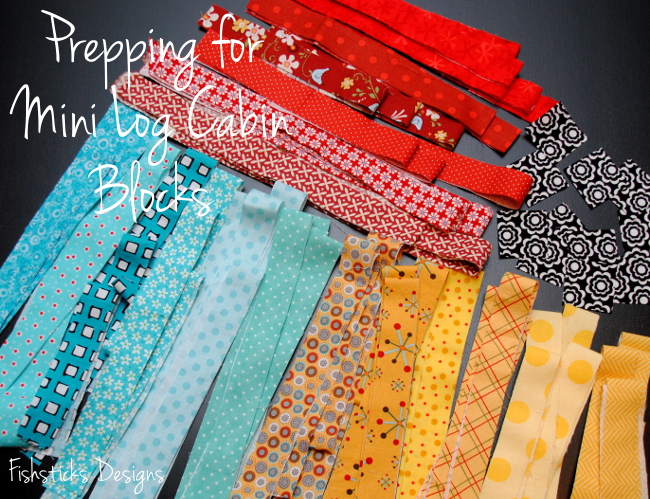 If you’re sewing along with the It’s a New Year Sew-along at Sew Can She, this week’s assignment is to show off your cut mini log cabin strips. This part is really easy with a unique sort of satisfaction. I grabbed my cutting mat, ruler and rotary cutter, heated up the iron, put an episode of Eureka on the Roku and started cutting! I’m sure I cut way too many strips for the project that I’m doing, but I tend to like having too many rather too few. I’m sure that I’ll use the leftover strips for another project . . . someday.
You can see from the picture that I opted not to use the first fabric that I’d chosen for the center squares of my log cabin blocks. The pictures were just too big to fussy cut for a 1″ finished square. 1″ is really small! 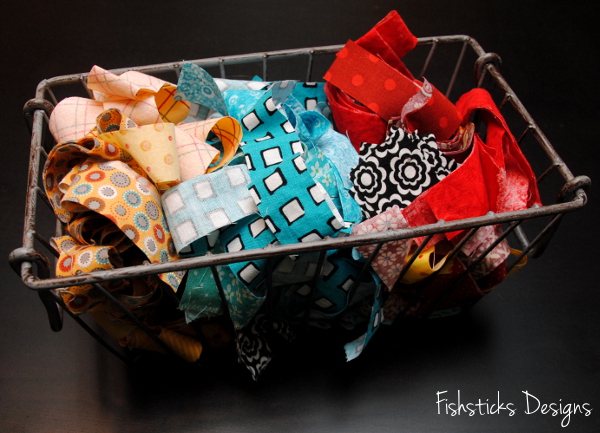 Since I’m not planning to sew all of my blocks at one time, I piled all of my strips into a basket. This way, I can grab them out as I need them while I’m sewing, and put them up out of the way once I’m done for the day. This basket looks really cute sitting on a shelf, too! (I actually do this often with all sorts of sewing projects. I like to do all my cutting at once, then toss everything for a certain project into a bin or basket so I can pull it out and work on it as I have time. It makes cleaning up my space a breeze!)
It’s a New Year Sew-along at Sew Can She: Fabric Choices

The It’s a New Year Sew-along is underway at Sew Can She! I loved the push that I got from the sew-along that I joined in with at SCS last year, so I’m jumping into this one, too. As a sponsor, I’m sewing along for the motivation and camaraderie, but not for the prize. You can join in, though, and not only have a great finished project by the end of the month, but also have a chance to win a $50 gift certificate to the Fat Quarter Shop! Pretty cool, huh? You only have a few days left to finish up the first week’s task — choosing your fabric — so go check out all the details by clicking on the button at the top of this post and join in the fun right away.
I mentioned in my 2013 Year in Review post that I’ve been working on a whole new re-design of my sewing studio. I’m so anxious to get it all done so I can share it with you, but I don’t want to share it until it’s really finished! The project that I’m doing for the sew-along is for my studio, though, so you’ll get a little peek at the colors in the room when you see the fabrics that I’ve chosen. What do you think? I’m planning to use the If She Sews, She Knows fabric from Michael Miller for the center squares of my log cabin blocks, but I’m not totally sure that I’m going to love it. I guess I’ll have to sew up a block or two and see what I think then!
So, are you ready to sew along? I can’t wait to see what you make!
May Riley Blake Mystery Quilt Block – Selvage Spools
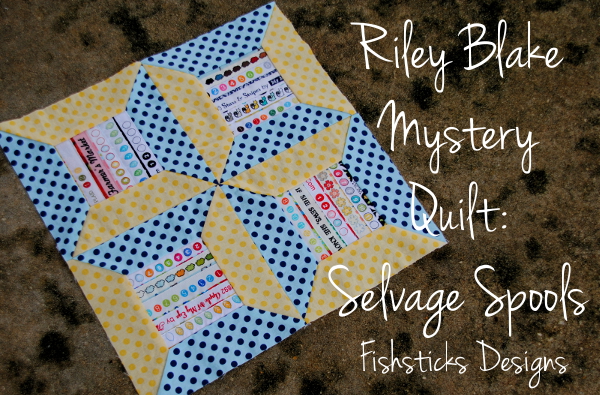 I’m almost caught up now! Woo-hoo! May’s Selvage Spool block is so cool, and the construction process was really fun!
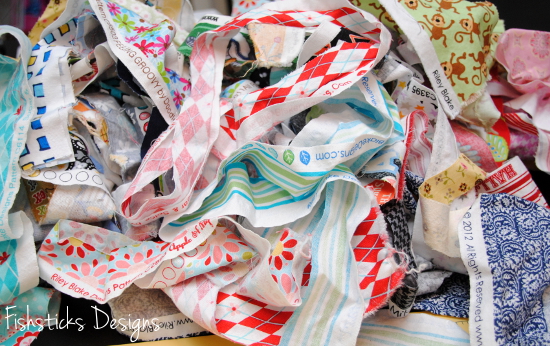 All those selvages and the blank solid squares waiting to be filled up were a little overwhelming, so I started by pulling out the selvage pieces that I knew wanted to use and cutting them down to a manageable size (4″). Before putting away the rest of the huge pile, I made a separate small pile of “maybes”. Once that was done, I was able to concentrate on arranging my selvages.
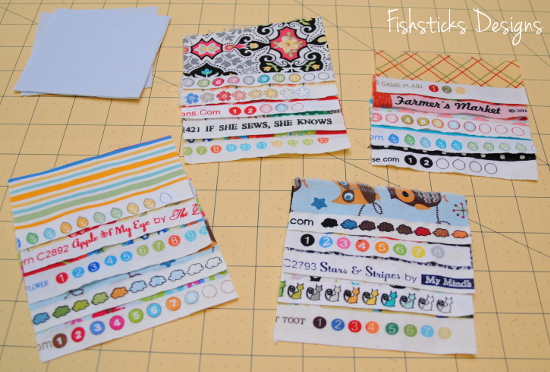 A little note here: the video for this block says to use a 3 1/2″ square, but the pdf says 3 1/4″. Your selvage square does need to be 3 1/2″ in order to get the correct finished size. Riley Blake is working on correcting the pdf. In the meantime, if you’re behind like me and still working on this block, be sure not to cut that square too small! You’ll also need to enlarge the spool end template. I did this by printing at 106%. My completed selvage spools came out with about 1/8″ to trim off and square up on each side.
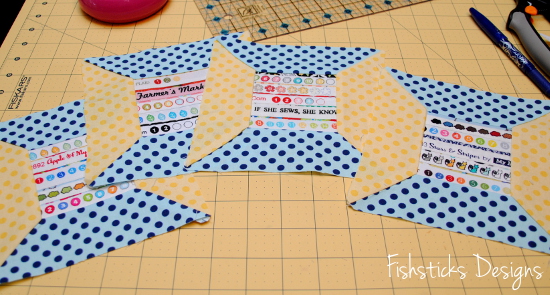 I think this block is my favorite so far! A whole quilt made up of these would be perfect for display in a sewing studio or as a gift for someone who loves sewing.
 Here’s my whole set so far. June’s block is another needle-turned applique. Should I just take a deep breath and actually try it this time? I suppose the worst that could happen is that I don’t like it, and then I at least tried it, right?
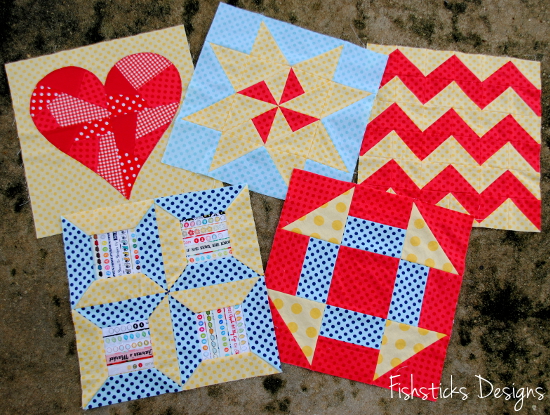
April Riley Blake Mystery Quilt Block – Sunshine
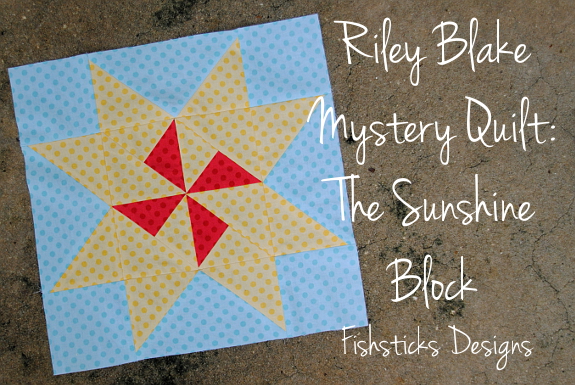 It’s catch-up time! I’ve fallen behind on my Mystery Quilt Blocks because I’ve been busy behind the scenes working on new patterns which should be ready very soon! I managed to get April’s Sunshine Block done over the weekend, though.
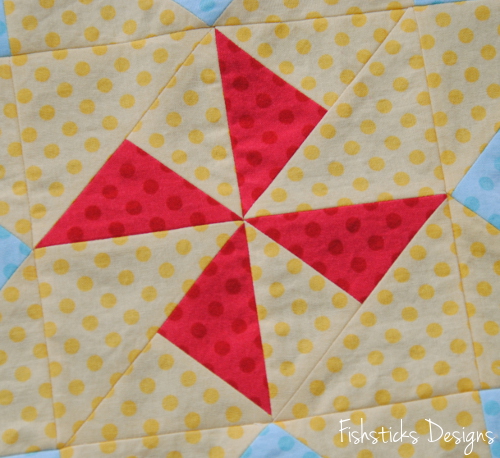 There are more half-square triangles in this one. Half-square triangles with smaller triangles mixed in to make up the center section. The four outside sections of the block are made up of flying geese. I used the same method that Bee in My Bonnet shares in her Easy Flying Geese Tutorial to sew those. I just increased the rectangle size to 3 1/2″ x 6 1/2″ and the squares to 3 1/2″ x 3 1/2″.
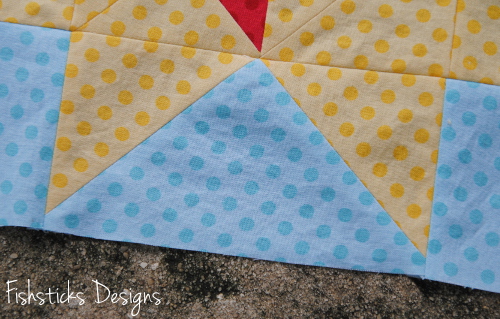 Here are all four blocks together:
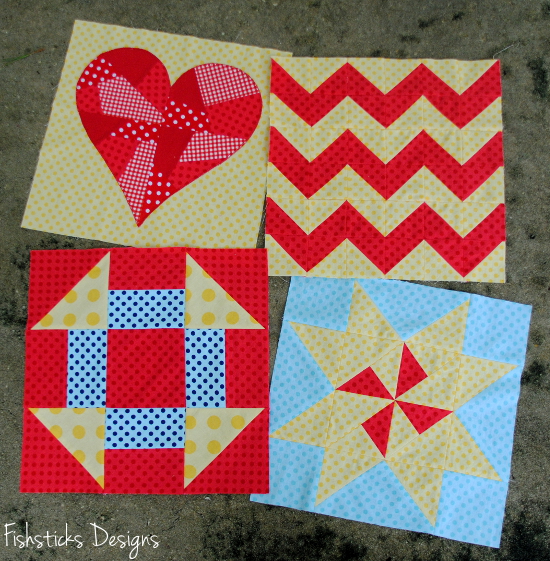 I’ll have to make time this week to dig through my selvage pile for May’s block which I’m hoping to get done next weekend. Once that’s done, I’ll be all caught up . . . as long as I can get June’s block done this month, too!
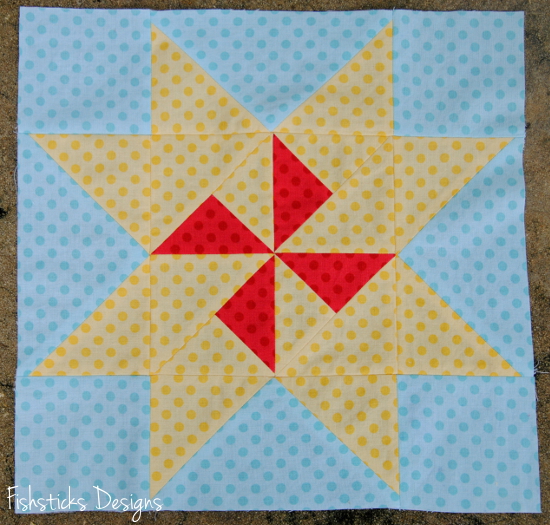
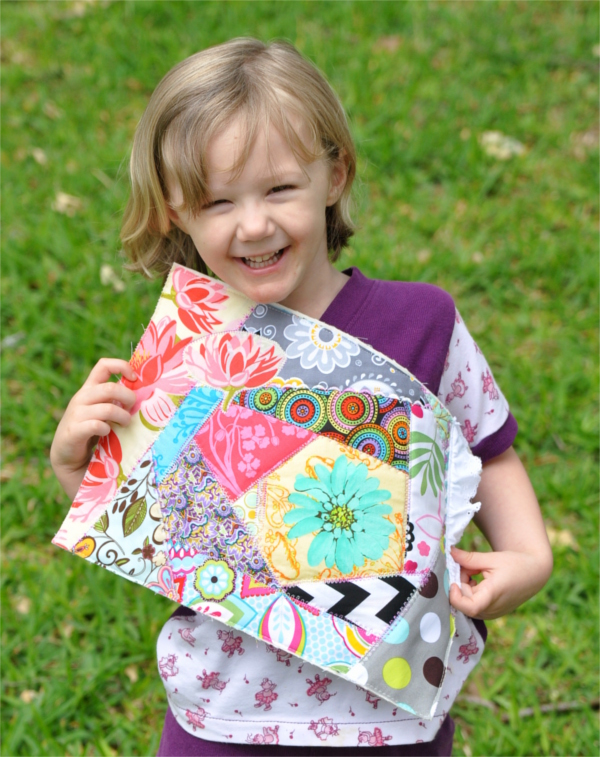
Charlie’s Crazy I-Spy Quilt
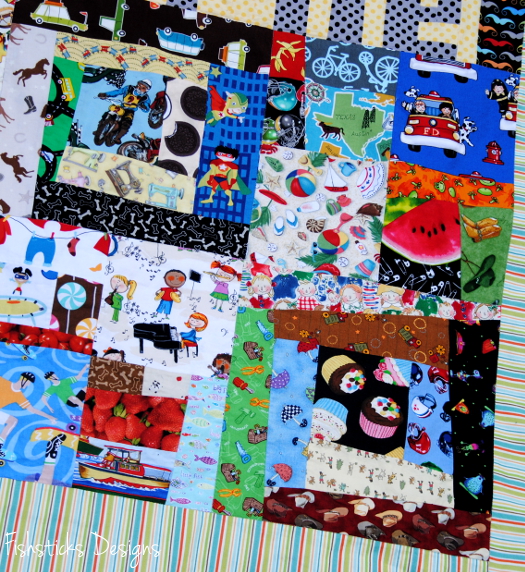
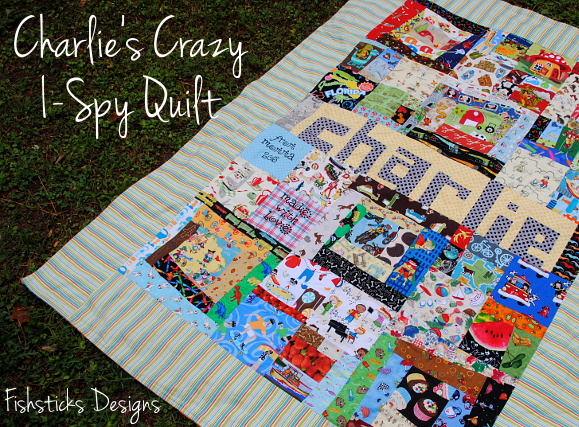 I’m so excited to show you Charlie’s finished quilt! I actually finished it the night before we left Florida two weeks ago on our family trip, and I had no time to take pictures before washing it, drying it and loading it in the car! These pictures were taken here outside the great little cottage where we’re staying right now. You’ll just have to ignore the fact that Charlie has loved this quilt well already, and it could stand another wash and a good ironing! (This is really how it will look from now on anyway!)
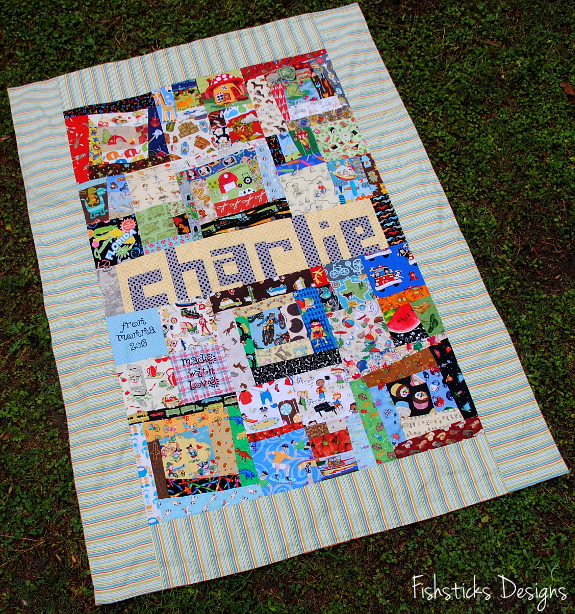 The front is constructed with the 12” crazy (or wonky) log cabin blocks that I finished last year, along with the 12” blocks that I made with the crazy I-spy mini-blocks that I’ve completed over the last few weeks during the Sew Can She Crazy Quilt Sewalong. (
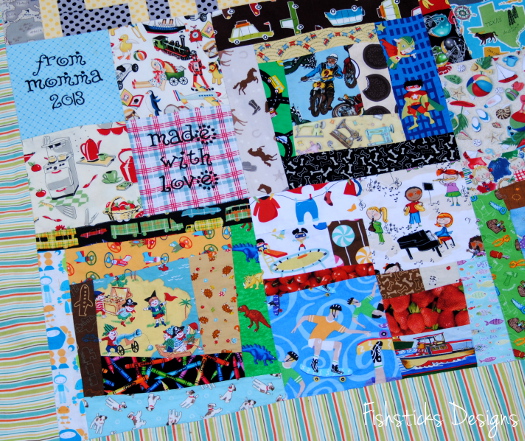
Don’t forget that you have until 10 p. m. to submit your Crazy Quilt project entries for a chance to win some great prizes!)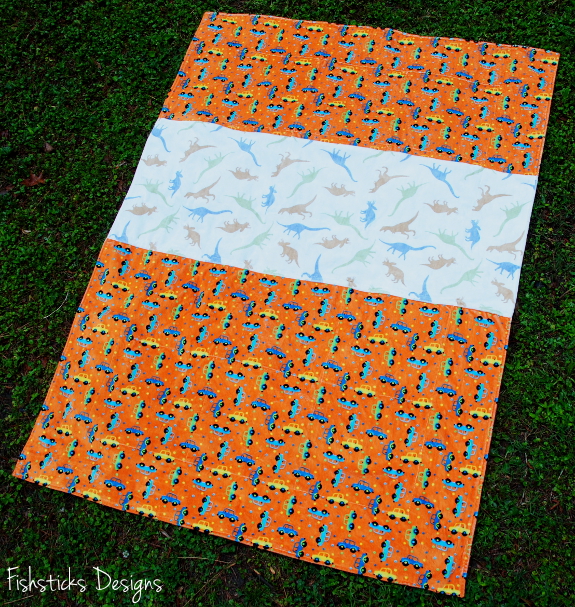 I mentioned before that this quilt is made similarly to the house-quilts that my other children have. It’s constructed with a pieced top and a minky backing without batting and quilted in the ditch. I’ve machine bound some, but since I was short on time with this one, I just turned and topstitched it. The piece of minky that I had planned to use wasn’t quite big enough, so I added a smaller piece, and I love the look that it gave the finished back! It works perfectly with the craziness of the front.
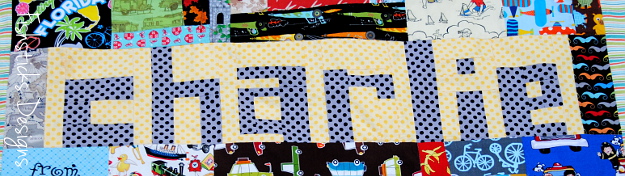 The pieced name turned out just the way I imagined it. Charlie thinks it’s, “So cool!” and so do I!
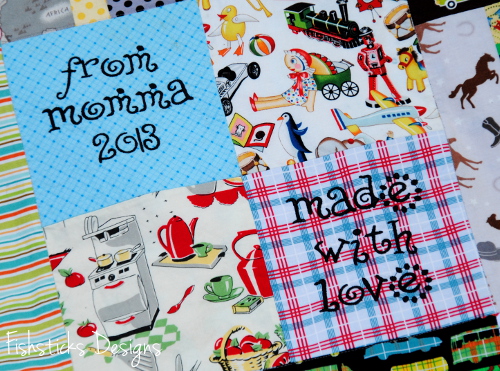 I’m also in the habit of using my embroidery machine to add a quick signature and date to these quilts. (An amusing little side note: this is the first time I’ve used my embroidery machine since we moved from Texas, and I seriously think that every single piece that I needed, from the hoop to the card to the software, was in a different unknown place. I was digging through drawers and boxes and . . . I almost gave up, but I’m so glad I didn’t!)
I think that covers everything. I’ll wrap up with close-ups of each section of the quilt. There’s a whole lot of stuff to spy!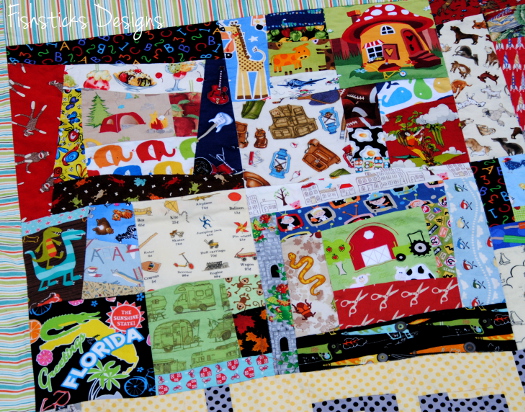


Personalizing the Crazy I-Spy Quilt
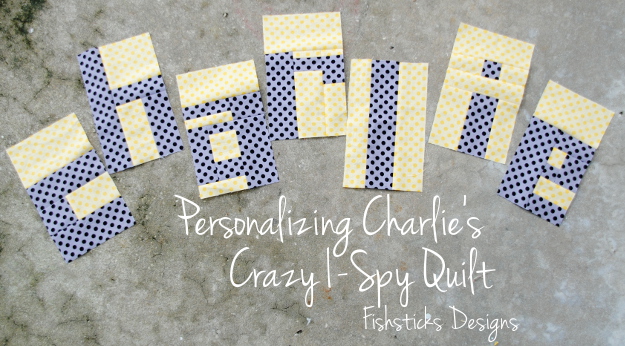 Rather than adding traditional stitching embellishments to Charlie’s Crazy I-Spy Quilt, I chose to piece his name into it! Piecing together letters like this looks complicated, but it’s actually really simple. You just need to decide on a width and height for your letters, then use basic elementary school math to determine width and length of each strip. If you want letters like mine with straight edges and right angles, just draw each letter out on graph paper before getting started. This will allow you to determine your measurements really easily, but don’t forget to add a 1/4″ seam allowance on each edge!
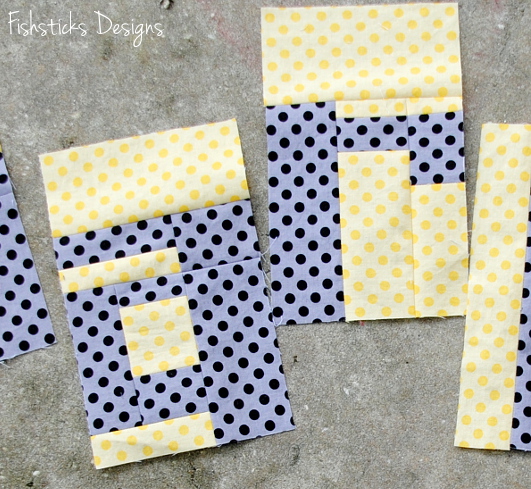 We’re on the road right now, but I finished up Charlie’s quilt before we left, and I’m planning to get pictures soon so I can share it with you before the end of the week. I did snap pictures of the remaining Crazy I-Spy Blocks before I sewed everything together:
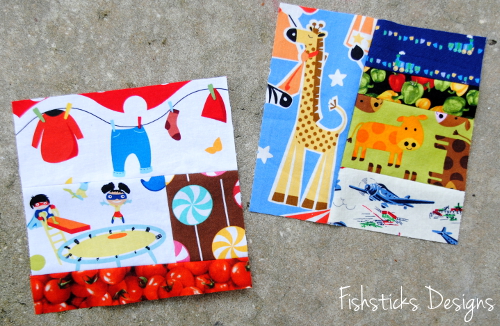 How’s your Crazy Quilt sewing going? Projects are due by 10 p. m. eastern this Saturday, May 18th. You can find all the details for entering over on the Sew Can She Blog. Even if you’re not entering, though, you might want to check out the Flickr pool for some great inspiration!
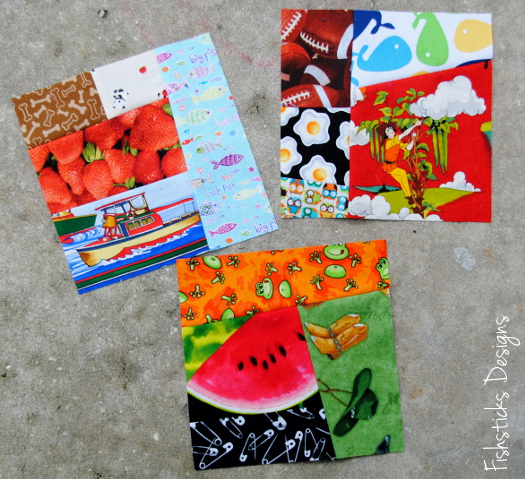
Special Touches And Pretty Stitches
Have you used every single decorative stitch on your machine? I can honestly say that after this last step, in the SewCanShe Crazy Quilt Block Sewalong, I have!
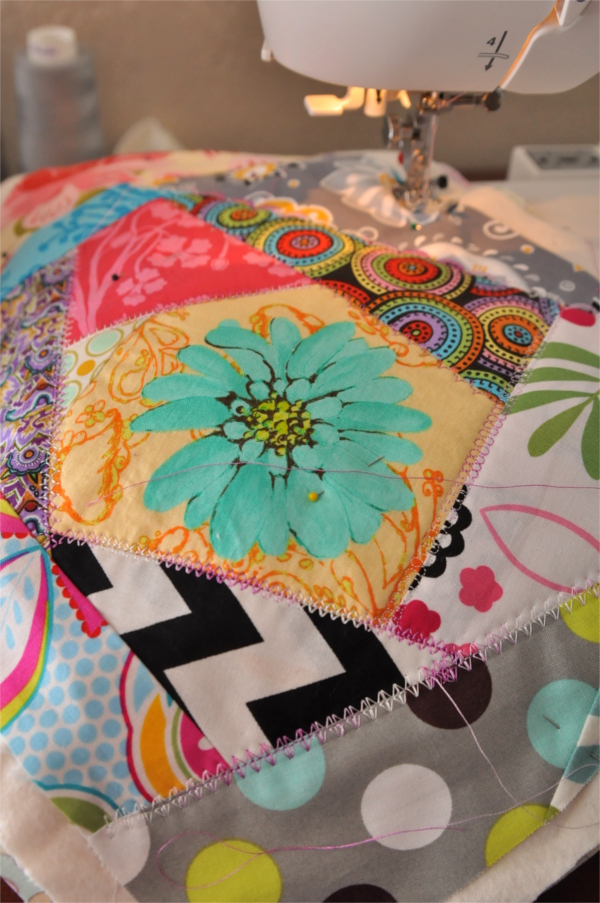
I am thrilled that I decided to work with the variegated embroidery thread. It adds a wonderful, shiny touch to the project!
 Before getting started I dug into my stash and pulled out my beloved Killington Flannel. Cuddled it for a minute, cut two layers, and then cut a woven print for the backing. Several pins later my quilt sandwich was ready for stitching! As you can tell I wasn’t doing any major measuring. I just laid the quilted top on the flannel, then the woven, and simply cut around them, leaving a bit of room in case anything shifted while I was sewing.
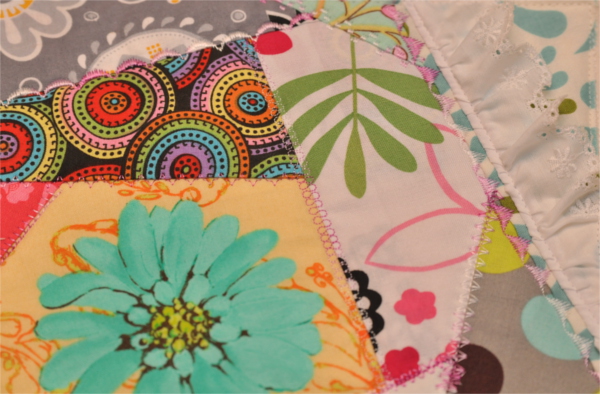
I thought about using little beads in the center of the flowers. But with a little girl that likes to fiddle and pick at things instead of finishing a meal, I knew it would become a problem and distraction for her. Instead, I tried out every single decorative stitch on the fancier of my two machines (spoiled much?), and used almost every single one on this snack mat!
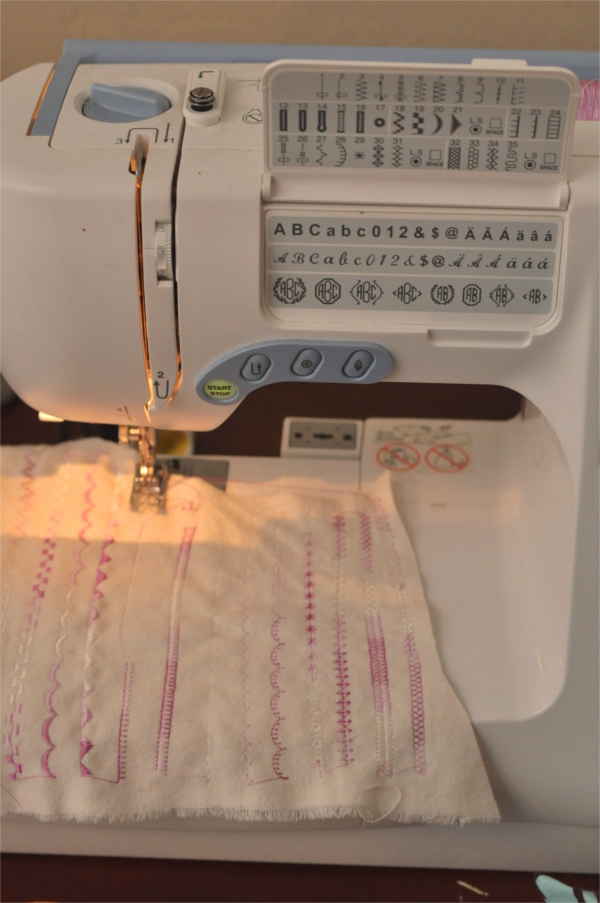
There were a couple I avoided because they were a bit too messy on the reverse, or were prone to tangles. I definitely recommend testing every stitch you plan on using on your project first. Some may need you to adjust the length or width in order for the design to stitch out perfectly on your current project. Also, if you’re stitching with a different thread than usual (in this case embroidery thread), you need to know how your machine is going to fare with it. In my machine I was struggling with the thread catching and fraying, until I realized what the issue was and could fix it.
Do you remember how I nicked the fabric near the bottom with my rotary cutter, leaving a small hole? Problem solved!
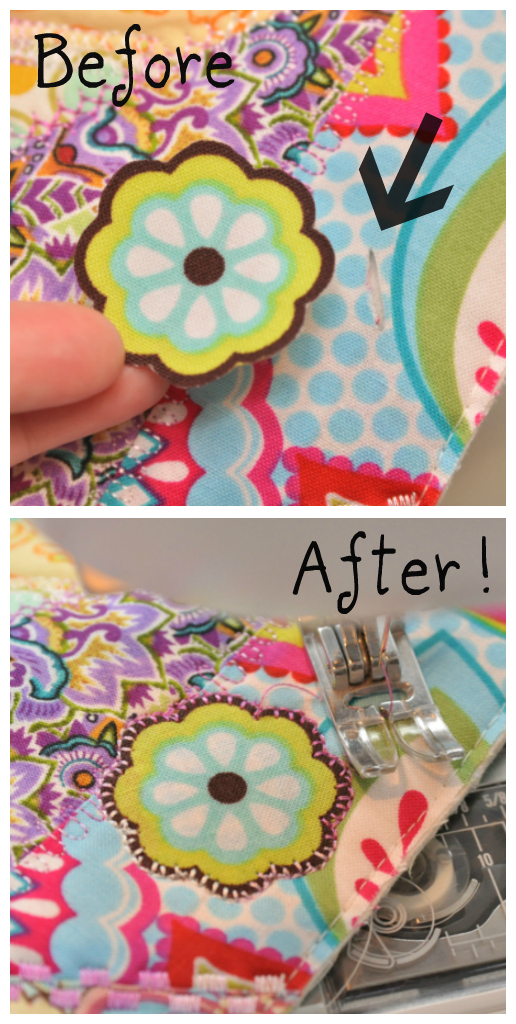
A little Heat’n Bond, some fabric scraps with cute flowers, a tiny applique stitch, and a little lacey trim are all you need to add a special touch for a flower loving girlie-girl!
Unfortunately, because I had to stitch so much slower than usual to stop the thread from fraying, I wasn’t able to complete both blocks for this post. I’ll be completing the other one and posting it on my personal blog this weekend: Rooibos Mom. Once it’s up, I’ll come back and share a direct link to it right here!
~Leigh


