Tutorials
Knit Knowledge–Simple Appliques & Hemming Tips

Now that you know all about the different types of knits. Let’s learn a little about adding the finishing details and a little extra punch to your knit sewing projects.
Because knits don’t fray like wovens, appliqueing with them is really easy! Here are the few things that you need to get started: a fabric that you’d like to applique, a fabric cut to applique on and a lightweight iron-on adhesive product like HeatnBond Lite (you want one that says it’s “sewable”).

Begin by using a washable marker to outline the sections that you’d like to cut out of your applique fabric.

Trim down your applique fabric so you have just a little extra left outside of the actual applique outlines, and cut out a piece of iron-on adhesive the same size as the applique fabric you have left.

Iron the applique fabric to the iron-on adhesive.

Cut out your appliques. (I cut just inside the washable marker.)

Peal the backing off of the iron-on adhesive.

Decide on the position of your appliques keeping the seam allowances in mind. (This is the side panel from the vertical colorblocked Charlie Tee, so it has a 1/2″ seam allowance.) You’ll see here that I decided after laying them out that I needed an additional smaller applique at the top to balance things out.

Iron the applique on to the main fabric. (If you’ll be overlapping them a bit like mine, start with the one on the bottom of the overlapping.)

Now just stitch around the applique. I generally keep my stitching about 1/8″ to 1/4″ from the edge. I intentionally did these a little messy, and I love the look!

Add a few more, if you’d like. Now wasn’t that easy?

I’m covering hemming last, but when I sew knits, I always hem first. I’ve found that hemming when you have a flat piece of fabric cuts down tremendously on the amount of puckering that you’ll have in your finished project. I covered hemming on my blog a while back. You’ll find my original post here: Hemming Knits Part 1. All of those tips are still great and work really well. I have, however, personally changed my hemming method a little. The way I was hemming then worked great for my guys until they got a bit bigger and started stretching and pulling on their clothes. Then, even with the stretchy nylon thread in the bobbin, our hems were breaking.
I was sharing my frustration over this with my friend, Michelle, one day, and she asked me if I used the triple-stretch stitch on my machine. Hmmmm. . . I’d never even heard of that! See–I told you I’m still learning new things along the way. Now, though, thanks to Michelle, I have a method of hemming that never fails! It takes a few extra minutes, but I think it’s worth the extra effort to have a finished product that not only will last for one season, but that I can pass down from child to child.
Here’s what that triple stretch stitch looks like on my machine. It’s stitch #5. (Am I the only one who didn’t know about it before?)

I start out my hemming by either folding up part way and folding up again or by serging off the edge and then folding up the hem allowance. (If you’re just starting with knits, use the first method because stitching through that extra layer will help cut down on the stretching while you’re sewing.) 
If your knit fabric is really stretchy or if it’s rolling on you, use a little spray starch before you press.

Now, when I sew with knits, I always (ALWAYS!) have a stretchy nylon serger thread in my bobbin. (I’ve used Wooly Nylon in the past. Now I’m using Maxilock Stretch.) When I start my hem, I like to sew on the inside. If you only have white stretchy nylon serger thread, then you’ll have to sew on the right side if your fabric isn’t white, though. In this case, I’m sewing on the inside for the first step: straight across the top of the hem using a regular straight stitch.

I left the orange thread from the applique above as the top thread so you could see that I sewed this step on the inside.

Then I flip my fabric piece over and switch to the triple stretch stitch, and sew again on the front side of the fabric right on top of the original stitching.

(Now you’re wondering why I don’t just use the triple stretch stitch and skip the first step. I tried that, but the triple stitch pulls the fabric back and forth under the presser foot to make three stitches side by side, and I found that if I didn’t sew down the whole length first, I always ended up with wonkiness. I’m assuming that’s because of the back and forth motion of the triple stretch stitch.)

All done! A hem that won’t disappoint you!

HEMMING UPDATE:
When I wrote the above information about hemming knits, I was looking for a great way to hem that wouldn’t come undone. The preferred way to hem knits is with a twin needle. It gives a nice side-by-side double stitch on the front with a zig-zag on the back which allows the fabric to stretch without the stitches popping. At the time, I’d been unable to master using a twin needle which, frankly, given that I have a business built on sewing with knits, was a bit embarrassing.
Not too long after this Knit Knowledge Series wrapped up, I got determined to figure out this twin needle thing once and for all. I sat down at the machine, pulled out my twin needle and grabbed the manual for my machine. I skimmed over the instructions as I’ve done in the past, but something new caught my eye.
Do I admit that it was there all along, or do I try and convince you that someone must have added this little detail to my owner’s manual secretly at some point? What is this little bit of important information? Well, the instructions for twin needle sewing begin, “Press the twin needle key to enter the twin needle sewing mode.” Wait! What?! There’s a twin needle key? Oh, look, there it is. (In fact, if you scroll up to where I posted the picture of the touch pad on my sewing machine, you can see it on the bottom center of the screen.)
And guess what happened? I pressed that little key, installed the twin needle, threaded everything up, and I’ve stitched all my hems beautifully with a twin needle since. I suppose that’s a good lesson in reading the instructions . . . and if it still doesn’t work after you’ve read the instructions, maybe you should read them again.

Knit Knowledge – Introduction & Overview

Welcome to Knit Knowledge Week! I’m asked questions about working with knit fabrics really often, so I thought I’d spend a week sharing some of my knowledge with you. I’m quite certain that I don’t know everything there is to know about working with knits, and I still occasionally discover a new technique that works better than what I was doing before. Everything I’ll share is what I’ve learned through my own hands-on experience.
My plan is to spend the week sharing a bit each day. Here’s the lineup that I have planned: Monday: Knit Overview, Tuesday: Interlock Knits & Jerseys, Wednesday: Ribbed Knits & Ribbing, Thursday: Hemming & Simple Applique, Friday: Questions & Answers and the Giveaway.
This week will require some participation from you, too. In order for me to have a Q&A on Friday, I need you to post any questions that you have in the comments section Monday through Thursday. Then, I’ll choose as many questions as I can and answer them on Friday (if I haven’t already answered them during the week).
Friday’s post will also include an exciting giveaway! Caroline at The Fabric Fairy has generously donated a $20 gift certificate that you can use in her store to purchase some knit fabrics from her incredible selection to try out for yourself. Just comment on my posts Monday through Thursday (one comment per post, please), and I’ll hold a random drawing on Friday morning.
Alrighty, let’s get started with a quick overview.
OVERVIEW
First off, don’t be afraid of knits! Knit fabrics, primarily cotton and cotton-blend knit fabrics, are what most of us live in! Once you become comfortable sewing them, you’ll be ready to sew up whole wardrobes of comfortable clothing that you and your loved ones will love to wear.
THE BASICS
ThinkQuest explains, “Knitted fabrics are made from a single yarn or a set of yarns. In making cloth, a knitting machine forms loops in the yarn and links them to one another by means of needles. The finished fabric consists of crosswise rows of loops, called courses, and lengthwise rows of loops, called wales. This looped structure makes knitted fabrics more elastic than woven cloth. Garment manufacturers use knitted fabrics in producing comfortable, lightweight clothing that resists wrinkling.”
Simply put, knit fabrics have stretch. Some, like sweatshirt fleece, have only a little stretch. Others, like cotton ribbed knits, have a whole lot of stretch.
The stretch in most knit fabrics runs across from selvage to selvage. When you place your pattern pieces on knit fabrics that show grainlines rather than direction of stretch, you generally want the grainline to run perpendicular to the stretch.
The right tools:

Before working with knit fabrics, you’ll want to switch out the regular foot on your machine for the walking foot. Your sewing machine has “teeth” that guide the bottom of the fabric under the foot while the needle sews. A walking foot has similar teeth that grip the top of fabric so top and bottom pass through under the needle evenly. This feature helps a great deal in cutting down on the amount of puckering that you’ll see in your knit fabric seams.

It’s also a good idea to switch out your sharp sewing machine needle for a ballpoint needle. Sharp needles cut through the knit loops on your fabrics and leave the fabric with small holes which tend to grow larger as the garment is pulled on and off. Ballpoint needles are designed to glide through the loops instead without causing harm to the fibers. Knit garments sewn with ballpoint needles will hold up much better over time.

The third tool that I think is worth mentioning is a serger. It’s a bit of an investment, and you definitely don’t needone to sew knit garments. (All of my patterns include instructions for sewing with a regular sewing machine, as well as a serger.) However, if you’re planning to sew a lot of knit garments, a serger will give you a nice finish to the inside, as well as a sturdier finished item. Once you get the hang of using a serger, you’ll also find that serging together a piece of clothing is much faster than sewing!
So those are few basics to get you started. To get your giveaway entry today, you’ll need to leave a comment. You can either leave a comment with a question that you’d like me to answer about sewing with knit fabrics, or you can answer my question for today, “What’s your favorite thing about wearing clothing made with knit fabrics?”
Oh, one more thing! As a thank-you for joining me this week, I’ve added a 20% discount code that you can use on any of my patterns through Friday: KnowKnits.
Adding a Little Detail with Your Serger

I was working on this laptee for a t-shirt and cloth diaper set that I’m sewing for a swap and thought I’d try out this idea that’s been running around in my head for awhile. A lot of ready-to-wear clothing has detailing like this around the neckline and sleeves. They use a special machine to do it, but I was sure that you could do something similar just using a run-of-the-mill serger. As it turns out, it’s really simple. I did take some pictures as I went along, though, so I could share with you how I did it.
I loved the result when the laptee was finished so I just had to try it out on a Charlie Tee. The pattern’s namesake is growing so fast, and he needed a couple of new longsleeve tees added to his wardrobe anyway. Aren’t they cool?

Just so you know, this serging method does leave a visible overlap at the back of the neck. If that little bit of messiness bugs you, you might want to just stick to using it for laptees or other patterns that don’t use a full loop of trim.

Honestly, though, once you put the tee on someone as cute as this? Would anyone even notice that tiny little imperfection? (And, just in case you wondered, I went hunting through my kids’ drawers and discovered that the clothing that has detailing similar to this almost always has an overlap at the back or on the bottom . . . and I’d never noticed it until I went hunting for it.)


Ready to try it out? Here’s my quick tutorial: Serger Detailing. Let me know if you have any questions!
The Joy-Nicole Bag Tutorial

Each year, I sew new bags for my nieces and daughters for Christmas. Last year, with my Messenger Bag Tutorial, I started a tradition of designing a bag for them and sharing it in a tutorial here for all of you to use, too. I’m a little behind on Christmas sewing this year. (There was this wedding . . . and it took up just a tiny bit of my time . . . ) I wasn’t ready to give up on the bag or the tutorial, though, so I made some time for finishing up both over the last week.
The first two versions of this bag weren’t quite what I wanted, but I’m thrilled with this final version! I can’t wait to hear what you think of it, too. This one is Samantha’s–as soon as she saw it, she begged for it to be hers. I’m so happy with the piping around the flap. It gives the bag a great finished look. If you’ve never worked with piping before (or if you have without great results) don’t fret–I’ve included my suggestions for perfect piping in the tutorial.

My nieces were here for the wedding, so I had the opportunity to have them visit my sewing studio and share with me their fabric preferences. My oldest niece, Tristen, asked for a bag made with her school colors: green and orange. I had my doubts about how those two colors would work together, but I love the result. I can’t wait to hear what her friends at school have to say about it!

Allie loves polka dots. She showed me a fabric in my stash that she really liked, but there wasn’t enough of it to work with for a bag. These polka dotted fabrics jumped out at me at the fabric store, though, and then I found the button that looks like it was made just for this bag. (The button is just decorative–there’s a magnetic snap under the flap.)

Finally, this is Kristen’s bag. When Kristen walked into my sewing studio, she saw this Michael Miller Dino Dudes and immediately said, “I want the dinosaurs!” I can honestly say that it never would have occurred to me to sew up a handbag with this fabric, but I think it might be my favorite of the bunch. Seriously? How often do you see someone walking around with a dinosaur purse? It’s definitely one of a kind!

I really like how each of the bags that I made this year showcase so much personality. Ready to sew up one or two in your favorite fabrics? You can find the pdf tutorial complete with pattern pieces right here: Joy-Nicole Bag Tutorial. If you use the tutorial, I’d love to see your bag!
Handmade Christmas: Fabric Garland Tutorial

Looking for a simple project to add some handmade beauty to your holiday decorating? I was really tired of our old tinsel garland, and we’ve been working towards decorating with mostly handmade Christmas decorations. I played around with a few different ideas for making a garland and this one is the one that turned out the best for the least amount of work. (I am really short on decorating time this year because, in case you haven’t heard, my daughter is getting married in just over TWO weeks!) This project took me an evening of cutting plus an afternoon of gluing with my two middle schoolers.

Here’s our tree all decorated with our new garland and mostly handmade ornaments.

It’s definitely not department-store perfect, but I wouldn’t want it any other way. I love all the memories that all of those ornaments bring back . . . our children when they were tiny, our former homes, all the foster children that we loved years ago when we were fostering, our past pets, our old neighbors . . . I try to steal a few quiet moments during the Christmas season to sit in the rocking chair with a hot cup of tea and admire the tree while enjoying those sweet memories.
Oh, you noticed that the tree ornaments almost disappear about 2/3 of the way down, huh? That would be because of this little tree-admirer:

I’m working on a project right now that I think will decorate that area very nicely while still keeping the tree safe for our little guy.
Oh, I almost forgot, the link to the tutorial: Fabric Christmas Garland Tutorial. If you make one, I’d love to see it!
Treat Bags and a Tutorial

I just did not have time to sew costumes for my children this year, but I think I made up for it a bit with these fun treat bags. They are really fast to put together, and, unlike most costumes, we can put them up to use again next year!
The design allows them to sit open like this when you pull the handles apart so that you can see the goodies inside:

But when you pick the bag up and pull the handles together, the bag closes up like this to keep treats safe and sound inside. Pretty cool, huh?

Ready to make one or two or a dozen? You can find the tutorial right here: Treat Bag Tutorial. If you sew up any, please be sure to share pictures. I would love to see!
Adding a Gusset to the Little One Layette

The Little One Layette pattern was designed with a little extra room for cloth diapered babies, but not all babies and not all cloth diapers are alike—some just need a little more extra room. Adding a gusset piece to the pants or Jamie Jumper will give some extra space for bulkier cloth diapers or just more growing room.

Here, you can see how the gusset gives some extra room through the crotch without having to make adjustments to the body of the jumper or pants. If you’re adding the gusset piece, however, you will have to add an inch to the length of the legs because the gusset pulls the legs up a bit.

You can find the gusset pattern and tutorial here: Gusset Tutorial. (The link inside the tutorial for the pattern is broken. Click here instead to download the pattern: Gusset Pattern.
If you’ve never sewn in a gusset before, it make take a little practice to get it sewn in straight and even. The pants are a quick-sew, so I recommend trying it out on them first, then moving on the the Jamie Jumper.

As always, if you have any questions, leave a comment or drop me an email, and I’ll get back with you as soon as I can!
40 Years, 40 Days, 40 Pillowcases

In 40 days, I’ll be *gulp* 40 years old! I was checking out the Crafthope blog a few days ago and discovered that they’re participating in ConKerr Cancer’s Miles of Pillowcase Smiles project. ConKerr Cancer organizes sewists around the country who sew bright and cheery handmade pillowcases for children who are seriously ill. It just so happens that the deadline for this project is September 15th–my 40th birthday. So, I’ve set a goal for myself to sew 40 pillowcases for ConKerr Cancer in the next 40 days.

I finished up my first four pillowcases today. They were so quick and easy! I’m sure there are zillions of tutorials online for pillowcases, but I thought I’d put together one to show my method. I timed myself to see exactly how long one pillowcase takes. Including cutting out the fabric, the total time was 9 1/2 minutes! You do need a serger to use this tutorial. (If you don’t have a serger, check out the ConKerr Cancer website for a tutorial using your sewing machine.) Just click for The 9 1/2 Minute Pillowcase Tutorial.

If one pillowcase only takes 9 1/2 minutes, surely you have time to sew up one or two, too! If you do, I’d love to see them!
Short Sleeves for Summer
It’s Mending Week over at Making More with Less which reminded me of these three shirts that have been sitting in my mending pile.

The top shirt was Allen’s favorite this past winter. The other two were discovered in the bottom of one of his drawers when I cleaned out the winter clothes . . . they’d never even been worn! I thought since they all had long sleeves sewn under short sleeves, I could convert them to summer apparel really easily.
I started by simply cutting the long sleeve portion off, just below the hem on the short sleeve, but that left this funky piece at the bottom seam.

So I grabbed my trusty seam ripper and ripped out the portion of that seam where the long sleeve had been sewn in. (A quick tip: When you’re ripping out serging, the easiest way is to find the side with the two rows of stitching that run parallel, slide your seam ripper under both stitches and rip them out. Every three of four stitches will do the trick. Then just pull the two pieces of fabric apart.)

Once that was done, I was able to cut off that little bit of extra fabric,

and then serge the seam back together. (If you don’t have a serger, it would be perfectly fine to sew those back together, too!)

Twenty minutes of work, and three tops are ready to add to Allen’s summer wardrobe.

Here’s Chewy, back in action . . .

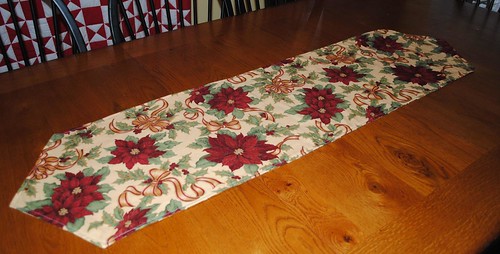
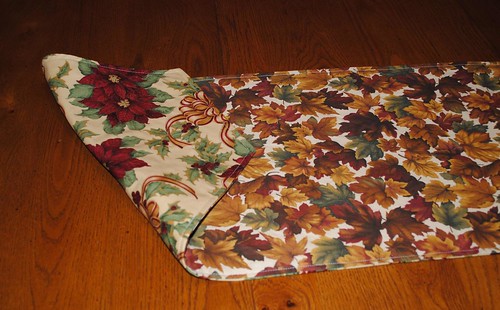
Table Runner Tutorial
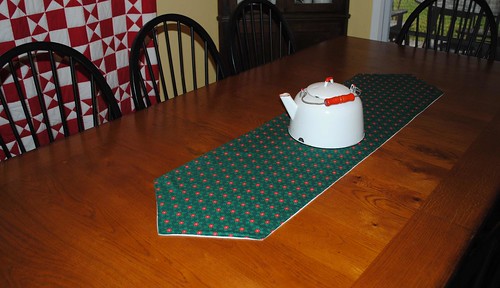
I really like having something simple to decorate our table — something that isn’t too big to leave on the table when we serve our guests. I just finished sewing up this quick and easy table runner and thought I’d share the instructions with you. It’s a really fast project that will give you years of enjoyment! You could make a different one for each month or for every holiday.
You can even make it reversible like this one that I made for a friend. She’ll be able to use one side for fall and Thanksgiving and the other for Christmas.
Here’s the link to the pdf tutorial for you: Table Runner Tutorial. I’d love to see what you create with the tutorial! Please feel free to comment or email me if you have any questions.


