A Little Tour of the Fall 2013 Fishsticks Designs Quilt Market Booth
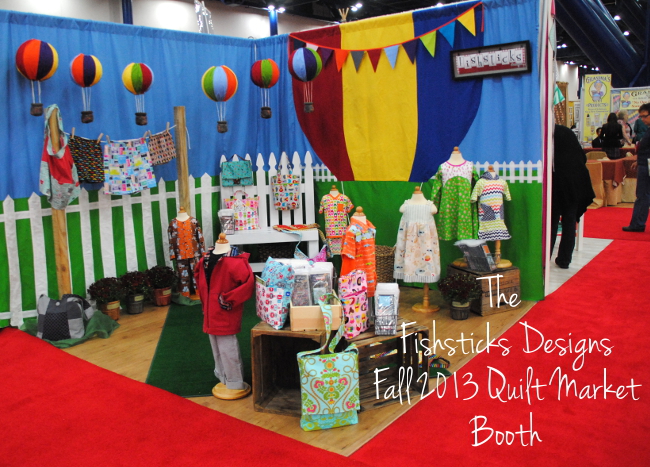 Are you ready to see the Fishsticks Designs Quilt Market booth?! I am so thrilled with how well it came together! The hot air balloon theme was an amazing suggestion from Leigh months ago. I sketched out how I envisioned the booth that night, and that sketch has been hanging on my bulletin board since. It was such a cool thing to see it come to life before my eyes!
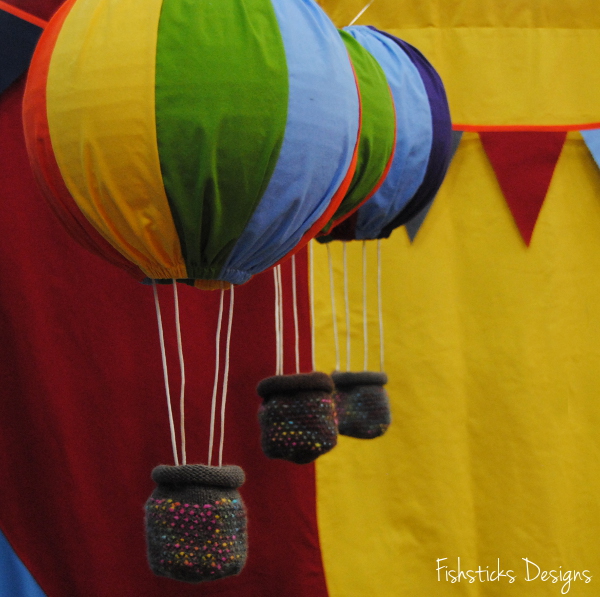
 So many people loved the hanging hot air balloons! It took a bit of trial and error to get them just right, but once I came up with an idea that worked, they were super easy. (There’s a tutorial coming soon, in case you wondered!) My 15-year-old knitter, Samantha, knitted all the baskets that are hanging under them, and she did a lovely job. (She got to come along with me to Market this year, too!)
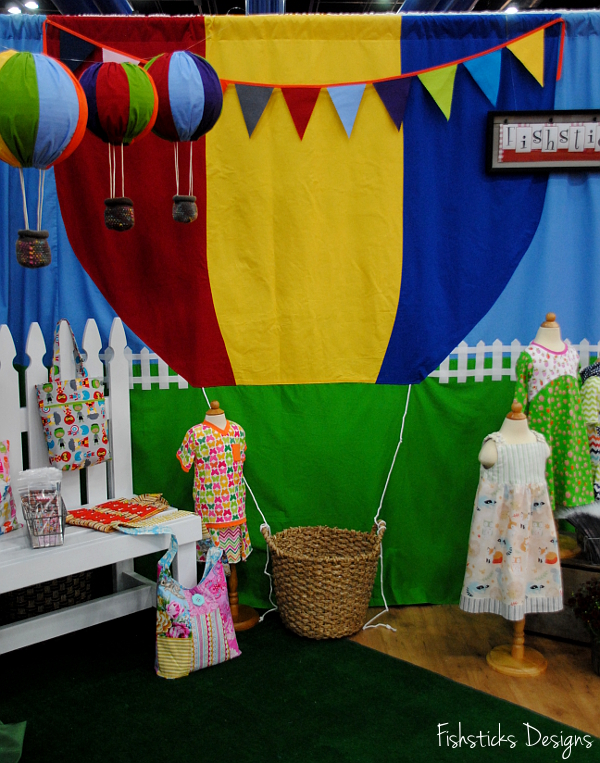 This was my first time sewing the drapes as a whole piece. Let me tell you, sewing an 8 foot by 10 foot curtain is no small feat. Add a giant applique to that curtain, and you just might be so sore for days after crawling around on the floor putting it together that you wonder aloud what in the world you were thinking when you moved into a split-level home! (It was totally worth the work and the pain, though!)
 I mixed in both well-known and newly-released patterns in our display.
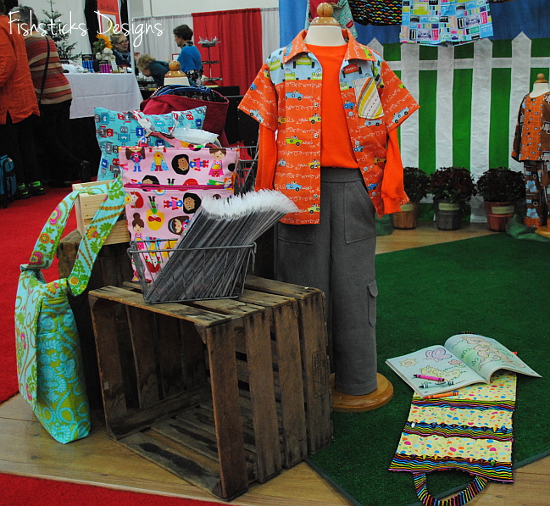 And, I added a few patterns that are not quite finished, but coming soon!
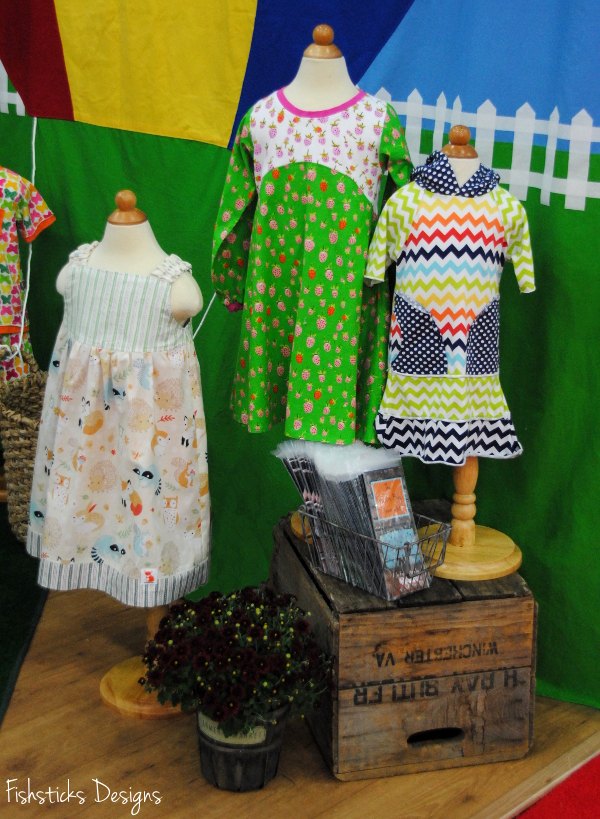 Oh, and you just might see a peek of a new size range of an old favorite, too!
 I really showcased my new Go Fish Pattern Series, and they seemed to go over really well! I think shop owners and sewists alike are going to love them for their simplicity, their speed and their practicality.
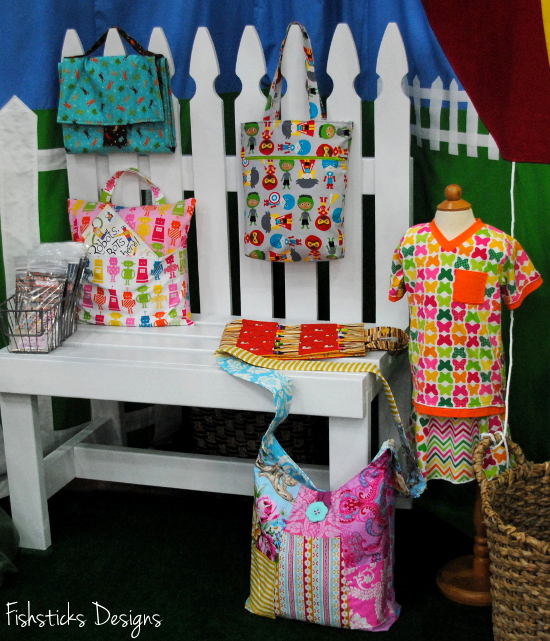 Leigh made the beautiful picket fence bench that you see above, and both Leigh and Kristy helped with sewing all the samples. (I could never have gotten it done without their help!) Speaking of my amazing Quilt Market crew . . .
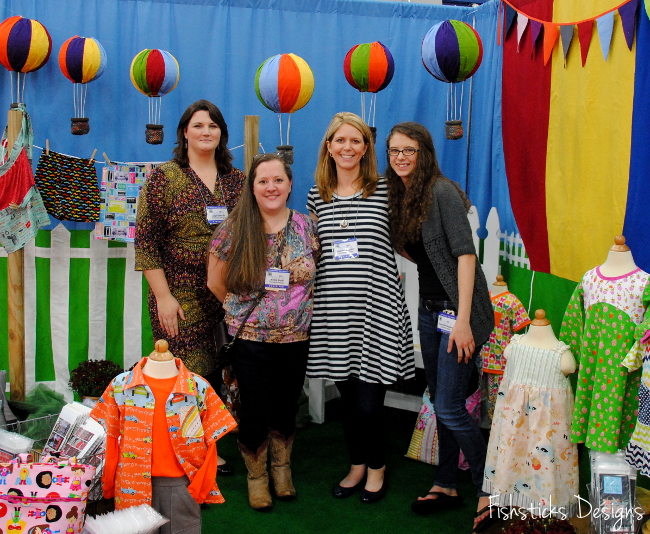 . . . from the left, Leigh (my incredible assistant, who you can also find at Rooibos Mom), Kristy (my dear friend and the heart behind Hopeful Threads), ME! and my beautiful Samantha. We had so much fun, even when we weren’t having so much fun. (That laminate floor tried to get the best of us, but we conquered it . . . sort of. We at least made it look presentable!)
I’ll be sharing more about the rest of Market later this week! In the meantime, I’ll be finishing all of the unpacking and working on getting those new patterns wrapped up as quickly as possible.
You’ve Got 54 Crafting Days Left Until Christmas!
Yes! Christmas is coming, and if you’re like me and LOVE giving handmade gifts, don’t put off getting started. In case you happen to need some inspiration, there are two different handmade holiday series that I’ll be watching this month, and they both start today! Oh, and both have great giveaways in addition to the wonderful crafting ideas!
 First up is the Holiday Bake, Craft & Sew Along at Skip to My Lou, According to Kelly and A Southern Fairytale. Cindy, Kelly & Rachel have gathered some of my favorite bloggers to share ideas for things you can sew, craft and bake for decorating, giving and eating. I’ll be popping in to share a sewing project at Skip to My Lou on the 21st!
 Second, I couldn’t possibly make it through November without checking out the amazing compilations of tutorials, recipes and printables at Sew Mama Sew! Each day has a different gift theme and curator, so you’re sure to find something perfect for everyone on your list.
What are you waiting for? You only have 54 days! (Oh, really, who am I kidding? You all know that I’ll be up until the wee hours of the morning every night before Christmas finishing up something. A little confession? I actually enjoy those quiet late nights at my sewing machine . . . . shhhhhh! Now is definitely the time to start planning, though!)
Quilt Market Guessing Game – The Reveal & the Winner!
 I’m on the road home with Samantha, but I had a few quiet minutes in our hotel room about halfway home, and I thought I’d take advantage of that time to reveal our booth theme for Market! (Of course, if you’re a Facebook fan or a follower on Instagram, you already know!) Did you guess that those supplies in last week’s post became hot air balloons?!
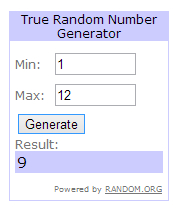 There were twelve correct guesses, and random.org chose number nine, Jennifer, as the winner! (Jennifer, I’ll get in touch with you on Thursday once I’m home and a bit settled to find out which four patterns you’d like.) Congratulations!!
I’ll be back next week to share more about Fall Quilt Market. We had so much fun, and I have tons to share. In the meantime, did you see that I was interviewed for The Moms Know Moms Series at Little Kids Grow on Monday? You can find my interview by clicking on the picture below. I would love to hear your thoughts on how you juggle sewing, family and other responsibilities!
Quilt Market Set-Up & A Little Guessing Game
 Good morning from Texas! We are busy here today getting the Fishsticks Designs Quilt Market booth up and ready. (If you’re going to be here, we’re in booth 2057. Come see us!)
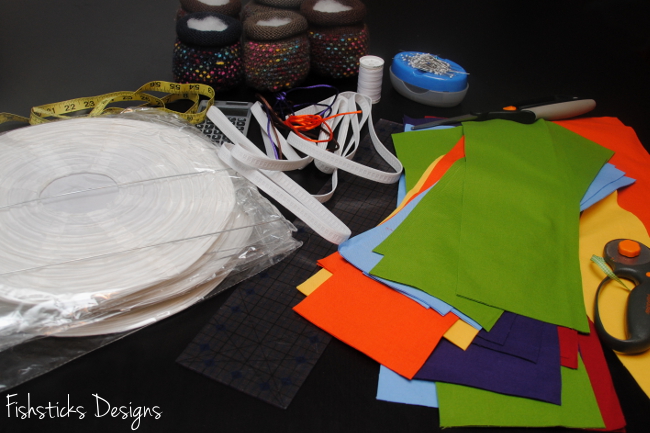
 I thought it would be fun to do a little guessing game/giveaway like we did before Spring Market last year! The FD booth this fall has a really fun theme, and the supplies that you see in the picture at the top of this post were integral to creating the props. Anyone have a guess as to what we might have turned them into?
How about if I give away a pattern 4-pack? Just post a comment below and tell me what you think we made! I’ll take all the correct guessers and draw for a winner tomorrow morning. Ready? Go!
Update on Saturday morning: I’ll get pictures and the drawing winner posted soon! Feel free to come check out my Instagram feed for ongoing picture updates: Fishsticks Instagram
Customizing a Tote Bag for Mom
This post originally appeared in The Make for Mom Series at The Shaffer Sisters in May 2013.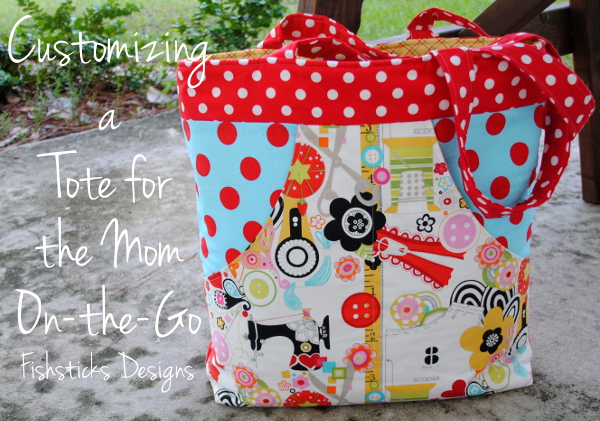 My husband and I have a habit of packing up our kids and heading out on road trips with stops in multiple states to visit friends, family and ministry supporters, and we always try to throw in some sightseeing (homeschooling on the road, right?), too. With so many stops, I need to keep myself organized. I put together this enormous tote bag with tons of pockets just before our last trip which included stops in West Virginia, Tennessee, Washington DC and Virginia. Crazy, right? This bag was such a great help!
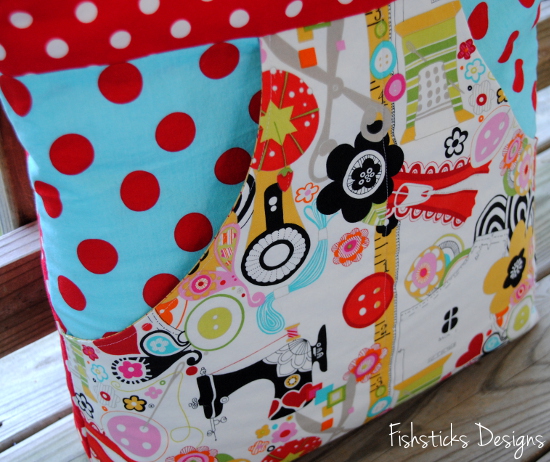 I knew just what I wanted from this bag, so I designed it exactly to my own specifications. It’s sort of huge at 16″ wide by 17″ tall by 4″ deep, but it holds everything that I need it to hold, and it looks pretty doing it!
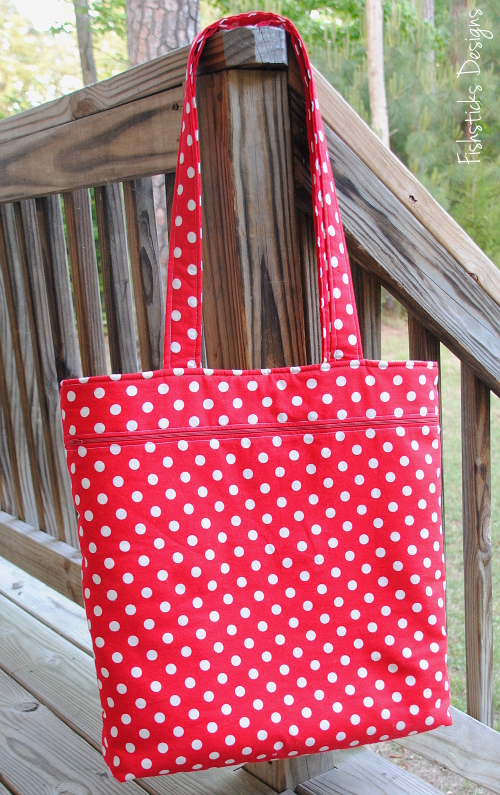 I added decorative pockets to the front and a zippered pocket on the back.
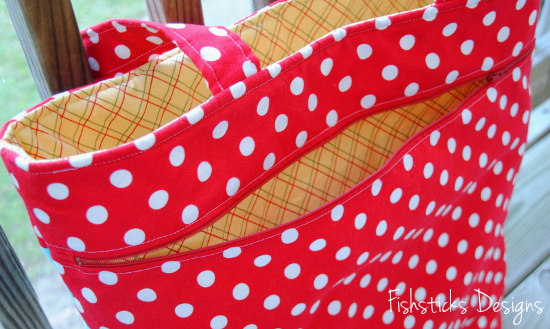 But, what I really want to show you is the inside of the bag.
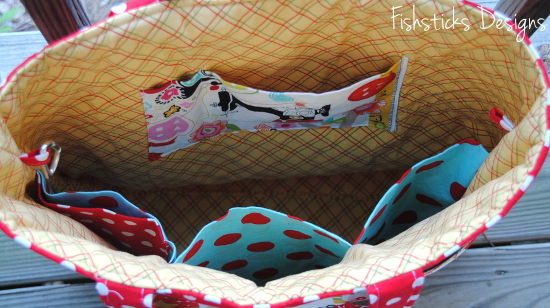 Without inside organization, the size of this bag would make everything disappear. Adding pockets and loops to the inside of any bag, though, is really simple. Once you know how to do it, you can grab your favorite tote bag pattern and customize it perfectly for you!
You’ll want to have your inner bag pieces cut and any interfacing added before starting on these little extras. Have a quilting ruler and a washable or disappearing marker handy. If you’ll be making custom-sized pockets for anything (cell phone, notebook, etc.) then have those ready to be measured, too. I’m using a 1/2″ seam allowance on everything and assuming a 1/2″ seam allowance on your bag pattern.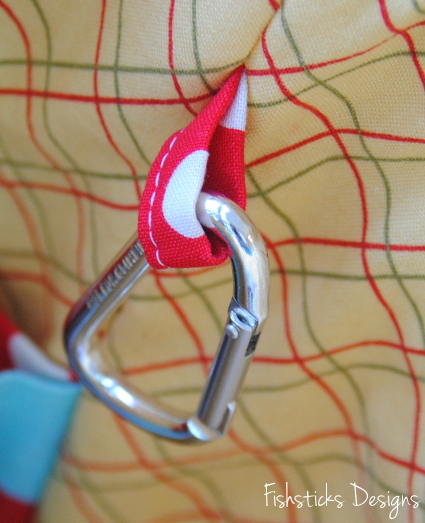 Let’s start with the loops. These little loops are really the most basic thing you can add to a bag, but you’ll be so surprised at what a difference they make! With a bag this big, you simply must have a way to clip in your keys or anything else that you need to be able to access quickly. With a loop or two sewn into the side seams and a carabiner clip, you’re good to go!
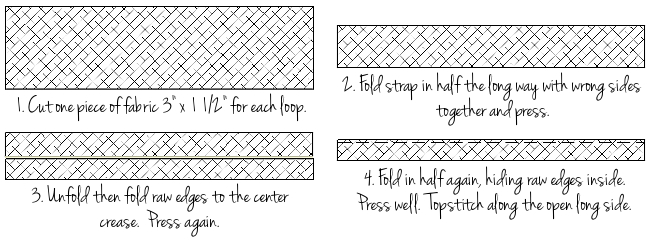 Fold your loop piece over to form a loop, matching up the raw edges. Pin in place as shown and baste it to one side of your unfinished bag inner.
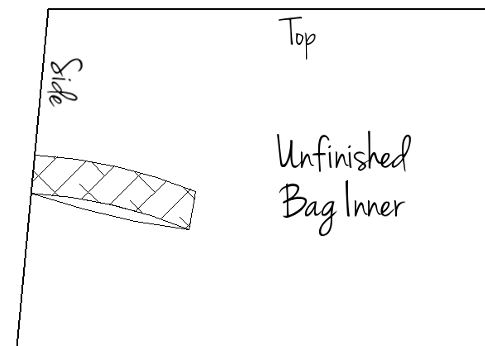 Now, let’s move on to the pockets. I designed this smaller pocket to hold a pen, a pencil and my little notebook.
 To make your own custom-sized pocket you have to do a little math, but it’s really simple, I promise! For pens or pencils, a 1″ wide pocket is perfect. I usually make credit card or loyalty card pockets 3 1/2″ wide. (That width works for my I-phone, too.) If you have something specific, like my notebook, measure it across and add 1″ for your pocket width. My notebook is 5 1/2″ wide, so its pocket needs to be 6 1/2″ wide. With me so far? The height of your pocket should at least 3/4 of the height of the things you’re putting in it. That will keep them tucked nicely in place. For a standard pen/pencil/card pocket, I usually go with 4 1/2″ finished height. My notebook is taller, though, so I made this pocket with a finished height of 5 1/2″. Now you should have all your measurements. Here are your formulas: pocket width + pocket width + pocket width + 1″ seam allowance + 1/4″ topstitching allowance = fabric width and pocket height x two + 1″ = fabric height. Just keep in mind that you are limited by the width and height of your bag. Pretty easy, right? Here are my formulas:
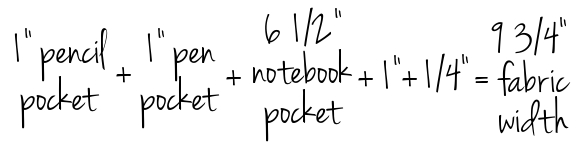
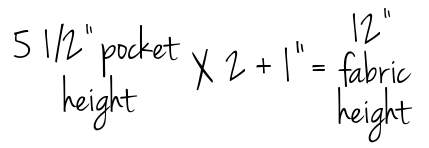 I’m going to cut my pocket fabric 9 3/4″ wide by 12″ high (or long, I guess). Your pocket width and height may be different, though, based on what you’re putting in it. (If you want to cheat a little, for two pen/pencil pockets and two card pockets, I generally go with 10″ x 10″.) Now that you’ve survived that math, sewing the pocket is super simple. Just fold your pocket piece in half with right sides facing and match up the edges that measure the width of your pocket. (In my case, I’m matching up the 9 3/4″ edges.) Stitch along sides and bottom, leaving a 1 ½” opening in one side for turning.
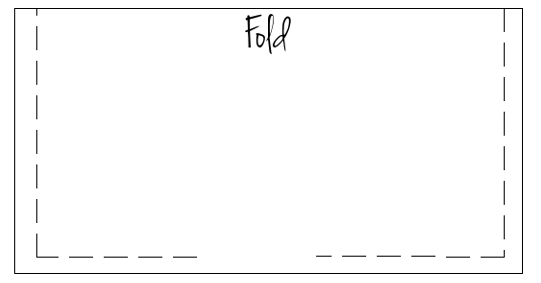 Trim your corners and turn your pocket through the opening. Press it really well. Center your pocket with the folded edge facing the top of the bag on one of your inner bag pieces. You can place it at whatever height you’d like, but I usually go with about 3 ½” to 4″ from the top edge. Topstitch around the sides and bottom 1/8″ from the edge. Once your pocket is sewn onto your bag panel, just use a quilting ruler to measure your pocket widths, then draw lines with your disappearing marker. Stitch down each line, remove the marker and your pockets are done! (A little tip here: stitch from the bottom up to avoid any puckers!)
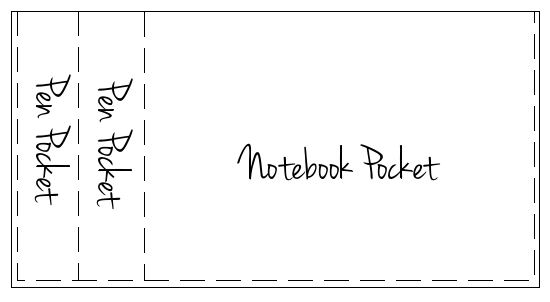 Whew! That wasn’t too hard, right? Ready for one more set of pockets for the other side of your bag?
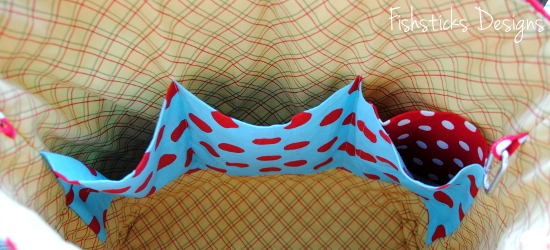 For this set of pockets, you’ll cut your fabric width the same as the width of your bag. You’ll use the same formula that we used above for your fabric height. Since I wasn’t exactly sure of what I’d be putting in these pockets but I wanted them to be pretty roomy, I went with 9″ for my finished height. The width of my bag inner piece was 21″, so I cut my pocket piece 21″ wide by 19″ (9×2+1) high. To sew this pocket, you’ll only need to stitch across the bottom edge because the sides will be tucked inside your bag’s seam allowance. Fold your fabric over with right sides together, the same way you did with the smaller pocket and stitch across the bottom edge.
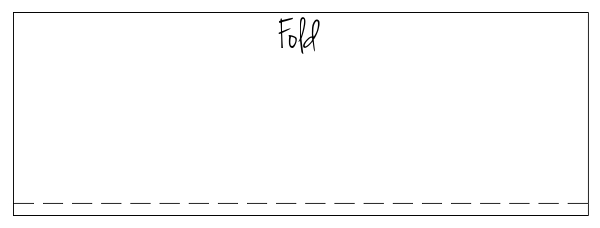 Turn your pocket through one of the short ends and press it well. You can see in the photo above that I tucked another little pocket inside this big pocket. That’s a designated spot for my cell phone. To determine the size of this pocket, simply follow those instructions for the small pocket above. Once you’ve sewn your cell phone pocket, turned and pressed it, you’ll simply topstitch it to the inside of one of your large pockets. Let’s decide on the width of your large pockets first. These pockets can be as wide as narrow as you want them. For mine, I just divided the width of my fabric into thirds. Since my fabric was 21″, that made each pocket about 7″ wide. Using this measurement to be sure my cell phone pocket didn’t end up chopped in half between two pockets, I marked a spot and topstitched my cell phone pocket inside what would become one of the pockets closest to the edge of my bag.
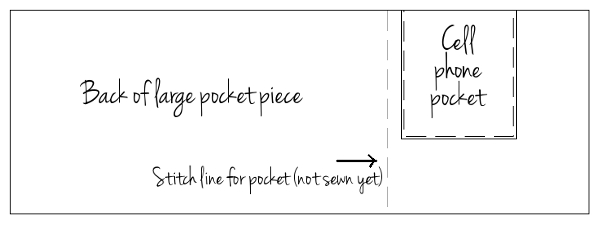 Now you’re ready to sew your large pockets to your bag. Position your pocket piece on your bag inner piece. The positioning with change depending on how tall your bag is, but I placed mine with the top edge 5 1/2″ below the top of the bag. Topstitch the bottom edge at 1/8″. Use a quilting ruler to measure your pocket widths, then draw lines with your disappearing marker. Stitch down each line, remove the marker and these pockets are done, too!
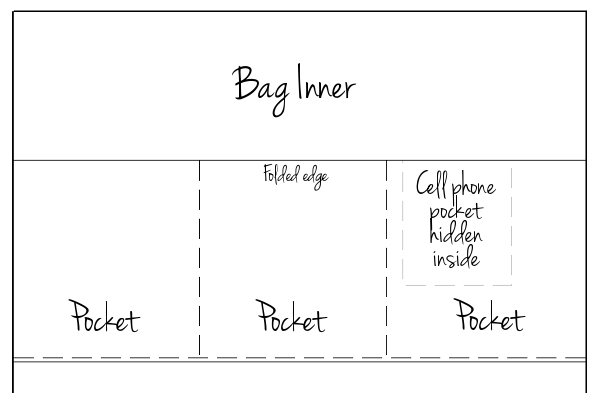 Now all that’s left is to finish your bag according to your pattern instructions. Then fill it up and go!
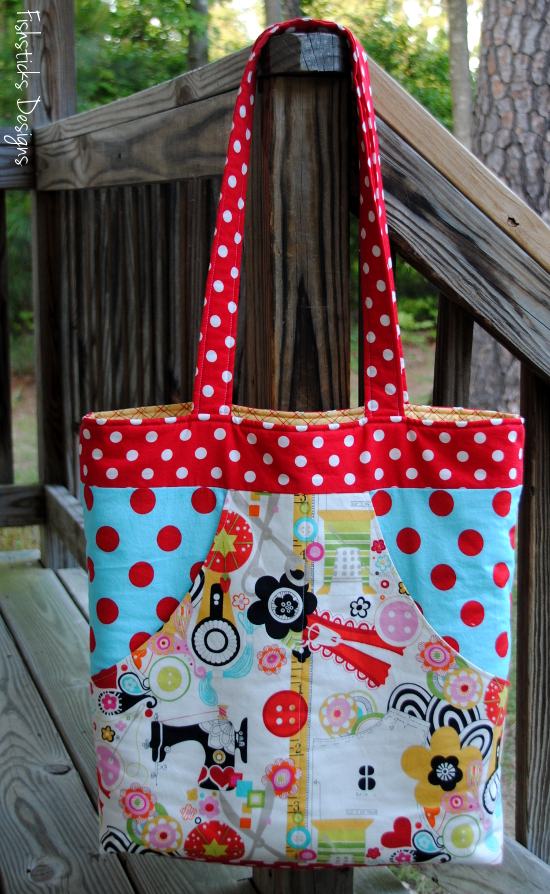
Our Loss
 Thank you so much to all of you who shared in the excitement of the news that we were expecting our seventh baby. We were so thrilled. Sadly, last Friday, just shy of 13 weeks, I miscarried that little one. It’s been an emotional week of ups and downs, but I’m doing well. I’ve been surrounded by the love of friends and family, reminded of how blessed I am even in such a difficult time. After a few days of recovery, my husband and I made the decision that it was best for me to continue with my plans for Market next week. Everyone is different when it comes to dealing with early pregnancy loss. I have a need to keep my hands busy and having something constructive to focus on has been very healing for me.
I’m going to share a bit of the story and some of my feelings in the following paragraphs. I totally understand, though, if it’s too much, and you’d rather just skip the rest. I have a tendency myself to avoid things that might make me cry. Things will be back to normal here soon.
Miscarriage is such a difficult subject to discuss. Many, including myself, deal with it in silence for the most part. This is our sixth pregnancy loss, and each has its own story. A positive pregnancy test is so full of joy and excitement for all of us, but when you’ve experienced a loss in the past, it’s met with a measure of caution, as well. Because of our past losses, we keep our pregnancies just between my husband and I until I start feeling those familiar strong pregnancy symptoms. In the past, that has been our sign that the pregnancy is healthy and will continue without a problem. That wasn’t the case this time. I had just breathed that sigh of relief to be past the high risk 12-week mark. I was allowing myself to really dream of who this little person would be. Our conversation was full of guesses as to gender and suggestions of names. We’d started the process of gathering the baby items that we’d loaned out to loved ones. We were chatting with our little ones about their new little brother or sister. I was even feeling those little occasional baby flutters. The bleeding came on suddenly and without warning. I was in the middle of a photoshoot for a new set of patterns — I’m so thankful that I had decided to do it here in my own backyard. Within a few hours, it was all over. Traumatic is the best word that I can find to describe it.
Like everyone who has walked this path, I wondered if there was anything that I could have done to change what happened. I’m thankful that I’m confident in my knowledge that nothing comes as a surprise to God. It’s not easy, but I’ve been able to see glimpses of His hand in all of this, even through my anger that He would allow this to happen to us . . . again. If you’re walking this path right now, I think it’s okay to be angry. Don’t hold onto that anger too long — it’ll take over — but if you’re like me, it helps to yell at God like a two-year-old having a temper tantrum. Sharing your real feelings is part of having real relationship. He’ll still love you and still draw you back to Him . . . even if you refuse to pick up a Bible for a week. He’ll send along friends to share His word or sneak in a song that speaks to your heart.
If you happen to have a friend or loved one who has recently experienced a pregnancy loss, my advice is to offer your prayers, do something practical or just loving, but be understanding. If she doesn’t want to see you and chat, don’t take it personally. If she’s like me, she doesn’t like for other people to see her cry. We’ve had meals and snacks provided by friends all week. We’ve received cards, notes, emails, texts, Facebook messages. The flowers that you see above were hand-delivered by two very dear blogging friends along with chocolate a few days after I came home from the hospital. (As a quick side note, I am so blessed to work in the fabric/sewing/blogging industry. I am overwhelmed with the outpouring of kindness and support that I’ve received from the people that I work with and alongside. This industry is truly one with heart.) Every message, meal and gift helped to lift us and get us through.
Even just being willing to pretend like everything is normal can be a blessing. I had an appointment to get my hair done on Tuesday, and I really couldn’t reschedule it. I texted my hairdresser on Monday evening, told her what had happened and asked her to tell me everything that she wanted to tell me via text so that we could just act like nothing was out of the ordinary on Tuesday morning. Since it was my first time leaving the security of my own home, it was so nice to just join in the everyday busy salon conversation. It’s amazing how encouraging it can be to just experience normalcy for a bit.
I have quite a bit of work to get done over the next few days, but I’m being kind to myself and not worrying about getting everything finished. Things may not end up being quite the way I had expected them to be, and that’s okay. If you happen to run into me at Market or anywhere else, please feel free to act as if everything is normal. I promise that I’ll appreciate it. If you ask me how I’m doing, I can’t promise that I won’t fight back tears, but chances are I’ll be just fine. I’ll probably say that I’m doing okay. Really, I’m sad, but joyful, too. When I run across the co-sleeper in the garage or my youngest asks again about the baby coming, the sadness comes crashing back in on me. My dreams of getting to know the baby that I was expecting are not going to happen. I can’t change that. In spite of that, though, I am so blessed with so much, and for that, I can find joy in the midst of my sorrow.
Fishsticks Fall One-Day Sale!
 Are you excited about the new Go Fish Pattern Series?! It’s up now in the Main Pattern Store, and I think it’s release calls for a sale! Use the code GoFish for 40% off of all Fishsticks Designs PDF patterns for the next 24 hours in the main pattern store. (The code will expire at 9 a. m. eastern on Thursday morning.) You won’t see a discount this big again this year! This is a great time to grab those patterns that you’ll need for Christmas PJs, clothes and gifts!
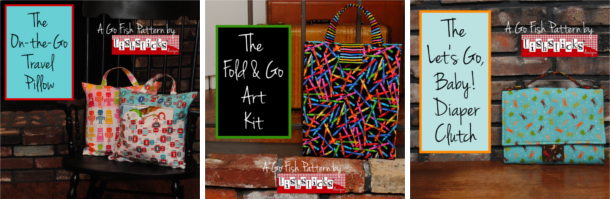
Introducing the Go Fish Pattern Series!
 I’ve had this idea running through my head for a little while. I tend to be an instant gratification sewist. I LOVE projects that can be finished in an afternoon or an evening, and while I know some of you enjoy tackling involved long-term projects, I’m pretty sure that there are others out there just like me! My idea was to create a series of patterns that are inexpensive, available both as PDFs and tri-fold sewing cards, and quick as can be. All of the Go Fish patterns are sewn with basic rectangles that are cut with your quilting mat and rotary cutter using the included measurements. (No need to print any pattern pieces!) These patterns are not quite “no frills” – I tried to put a little extra something in each one. The first six patterns in this series will all be available as PDFs on my site tomorrow morning, and as sewing cards at your favorite local quilt shop in November after Quilt Market. They will be priced at $4.25 retail in both versions.
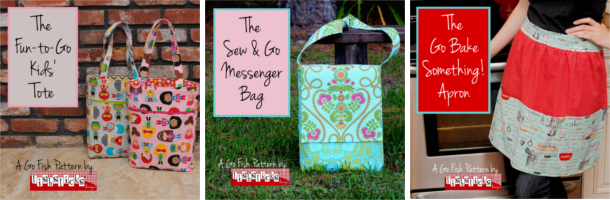
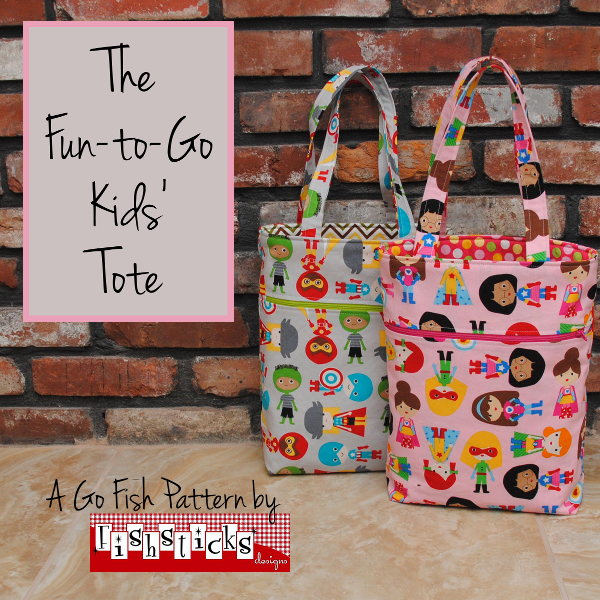 First up is the Fun-to-Go Kids’ Tote. This tote bag is sized perfectly for little ones from preschool through elementary school to carry the fun with them everywhere they go. (My testers tell me that it’s also a great project bag for you knitters and crocheters!) The lined front zipper pocket is super easy to sew in (I promise!), and it provides the perfect spot for those little things that you don’t want to disappear.
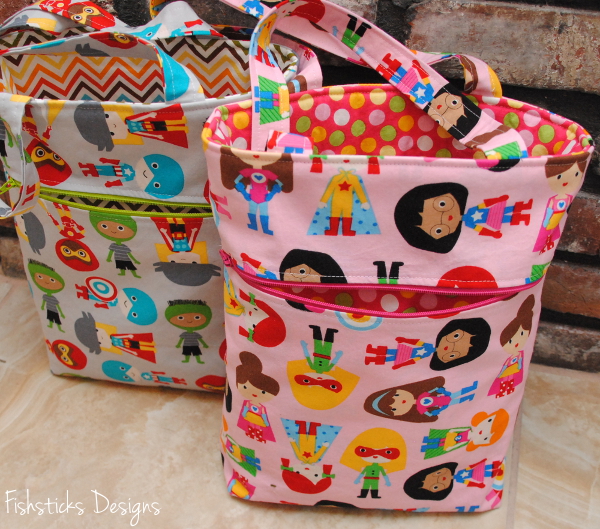
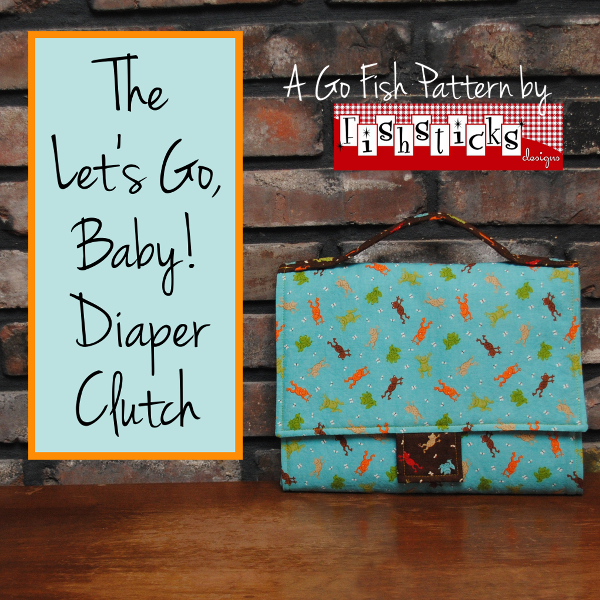 Next up is the Let’s Go, Baby! Diaper Clutch. This handy clutch is easy to grab and go when you’re just running out of the house for an errand or two, and it will fit right inside your diaper bag for quick changes on longer outings. The clutch unrolls to reveal a changing pad and pockets for diapers and wipes, then rolls back up again in a flash.
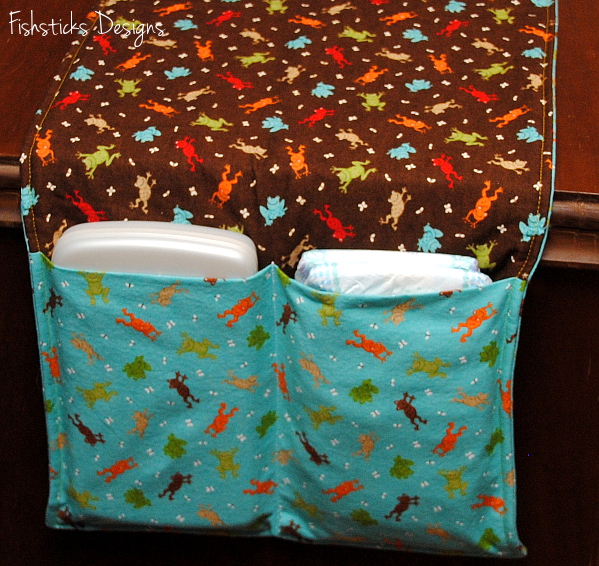
 The Sew & Go Messenger Bag features two strap lengths and a hidden front pocket. It’s the perfect bag for school books or business papers — it’ll even hold most laptops! The flap closes with just a flip and no other fasteners.
 The Fold & Go Art Kit is just what your little budding artist needs to keep his little hands busy at home or away. The large pocket on one side holds full-size coloring books and sketch pads, while the 20 smaller pockets on the opposite side are sized just right for your favorite crayon colors. The kit folds up and closes with a hook & loop tab.
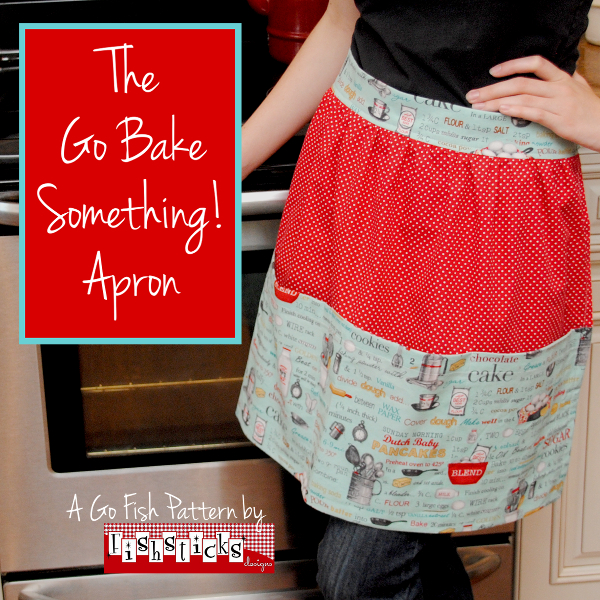 I couldn’t leave out something for the kitchen, since we spend so much time there! Meet the Go Bake Something! Apron. This modern take on the traditional half-apron makes a great gift for someone else or to keep for yourself. It fits sizes 4 to 16, and the four roomy pockets will make any cook happy!
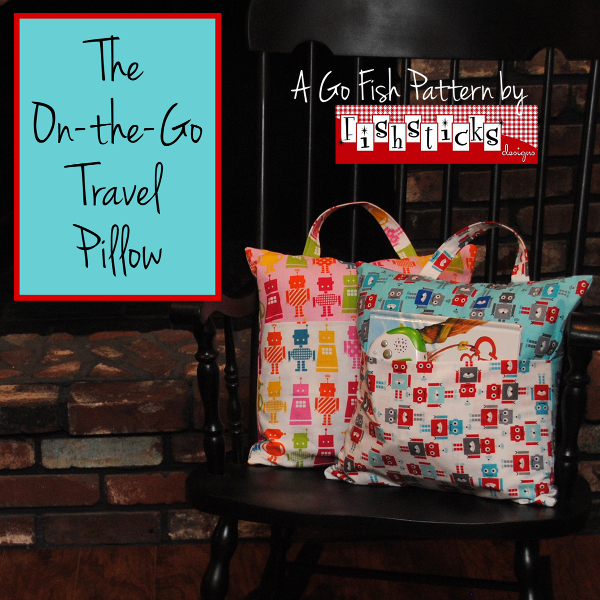 Wrapping up this first group of Go Fish patterns is the On-the-Go Travel Pillow. This little pillow is perfect for long car trips, sleepover parties or overnights at Grandma’s house. The pocket on the front is a great place to hide a favorite book, toy or video game, and the handle makes it easy to take along. The sham-style closure in the back makes the cover easy to remove for washing, too!
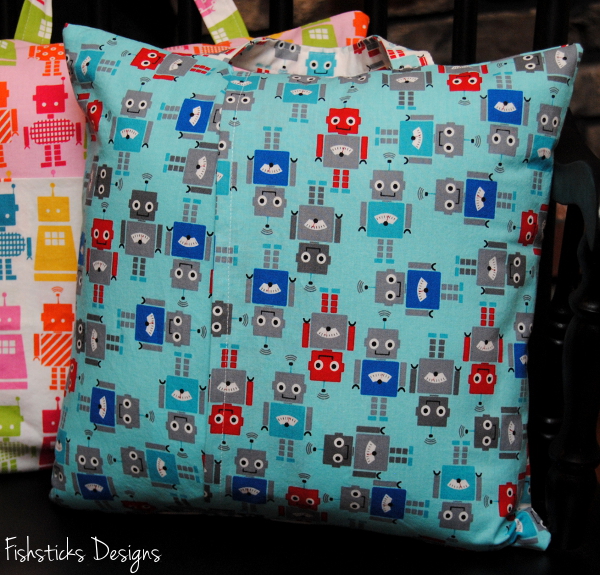 That’s all for now! What do you think? Which one is your favorite? I think these would be great for Christmas, birthday and shower gifts, and for those of you who are WAHMs, these are just the thing for making multiples for those upcoming holiday craft shows!
Comfy Pants for the Whole Family at Cutting Corners College!
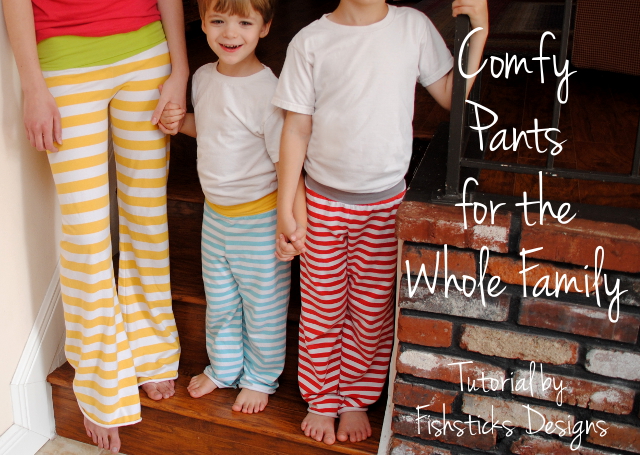 I am so, so excited to be teaching at Riley Blake’s Cutting Corners College today! I would love if you’d click over and check out my tutorial for making comfortable knit pants for your whole family. There are tips for sewing with knit fabrics, instructions for making an elastic-free waistband, and directions for making your own pattern using a good-fitting pair of pants! Just click right here: Comfy Pants for the Whole Family
Slightly Delayed Selfish Sewing – The Lola Dress
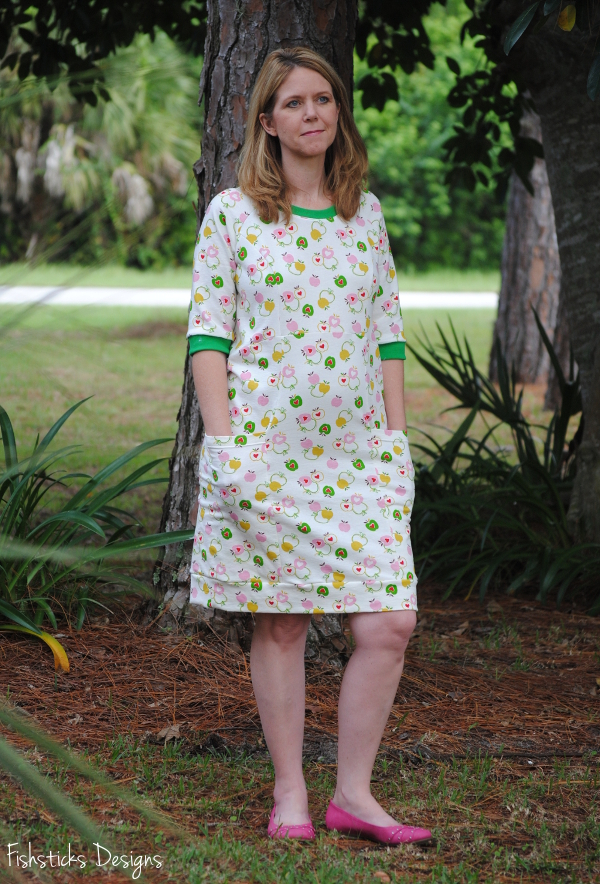
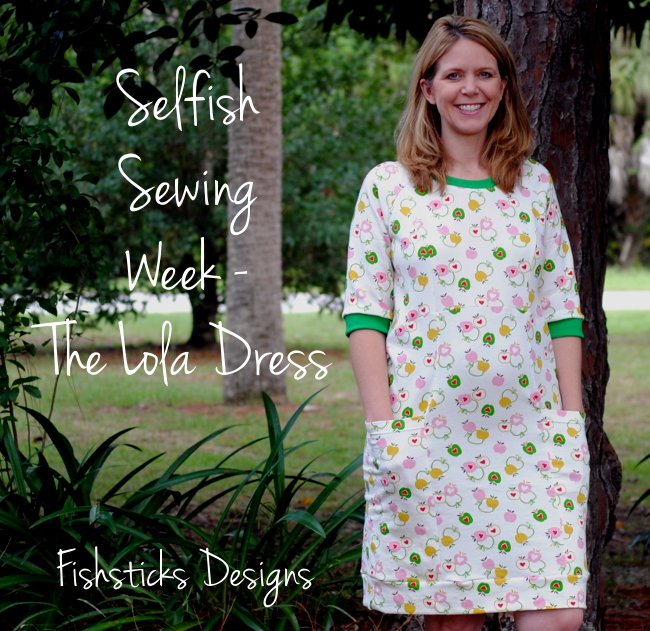 I had grand plans for Selfish Sewing Week, but I only managed to sew one thing, and I’m finally getting around to blogging about it a week later! Better late than never, I suppose. Here’s my version of the Lola Dress from Victory Patterns. It’s a terrific pattern as written, but I did make a few alterations. One of the advantages of sewing is that you can alter to make something fit just the way you want it!
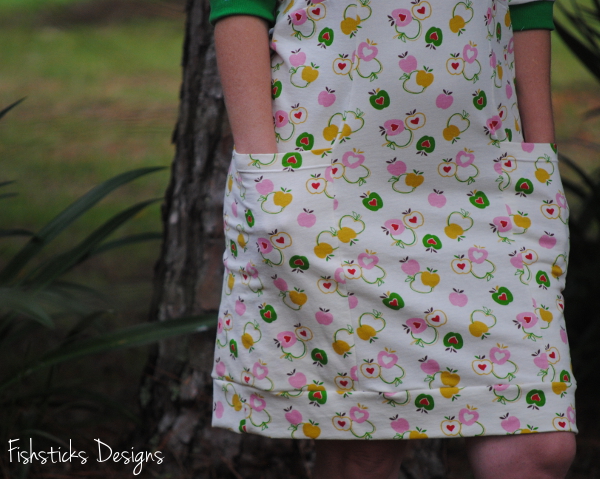 I adored the fit of the bottom part of the dress, and the huge pockets are amazing! I did add about 1″ to the bottom of the dress and to the width of the band, adding a total of about 1 1/2″ in length. I’m about 5′ 7″ and around size 10 to 12, and those adjustments brought the length right to the top of my knee. I also made the length of the bottom band longer because I was working with cotton french terry that doesn’t have much stretch.
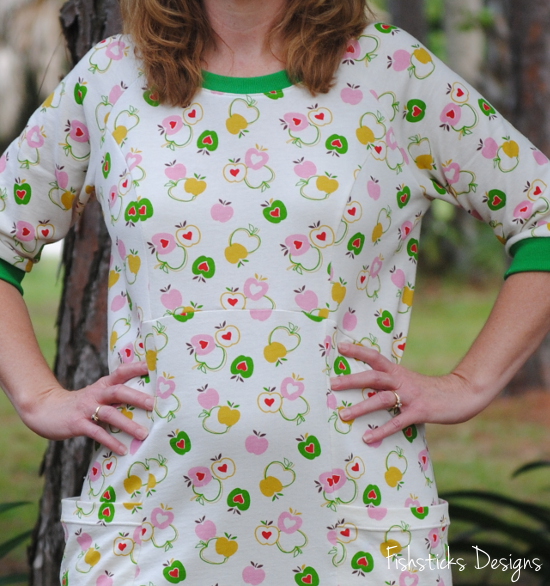 The pattern is super easy to tape together, cut out and follow, so this dress went together in no time at all! Most of the adjustments I made were to the top. I pulled in a few inches along the neckline, where the sleeve and front meet, and about 1/2″ in both of the bust seams. (In retrospect, I probably should have cut a smaller top than bottom, but I was in a hurry and just cut out the size 12 all over.)
I adore the princess seams! They add so much character to an otherwise plain dress, and they really give it a professional look.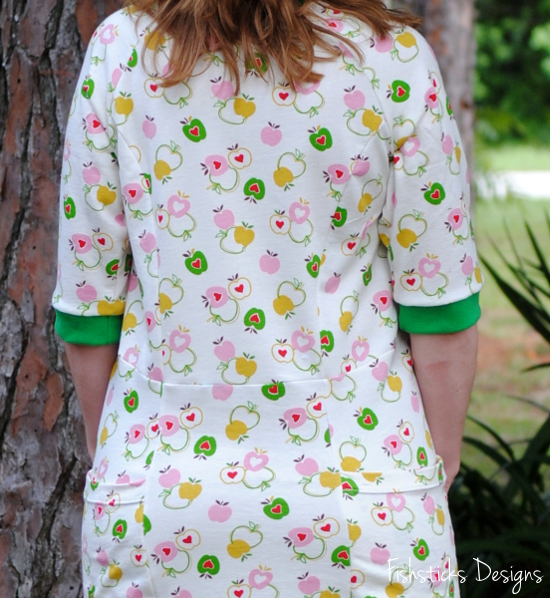 This dress is incredibly comfortable . . . almost like wearing PJs! (Here I am showing off my amazing ability to model while staring off into space. Impressive, right?)