Real Food Gluten-free Dark Chocolate Brownies &
the IJ Pattern Winner
 I have been experimenting with creating a yummy, gluten-free brownie with real-food ingredients since I went gluten-free in January, and I think I finally found the one! It’s not too gooey, not too cakey, but right in between. It’s filled with dark chocolate and has just a hint of coconut flavor from the coconut oil. YUMMY!
These do have a small amount of white sugar from the chocolate chips. I started my experimentation with this recipe, and hoped to substitute something else. Nothing else worked quite the same way, though. I do use Enjoy Life chocolate chips since they’re free of soy and other allergens, and they taste great!
I’ve been working to take xanthan gum out of my gluten-free baking because it’s just not an ingredient that I’m comfortable using. It doesn’t fit the real-food guidelines well at all. I’ve found that whole husk psyllium works well in everything except for yeast bread, and it’s good for you! It’s also fairly easy to find in any health food store. (Sprouts carries the Organic India brand that I use.) The Ingredient List
¾ cup brown rice flour
½ cup almond flour
1 tablespoon whole husk psyllium
1 teaspoon baking powder
½ teaspoon salt
3 tablespoons dark cocoa or cacao powder
½ cup salted butter (if using unsalted, increase salt by ¼ tsp.)
¾ cup + ¼ cup chocolate chips
½ cup coconut oil
2 teaspoons real vanilla extract (gluten-free)
1 cup maple syrup
4 eggs
Preheat oven to 350 degrees. Measure dry ingredients into bowl of stand mixer or a large mixing bowl. Mix or whisk by hand. Melt butter and ¾ cup chocolate chips over low heat in saucepan, stirring to keep from scorching.
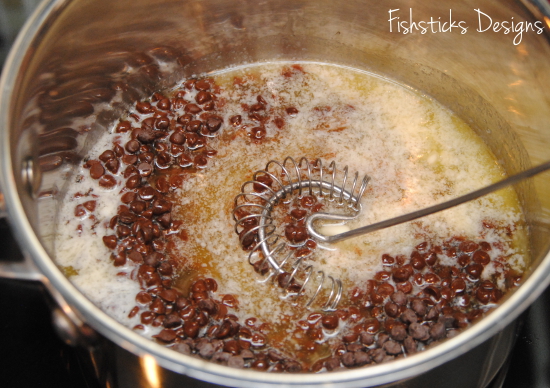 Once both are melted and smooth, remove from heat.
 Whisk in coconut oil and vanilla extract.
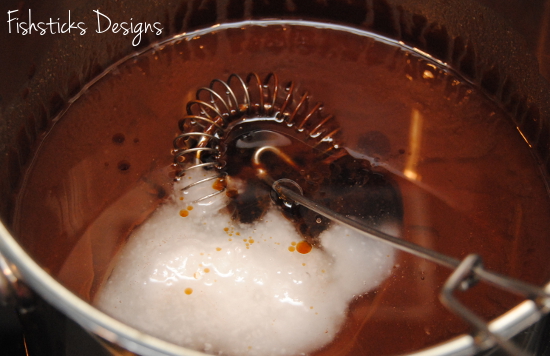 Pour the chocolate mixture into mixing bowl and mix well. Add maple syrup, then eggs, one at a time. Mix well with each addition or allow your stand mixer to do it for you.
 Grease a 9X13 baking dish. Pour batter into dish and spread evenly.
 Sprinkle the top with the remaining chocolate chips.
 Bake for 32-34 minutes at 350 degrees. Brownies are done when a knife inserted in the center comes out clean. Be careful not to overcook them!
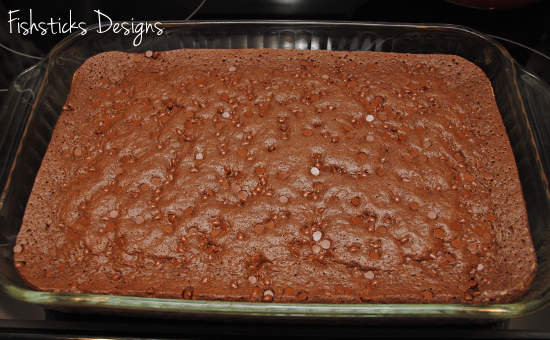 If you can stand to wait, allow them cool before cutting them so they’ll hold together nicely. If you’re like us and need them straight out of the oven, remove them very carefully so that they don’t fall apart . . . and don’t burn your tongue trying to eat them too fast! Enjoy!
 Last Saturday, I shared my version of the Indygo Junction Casserole Carry-All and offered a second IJ Casserole Carry-All pattern to one of you! I asked you to share your favorite thing to bring to potlucks, and every single response made me more and more hungry. Some of you even shared whole recipes! Thank you! I’m going to have to give a few of them a try. There were 80 total individual comments, and Random.org chose #72 as the winner. Huge congratulations to Fran who said that she likes to bring Chicken and Broccoli Casserole to potluck dinners! I’ll get in touch with you right away so I can ship this pattern and the wooden spoon handles to you!
The Jersey Love Blog Tour Day #4
Day four of the Jersey Love Blog Tour has arrived, and I am so excited that we have two sibling groups modeling Jersey Love patterns sewn with Riley Blake Jersey Basics today! Ready to check out what Leigh at Rooibos Mom and Terra at Mama Says Sew created for the tour? Many of you already know Leigh as my amazing virtual assistant. I can’t imagine how I’d make it without her! Leigh has her own blog, too, though! She shares her adventures in urban farming, raising kids and creating at Rooibos Mom. Leigh sews beautiful, feminine outfits for her daughter, like this sweet Lazy Susan Dress, and adorable, but very boyish clothing for her two boys, like these Boxer Brief & Tank Sets. Leigh is a talented seamstress, but her woodworking skills are just as impressive! She and her husband raise chickens for eggs in their backyard, and together they built this incredible (and oh-so-pretty) Handmade Chicken Coop. Early this year, the two of them built this Birthday Bunkbed Set for their two oldest, too! Leigh is great about mixing in real-life stories that are sure to make you laugh. Preteen Jammies and Freshly Licked Walls is my current favorite!
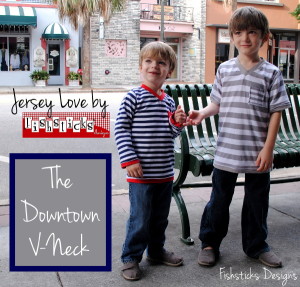
  For her stop on the Jersey Love Blog Tour, Leigh sewed three Downtown V-Necks, one for each of her littles. Go check out the cuteness by clicking on the picture below.
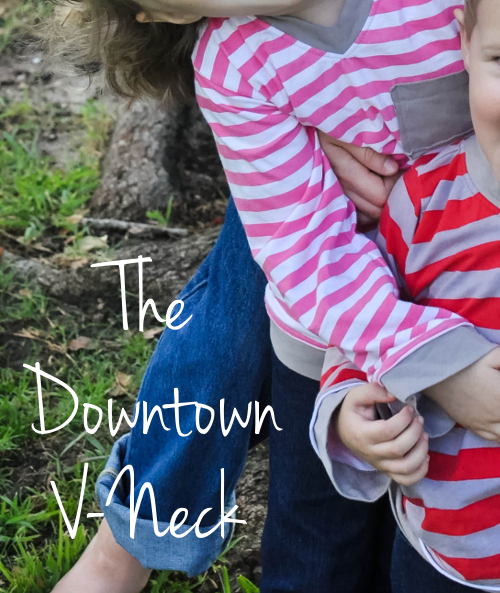 Terra from Mama Says Sew is a multi-talented crafter, too! Her blog is full of inspiring sewing projects, decorating ideas, party suggestions and tons of tutorials. In fact, it’s not often that Terra shares anything that she creates on her own without sharing how she did it! Check out her Color Blocked Leg Warmers tutorial for adorable little girl legwear, and her Vintage Headband Tutorial for the sweetest headwear ever. There are great mama-fashions, too! I love this dolman-sleeve Set Sail Top! Need a great birthday party project? How about a handmade Rainbow Pinata? And, for the perfect finishing touch to your family room, this I Heart My Town Map is sure to impress all your visitors!
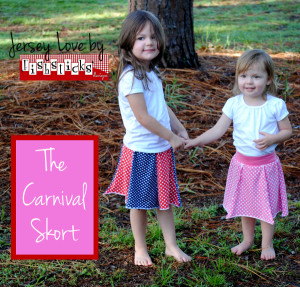
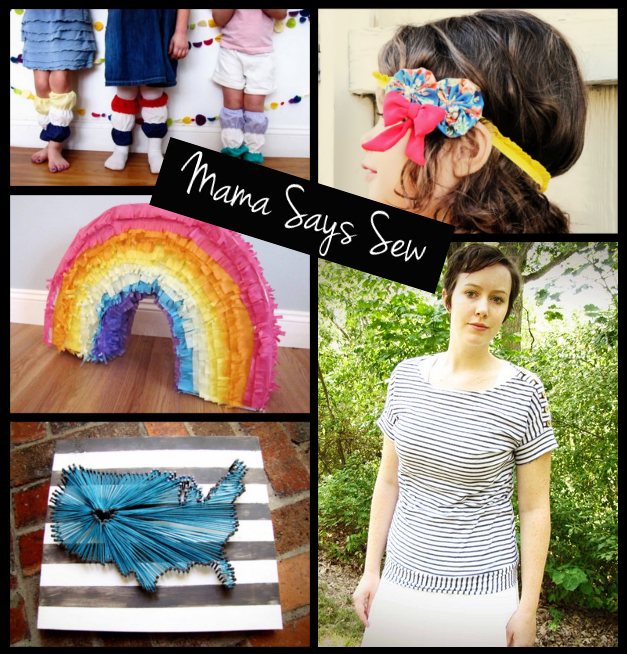 Terra made coordinating Carnival Skorts for her girls, and they are so sweet! To see more of them, just click on the sneak peek picture below.
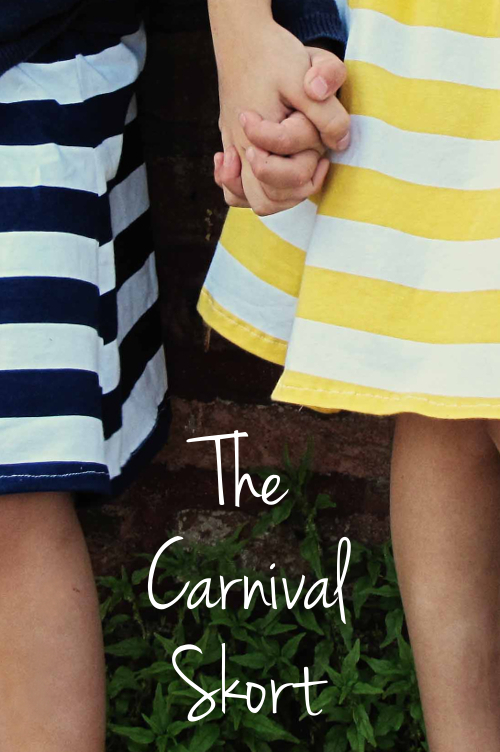
The Jersey Love Blog Tour Day #3
It’s Day Three of the Jersey Love Blog Tour and two more amazing bloggers are sharing Jersey Love patterns sewn with Riley Blake Jersey Basics. Up today are Sarah from Blue Susan Makes and Scary from The Shaffer Sisters!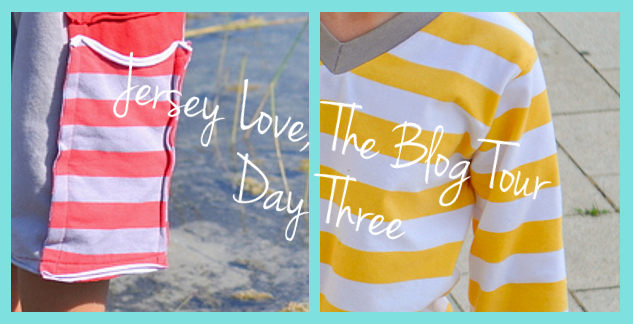 The Blue Susan Makes blog is packed full of creative inspiration from my friend and neighbor, Sarah! She has a lovely selection of sewing tutorials including this gorgeous Bursting Heart Toss Pillow and this stylish Girlfriend Clutch. Sarah shares great sewing tips, too — you have to check out her genius tips for Pattern Cutting! If you have a superhero-loving little one, you’ll love reading about the Superhero Training Academy Birthday Party that she threw for her son this year, including ideas for invitations, decorations, games and food! One of my favorite things on Sarah’s blog is the series she did late this spring called I Am a Soccer Mom! I happen to be a football and track mom, but Sarah’s ideas and tips are perfect for surviving and enjoying all sorts of kids sports.
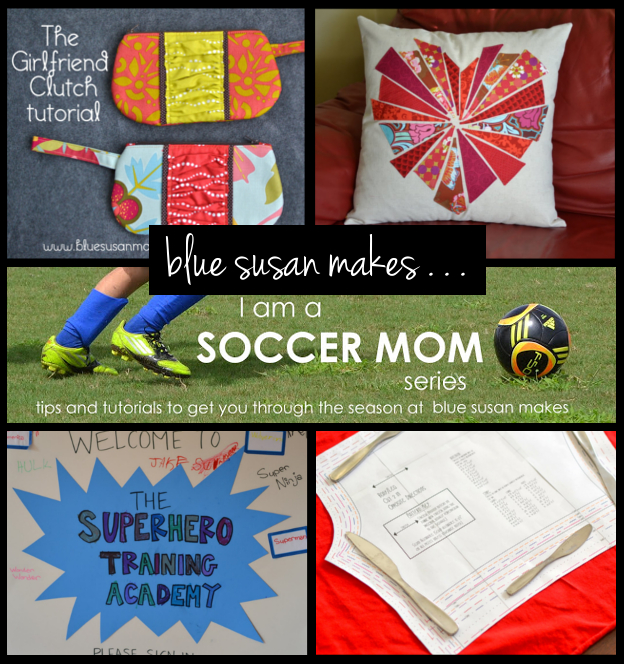 Sarah sewed Runaround Shorts for her son, Jack. Just click on the preview picture below to see how cool and comfy they are!
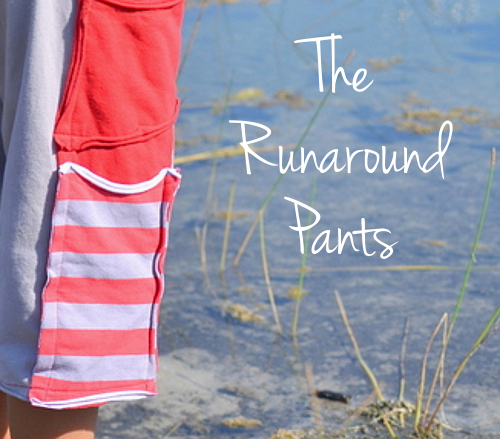 The Shaffer Sisters, Al, Jo and Scary, all blog together, and they’re a trio that is inspirational in all areas from family to faith to creativity. Their blog is bursting with practical, budget friendly sewing ideas like Boston’s Miniature Minky Blanket and Rogue’s Bold on a Budget Overalls. The sisters share tasty recipes like this Fresh, Light Pasta Dinner that I can’t wait to try! (Have to put bacon on my shopping list.) One of my favorite things on the Shaffer Sisters blog right now is Scary’s Beginner’s Guide to Pattern Testing. If you’ve ever considered joining a pattern-testing team, you should definitely check it out!
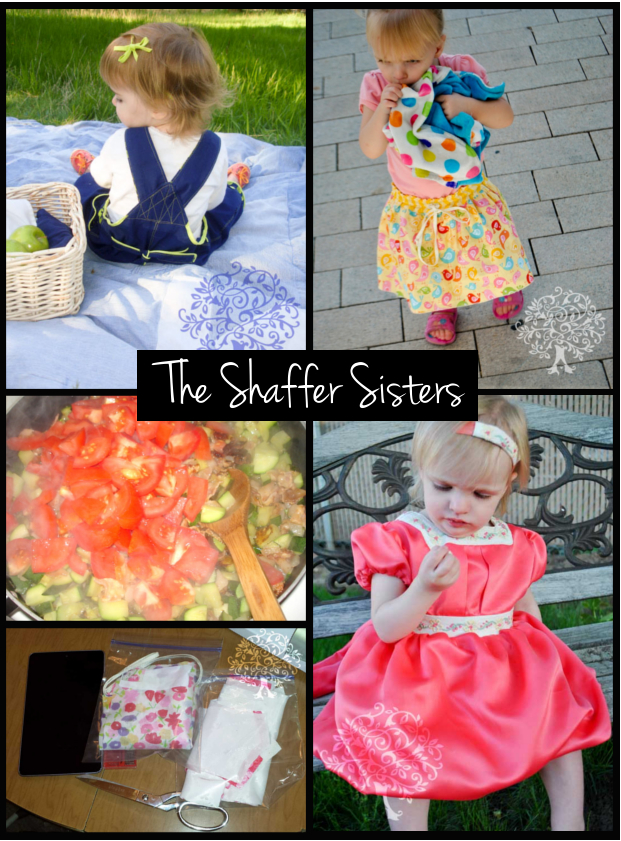 Scary sewed the cutest preppy Downtown V-Neck for her son, Ryder! To see it, simply click on the picture below.

The Jersey Love Blog Tour Day #2
Day two of the Jersey Love Blog Tour is here! Today, Rachael from imagine gnats and Caroline from Busy, Beautiful and on a Budget are ready to share adorable and comfortable clothes sewn with Riley Blake Designs’ Jersey Basics and my Jersey Love patterns!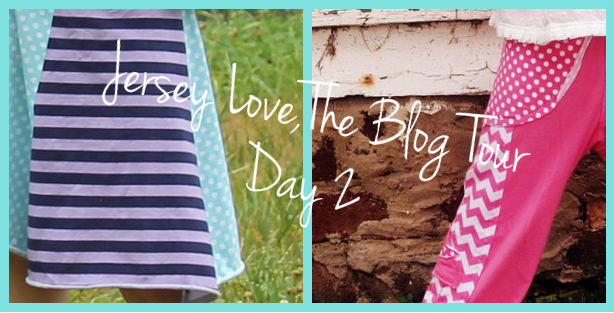 Rachael from imagine gnats is incredibly talented and so much fun! (And, the sweetest ever — I have loads of pictures to show you next Monday that she took for me at Spring Quilt Market!) I love that her girls always seem to be having as much fun as she is! Rachael sews everything you could imagine from clothes for her girls and herself (Don’t you love her Lady Skater Dress, complete with skating pose?) to beautiful hand-embroidered wall-hangings (Be sure to check out her free Sewing Sayings embroidery pattern!) to practical, but pretty accessories (I hope I can find time to sew her Cammy Pack before Fall Market!). Rachael has two patterns of her own now, the Roly Poly Pinafore and the Tumble Tee, and a third one coming soon!
 For the blog tour, Rachael sewed a Carnival Skort for her oldest daughter. Go check it out by clicking on the sneak peek picture below!
 I have known Caroline, the incredibly creative blogger from Busy, Beautiful and on a Budget, for years. (We met on an online sewing board for moms who sew cloth diapers. Pretty cool, huh?) I love that she shares such a wide variety of clever tips and tutorials on her blog that are fun, simple and practical. She has sewing tutorials like this adorable Mermaid Costume, storage ideas like Turning an Old Box into Beautiful Storage, organization ideas like her Housekeeping Binder, and party decor like this great Mermaid Party Photo Prop!
 Caroline sewed a pair of Runaround Pants for her oldest daughter. You’ll want to hop over to her blog and see how cute they are! Just click on the photo below.
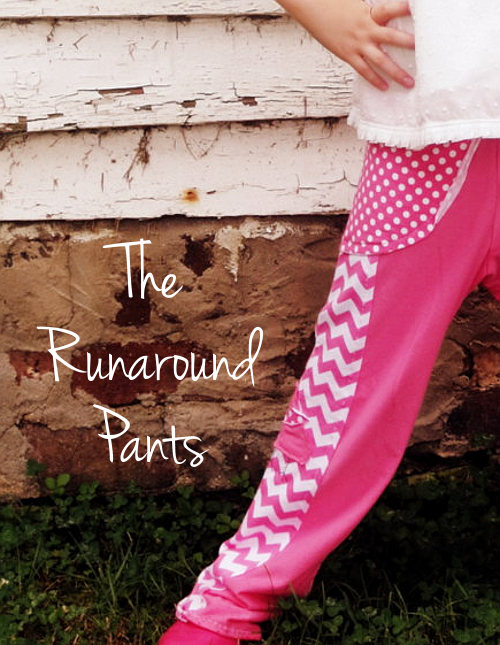
The Jersey Love Blog Tour Day #1
It’s Day One of the Jersey Love Blog Tour! Are you ready to see what these ladies have been sewing with Riley Blake Designs’ Jersey Basics and my Jersey Love patterns? I can’t wait!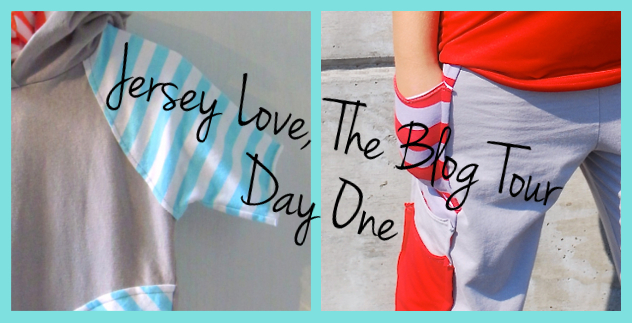 Our first two tour stops are at Call Ajaire and Rock the Stitch!
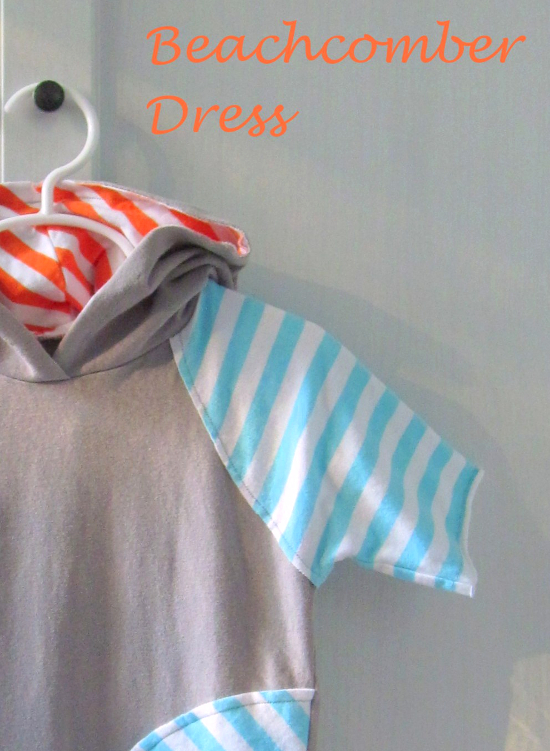
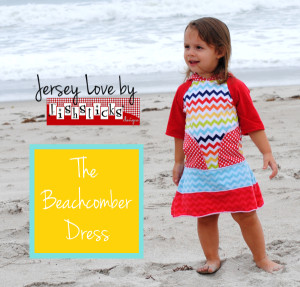
Ajaire sews the sweetest outfits for her 2-year-old daughter, Bean. Seriously. Her pictures make me want to sew a whole wardrobe for our 2-year-old granddaughter, Katie. Ajaire does amazing things with fabric, too — like the Lattice Smocking on Bean’s Birthday Dress and the multi-directional pleats on her Emily Carr Inspired Dress, and she shares how she did it on her blog! My current favorite project from Ajaire, though, is one she did for herself! Have you seen the Polo Dress Re-do that she shared during Make for Mom in May? I love it!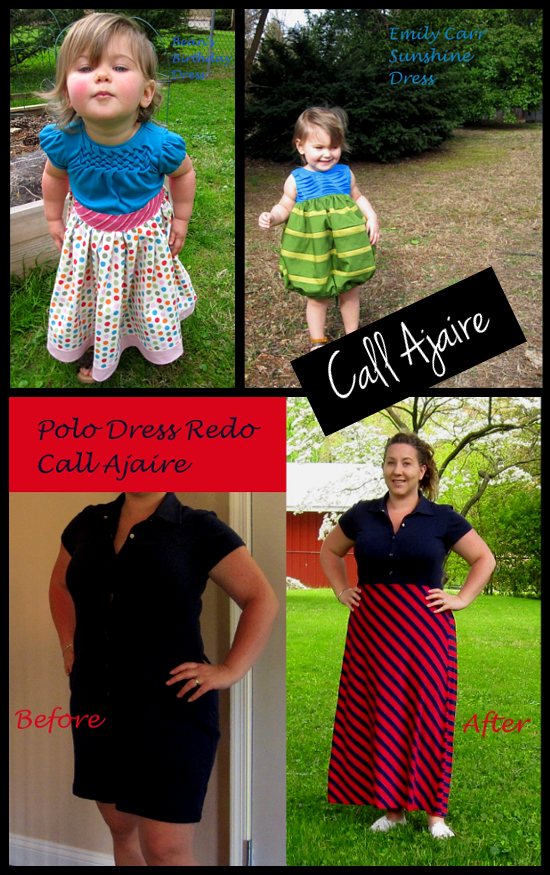 For the Jersey Love Tour, Ajaire sewed Bean a Beachcomber Dress! You can check it out by clicking the picture below!
 Rebecca from Rock the Stitch is a master at sewing stylish, modern clothing for her sons and her daughter! The outfits that she makes for her daughter are amazing, and I am in awe of the things she sews for her sons. Rebecca shares some great tutorials on her blog for modifying any pattern you might have on hand to give it that perfect finishing touch. For your boys, you can learn how to add a Chevron Stripe to an otherwise plain tee pattern or turn basic shorts into Hip Boardshorts. For your girls, you have to check out her guide to adding a Self-Bound Petal Cuff to capri pants and her free Peep Hem Dress Pattern!
 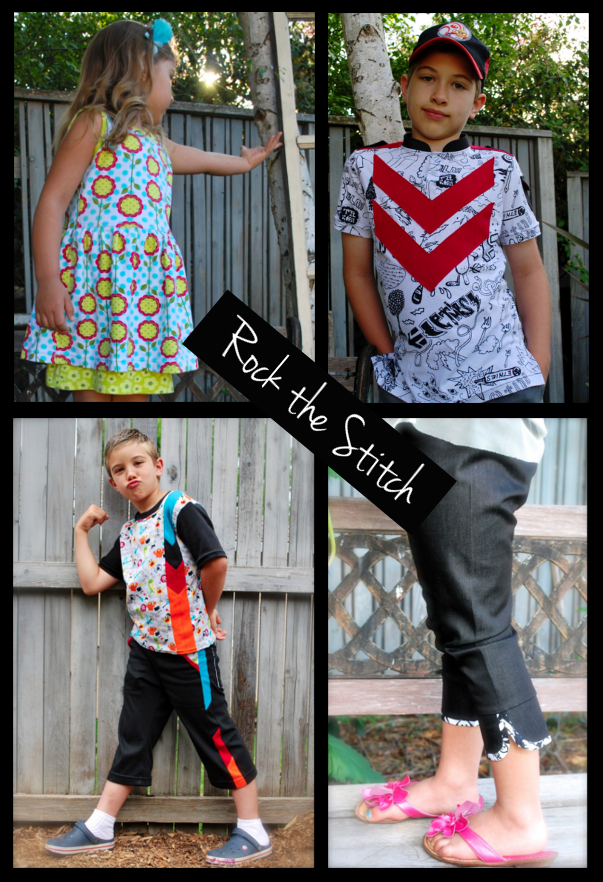 For the Jersey Love Tour, Rebecca sewed a pair of Runaround Pants for her oldest son. Go check them out on her blog right now by clicking the picture below!
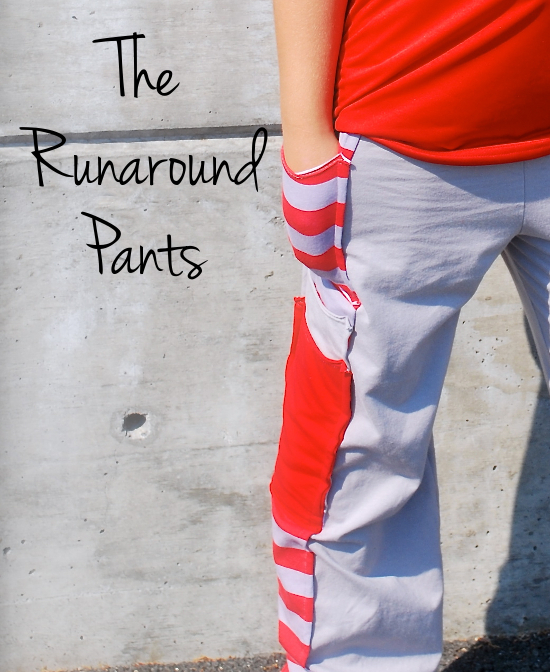
The Jersey Love Blog Tour Kick-Off!
 Guess what starts tomorrow morning?! The Jersey Love Blog Tour, that’s what! I am so excited about this group of sixteen amazing sewing bloggers who agreed to host the tour over the next two weeks! Each blogger chose a pattern from the first four patterns in my new Jersey Love series to sew and review, AND they each got to choose fabrics from Riley Blake Designs’ new Jersey Basics line to use for their projects! Huge, huge thanks to Riley Blake Designs for sponsoring this tour by providing fabric to all of the bloggers!

My goal with this series of patterns is to get all of you sewing these great designer cotton/spandex stretch jerseys. While they may seem intimidating at first because they stretch and roll, with a little bit of guidance and a pattern that uses those things to its advantage, I think you’ll fall in love with sewing them! Your little ones are definitely going to love wearing them. They’re so comfy. They totally let kids be kids!
In fact, I have a few pictures to share that demonstrate that fact quite well. As you can see from the pictures above, we had several onsite photo shoots for this group of patterns. The day we went to the beach I thought I would dress my boys in outfits from this line and get pictures of them with my 2-year-old Beachcomber Dress model. I had grand plans for beautiful images for the front page of my website. The weather was overcast and still — just perfect for beautiful photography. 2-year-olds and 3-year-olds, however, really just don’t care much about standing still and being cooperative when they’re at the beach. It’s far more fun to throw sand, and that’s what they did . . . pretty much the entire time we were there.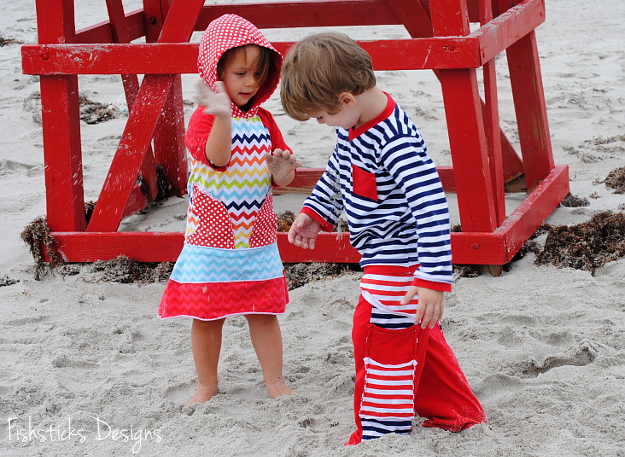 You just have to laugh, right? These clothes are made for playing!
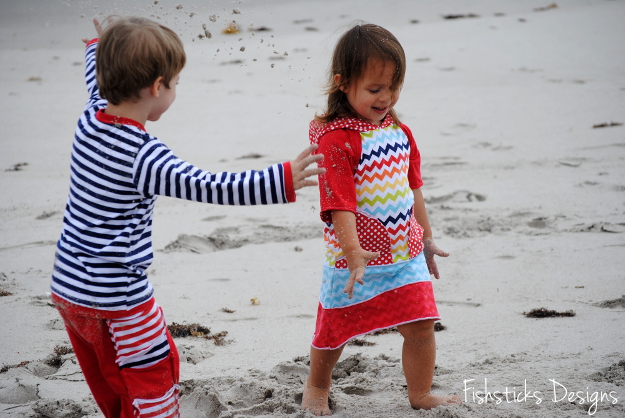 Ready to see the Jersey Love Blog Tour line-up? It’s a great one! You’re going want to stop in and see every one:
Tuesday, 8/13: Call Ajaire & Rock the Stitch
Wednesday, 8/14: imagine gnats & Busy, Beautiful and On a Budget
Thursday, 8/15: Shaffer Sisters & Blue Susan Makes
Friday, 8/16: Rooibos Mom & Mama Says Sew
Tuesday, 8/20: Designs by Sessa & Hopeful Threads
Wednesday, 8/21: Making More with Less & Sew Can She
Thursday, 8/22: Crafty Hour & Winter Wonderings … Wanderings & Whatnot
Friday, 8/23: Little Kids Grow & Max California
The Indygo Junction Casserole Carry-All Review & Giveaway!
 I am so excited to share this cute casserole carrier with you guys! As fall approaches and the kids start back to school (or homeschool, in our case), opportunities to enjoy potluck-style gatherings start popping up all over. We always seem to be grabbing our dish from the oven and wrapping it up with all the dish towels we can gather to transport it to our dinner. You’d think that I would have made one of these long ago, wouldn’t you?
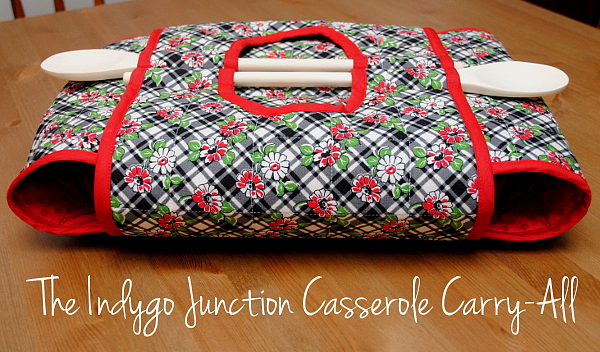
When I got an email from Indygo Junction asking if I’d like to try out one of Amy Barickman’s new patterns, I was so excited to see the Casserole Carry-All! Actually, I was really excited until I realized that it’s sewn with bias tape. If you’ve been around me much, you know that I sort of view bias tape as my sewing arch-nemesis. I loved the design of this pattern so much, though, I decided to give it a try. The way I figured it, if I could make it through sewing this casserole carrier without losing my patience, I could tell you in all honesty that this is a great pattern! I’m happy to report that not only did I make it through with my patience in tact, I enjoyed sewing it, AND I’m planning to make at least one more!
The pattern and instructions are really straight-forward and easy to follow. I used one of my handy-dandy Frixion pens to draw the quilting grid on the inside layer.
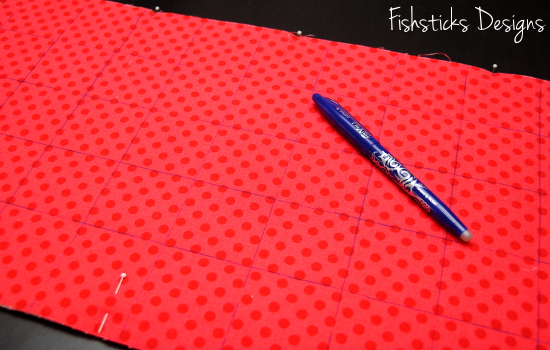 And, with a swipe of my hot steam iron after quilting, the marks were gone! (Do be careful with using Frixion pens on things that won’t be washed and might be subjected to cold temperatures. That ink that disappeared can sometimes reappear if it’s not washed away before being exposed to really cold temperatures. No worries about that at all with this project!)
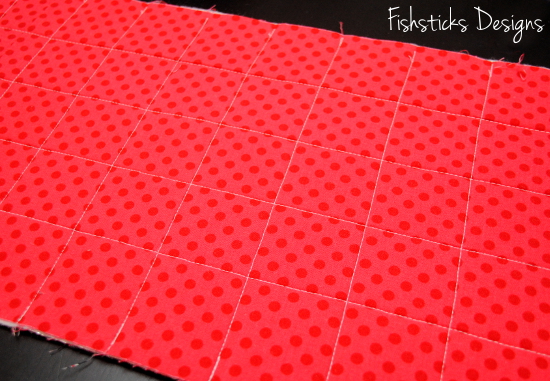 The only place that I had a problem wasn’t even related to sewing, it was with finding spoons the right length! I assumed that the long-handled wooden spoons in my kitchen would work, but the handle wasn’t quite long enough. You can see in these pictures that the loops the spoons pass through are sort of squished together and the handle only comes out a tiny bit. My spoons are 14″ long total, and I really needed 16″ long ones. I searched all over town and didn’t turn up a single one long enough. Amazon is coming to my rescue, though, with a set of 16″ long wooden spoons that are on their way to me right now!
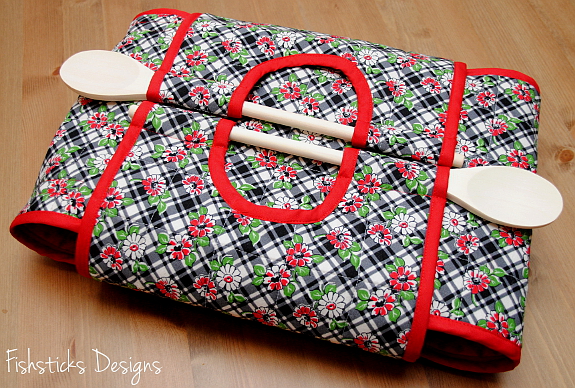 I love that this casserole carrier has multiple layers of hook & loop tape so it works for a 9×13 rectangle dish or an 8×8 square dish. You just open it up, center your dish on it, fold over the long ends and fasten the hook & loop, then fold the spoon-handles up and you’re ready to go!
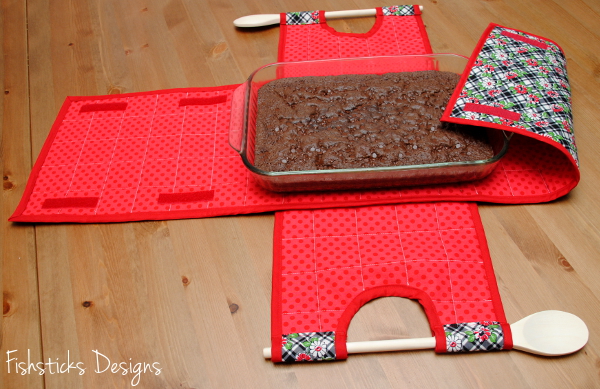 The casserole carrier is also lined with insulated fleece, so when you need to hold it in your lap on the ride to the potluck, you don’t have to worry about burning yourself! Nice, huh? (Oh, the dish above? That’s the gluten-free, real-food brownie recipe that I’ve been experimenting with! I think it’s finally ready to share with you. You’ll have to check back next Saturday to find it!)
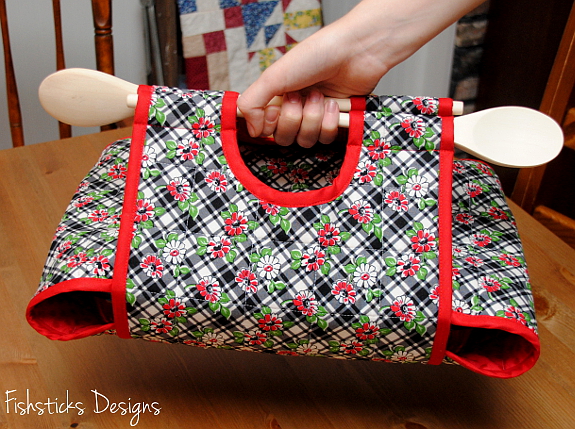 Indygo Junction didn’t just send me one pattern, by the way. They sent me two! I get to give away the second one to one of you! But that’s not all! Since I was already ordering 16″ long spoons for my Casserole Carry-All, I ordered a second set to go along with the pattern to the winner!
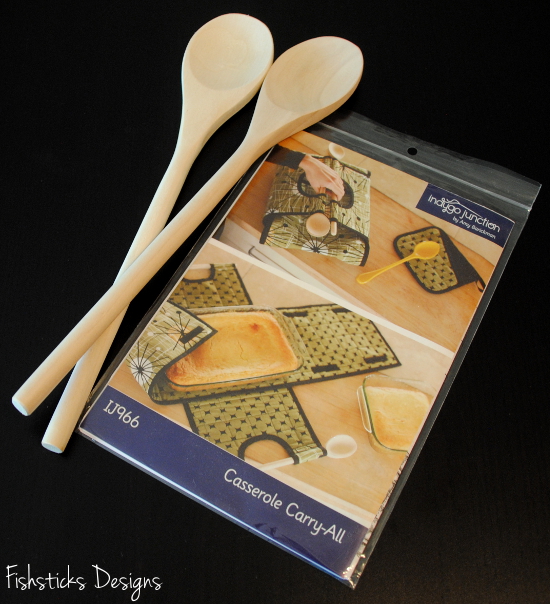
GIVEAWAY IS NOW CLOSED!
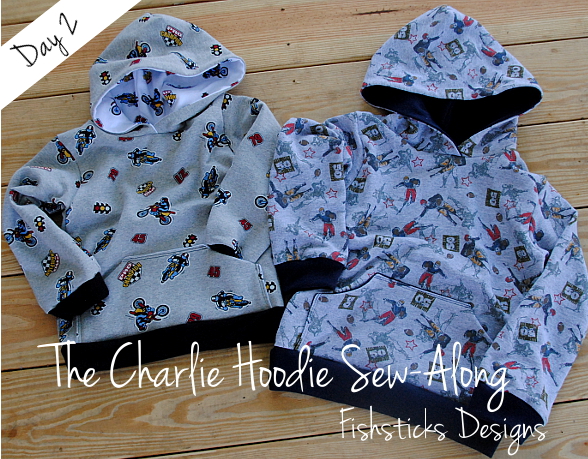
The Charlie Hoodie Sew-Along Day 4
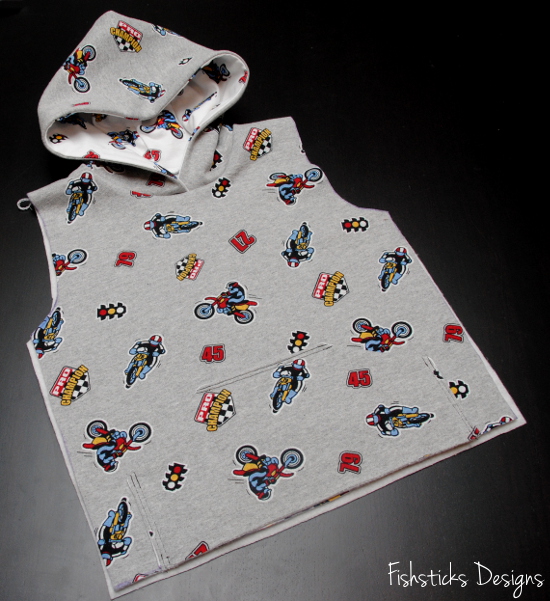
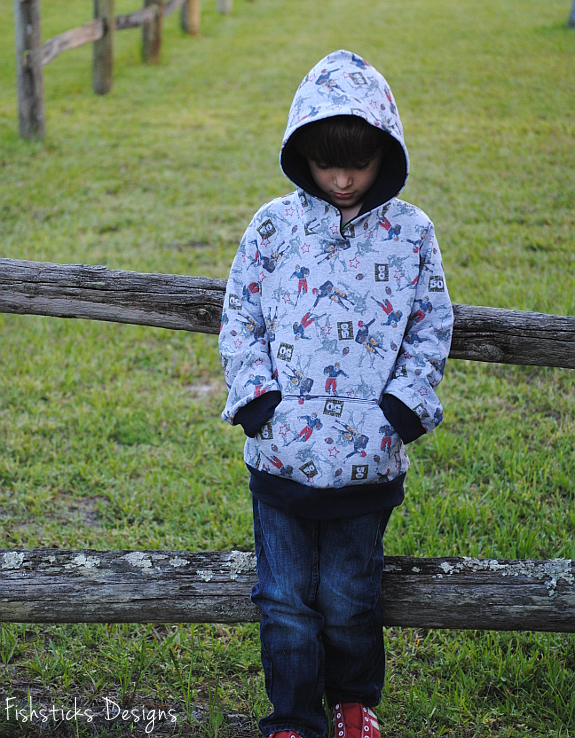
 It’s the last day of the Charlie Hoodie Sew-Along! Are you ready to finish up? If things at your house are like they are at mine, you’ve got a little one jumping up and down waiting impatiently for his motorcycle hoodie . . . and he doesn’t even care that it’s 98 degrees outside! He’s going to wear it all day!
Grab your hoodie and flip it so that the right sides are together and the sleeves and sides are aligned. Pin along both sides, being careful to line up the underarm seams and the ends of the sleeve and body pieces nicely. Sew or serge up both sides, around and under the arms, then down the bottom of the sleeve. 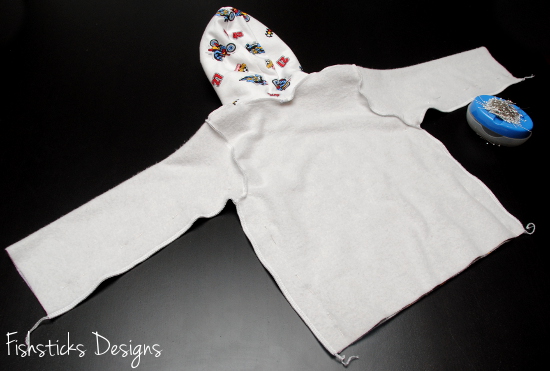 Flip it right side out and make sure that everything looks the way it should, then turn it inside-out again so you can add the sleeve cuffs and waistband..
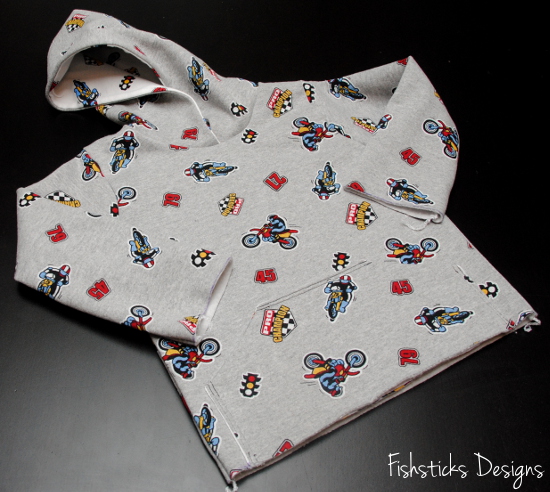 Place your two waistband pieces right sides together. Pin along the short edges, and sew or serge each end.
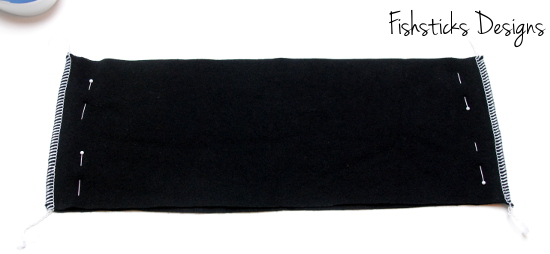 Flip the waistband in half the long way so that the wrong sides are together and the raw edges are aligned all the way around.
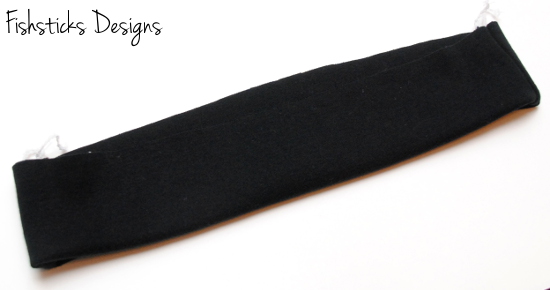 Slide the waistband inside the bottom edge of the hoodie and line up the raw edges. Match up the seams of the waistband with the side seams of the hoodie, and pin the waistband in evenly.
 Take your hoodie over to your sewing machine or serger and sew in that waistband.
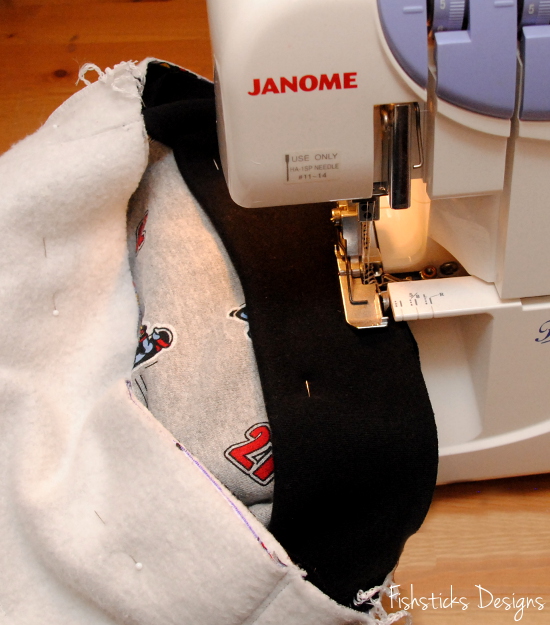 Fold each of the sleeve cuff pieces over so that the short sides are matched up and the right sides are together. Pin and sew or serge the pinned edge.
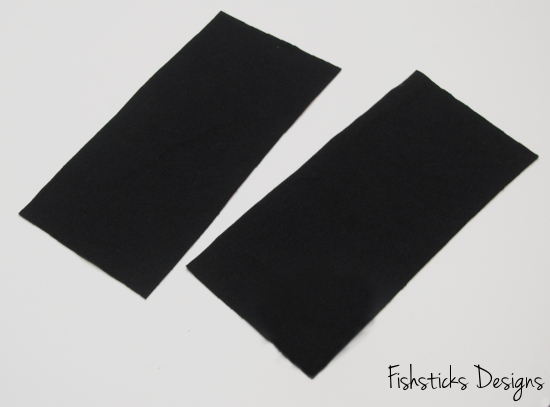
 Fold the cuffs in half the same way you did the waistband.
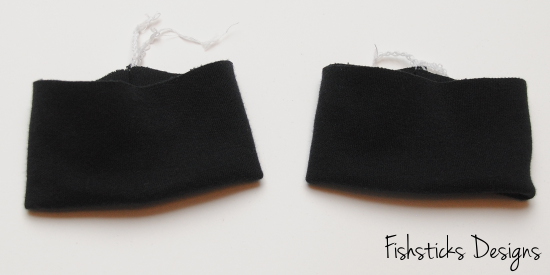 Slide each cuff inside a sleeve, matching up the raw edges and the seams. Pin them in place and sew or serge around.
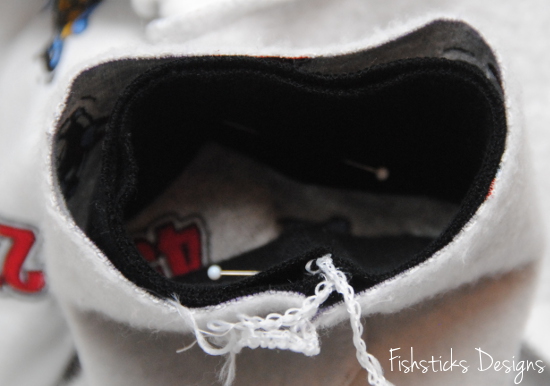 Flip your hoodie right side out and admire your finished hoodie! That wasn’t hard at all, was it?
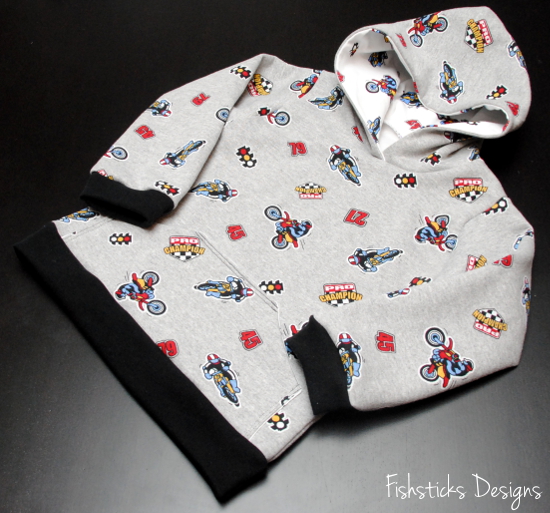 Now it’s time to try it on your little one and take him or her outside to get pictures. If you live in Florida, and it’s 98 degrees outside and you’ve only lived in your house a few months and your neighbors all seem to be out walking, just smile and say, “Hi!” and pretend that they don’t think you might be a little bit crazy for taking pictures of your little ones in hoodies in the middle of the summer.
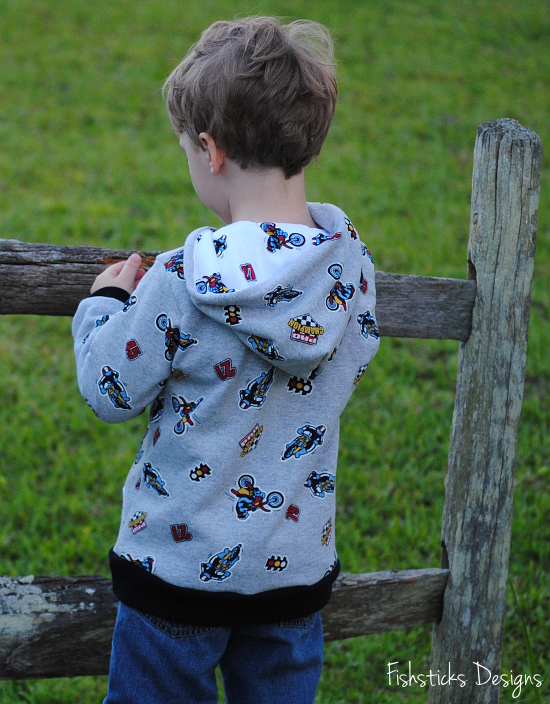
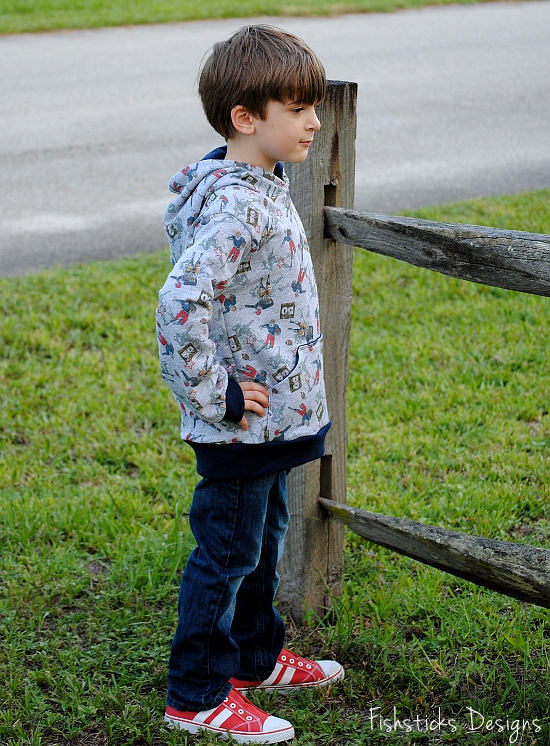
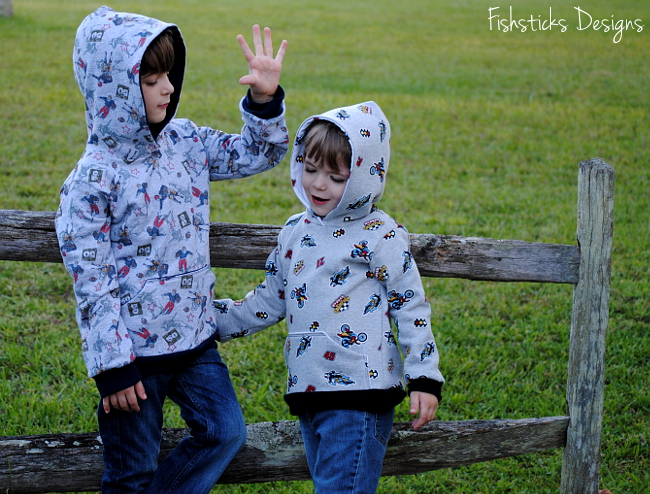 Aren’t they cute?!
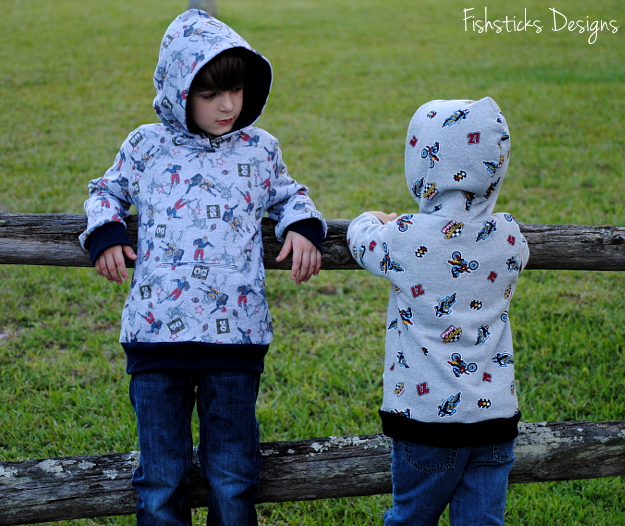 They both love their hoodies, and I’m excited that they seem to have enough growing room in them that they should get plenty of use this winter.
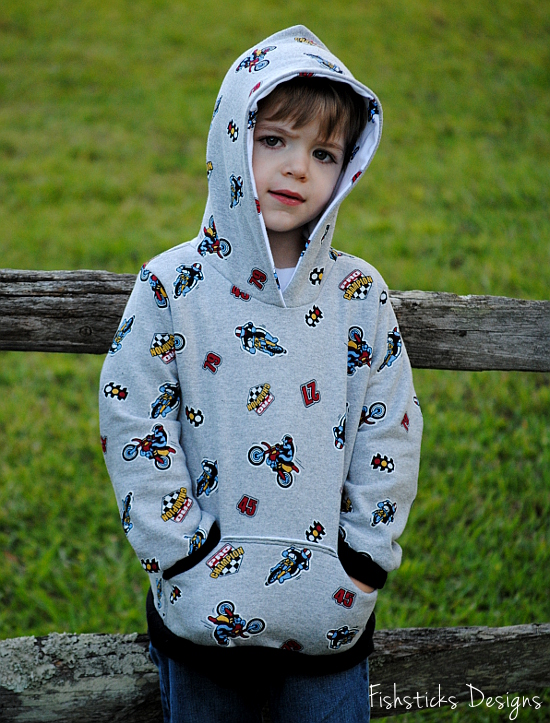
 I really love how fast and easy these are to sew. My favorite thing about them, though, is that because they’re outerwear, they’ll get a ton of use! It’s always nice when you spend time sewing something to get to see it in use a lot!
 Thank you so much for sewing along the last two weeks! Be sure to come share your finished hoodies with us in the Fishsticks Designs Sewing Group or the Fishsticks Designs Flickr Group! I can’t wait to see them!
The Charlie Hoodie Sew-Along Day 3
 Today’s task is quick and easy. If you followed along with last week’s Charlie Tee Sew-Along at Pattern Revolution, it’ll be even easier! We’re going to add the sleeves to our hoodies.
Grab those sleeves and fold them in half to find the center of the curved edge. You can mark this with a disappearing or washable marker. I just press down there with my iron to mark the center.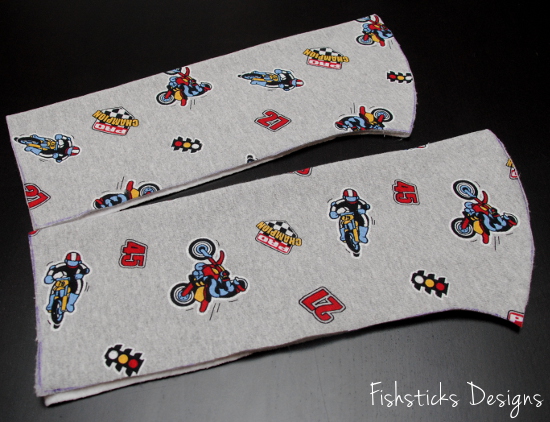 Match that center mark on one of the sleeves with one shoulder seam and pin in place with the right sides together.
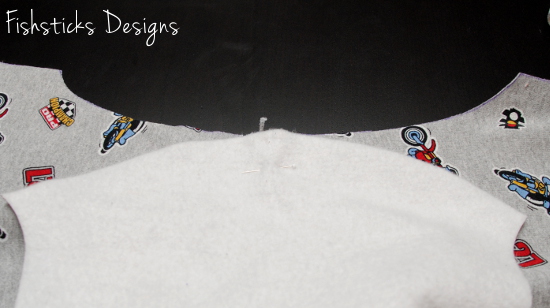 Pin each end of the sleeve to the ends of the sleeve curve.
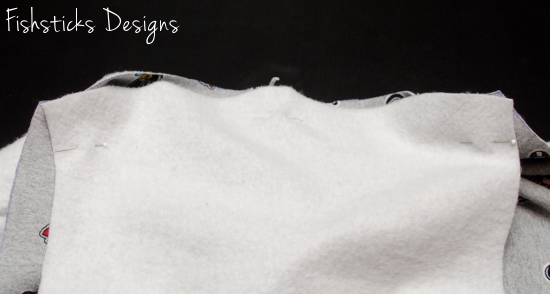 Ease the rest of the sleeve around the curve and pin it into place. You may have to stretch the sleeve a tiny bit to get it to go in nicely. Repeat with the other sleeve. Sew or serge in the sleeves. I prefer to sew on the sleeve side when I’m sewing knits so that I can make sure the curve of the sleeve falls nicely into the curve on the shirt.
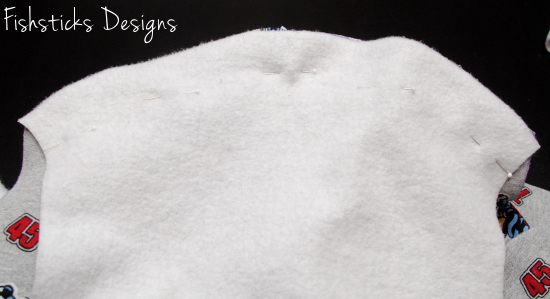 Flip your hoodie right-side out and see what you think so far! We’re going to finish up tomorrow by sewing up the sides and adding the waist- and arm-bands.
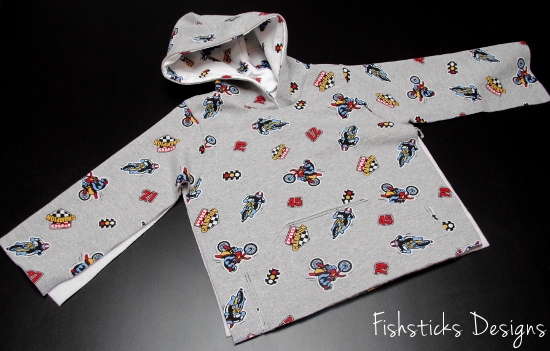
The Charlie Hoodie Sew-Along Day 2
 It’s Day 2 here at the Charlie Hoodie Sew-Along! How did your pocket sewing go yesterday? Ready to move on to the hood? Go ahead and grab the inner and outer hood pieces and let’s get started!
 Flip each one over so that the right sides are together and pin along the back curve. Sew or serge that pinned edge on both pieces.
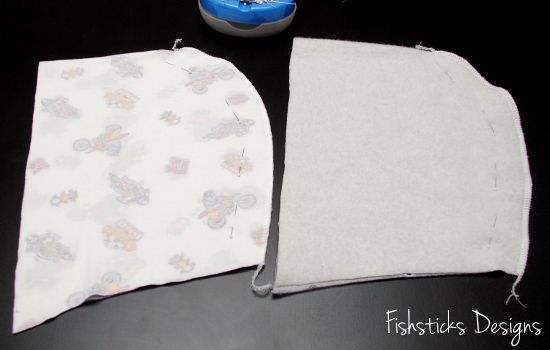 Now turn the hood inner right-side out and slide it inside the hood outer so that the right sides are facing.
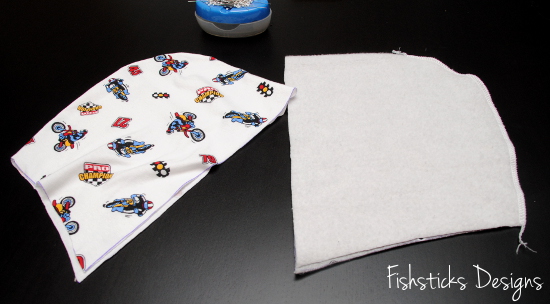 Pin the two hood pieces together around the front of the hood. Sew or serge around that pinned edge.
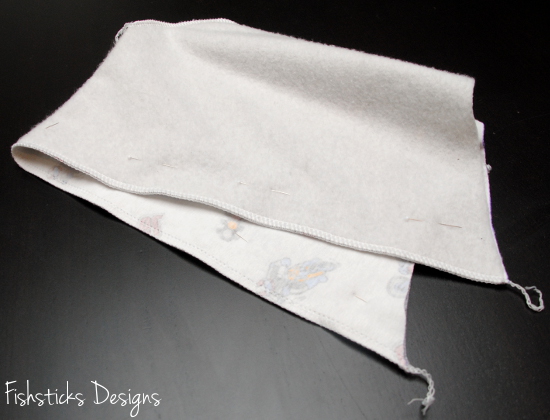 Flip the hood inner out of the hood outer, turn the pieces right-side out through the opening at the bottom, then push the hood inner back inside the hood outer. Now the wrong sides should be facing, and the right sides should be facing out. Press well all the way around the front edge of the hood. (You can topstitch this edge if you’d like.)
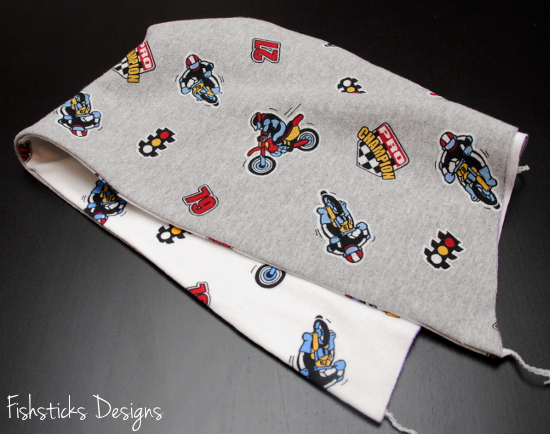 Now that your hood is ready, you need to sew the shoulders of your body pieces together. Place the front on top of the back with the right sides facing and line up the shoulders. Pin them in place and sew or serge across each one.
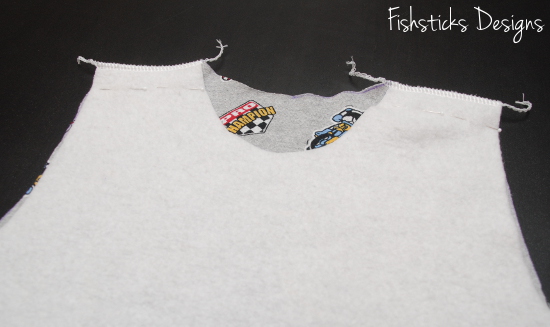 Before pinning the hood inside the neck opening, it’s a wise idea to find and mark the center front and the center back. The easiest way to do this is to pull the front and back apart, then fold the whole thing in half like this:
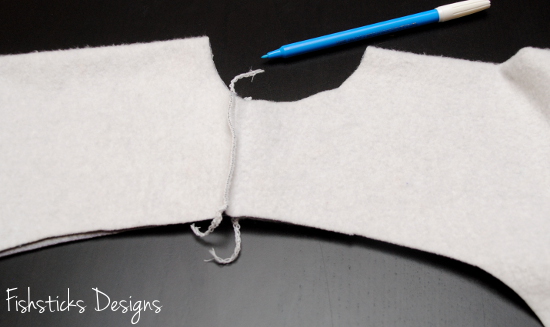 Now you’ll easily be able to mark those center points on both the front and the back with your washable or disappearing marker.
 With the hood right side out, slide the hood inside the neck opening. Match up the seam at the back of the hood with the mark you made at the center of the back of the neckline and pin. At the center front, overlap the front edges of the hood 1/2″ and pin in place. Pin the sides of the hood evenly.
 Sew or serge the hood in place. Remember that we’re using the standard 1/2″ seam allowance rather than the 3/8″ seam allowance that we used on the neckband of the tee. If you’re using a fabric like sweatshirt fleece or cotton french terry that has less stretch than most cotton knits, and you find later that you’re having a hard time pulling the hoodie on and off, you can go back and widen this seam allowance to give a little more room. Don’t do it unless you need to, and don’t go more than an 1/8″ wider! You will lose a little shoulder width and hood height. An 1/8″ won’t take away too terribly much, though, and it adds up quickly all the way around the neck opening. (If you need a picture of how I sew the hood in using my serger, check out this post that shows how I serge the neckband on the Charlie Tee: Charlie Tee Sew-Along Day 3. I sew my hoods in exactly the same way.)
Flip that hood out and admire how nice it looks!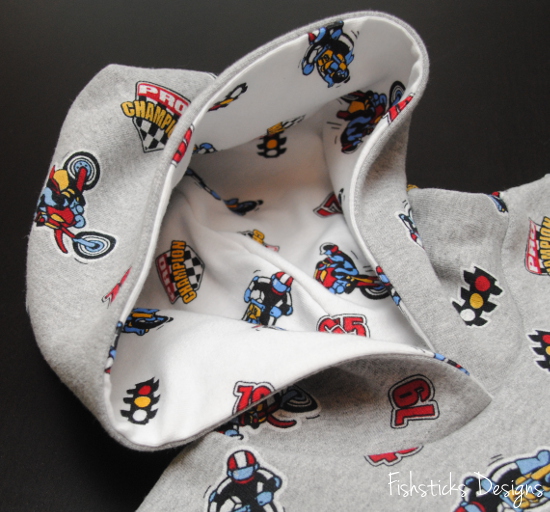 It’s starting to look like a hoodie already, isn’t it? We’re going to stop there today and move on to sleeves tomorrow!