The Runaround Pants for Boys & Girls
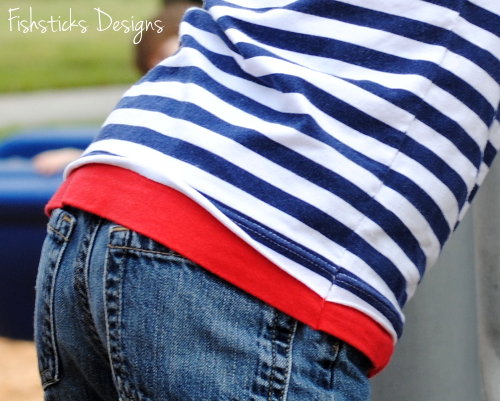
Wrapping up this set of four Jersey Love patterns is the Runaround Pants! Styled for both boys and girls, the easy wear and stylish look of these pants will make them a favorite for running around at playtime and snuggling up at bedtime.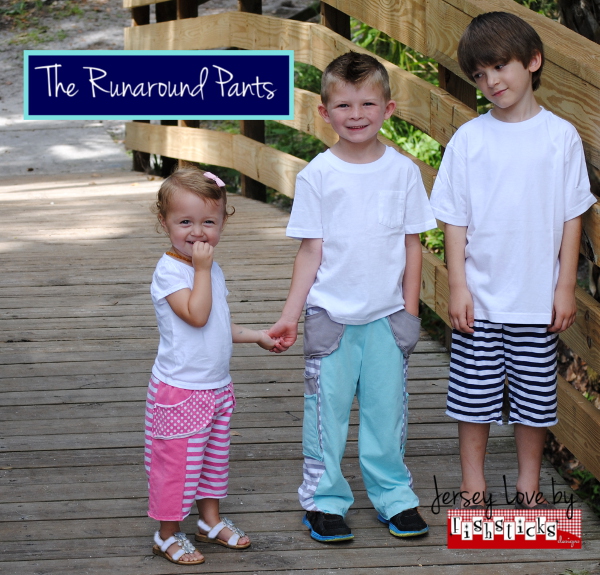 In sizes 12 months to 12, the Runaround Pants include an optional side stripe, curved front pockets and two side pockets. They’re sewn with a stretch jersey, no-elastic waistband.
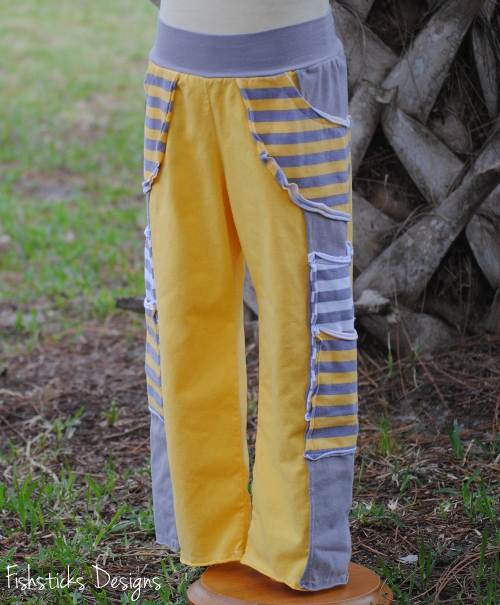 This pattern includes three different lengths: pants, capris and boardshorts. You can choose to spend a little extra time to sew them with all the options or be done in minutes by sewing them with with no options at all. (With no added options, these just might be the quickest pants you’ve ever sewn!)
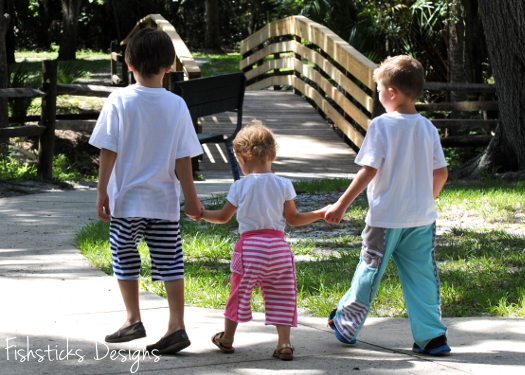 You’ll see those curled raw edges again on the pockets, stripes and hem of the Runaround Pants adding some modern style and playfulness to their finished appearance.
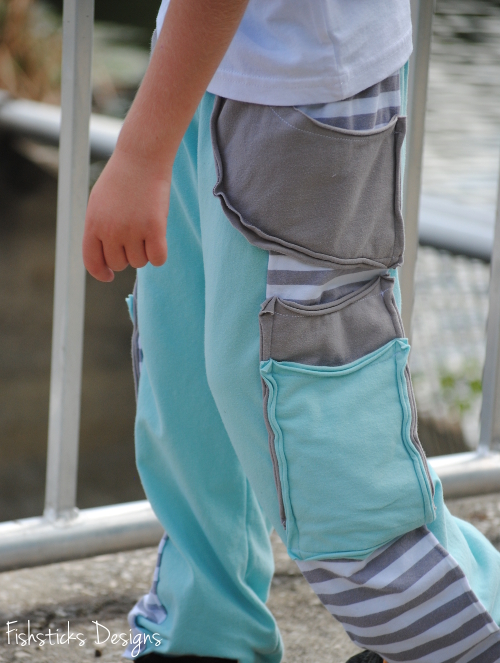 This is the last of my four new Jersey Love patterns! Are you ready to fall in love with stretch jerseys? Patterns will be released tomorrow! I still have a few finishing touches to add, so I’m not going to give a definite time yet. I’ll announce it here and on the Fishsticks Designs Facebook page as soon as they’re ready to go. And, to celebrate the release of these new patterns, there will be a discount code to use through the weekend on all of my patterns!
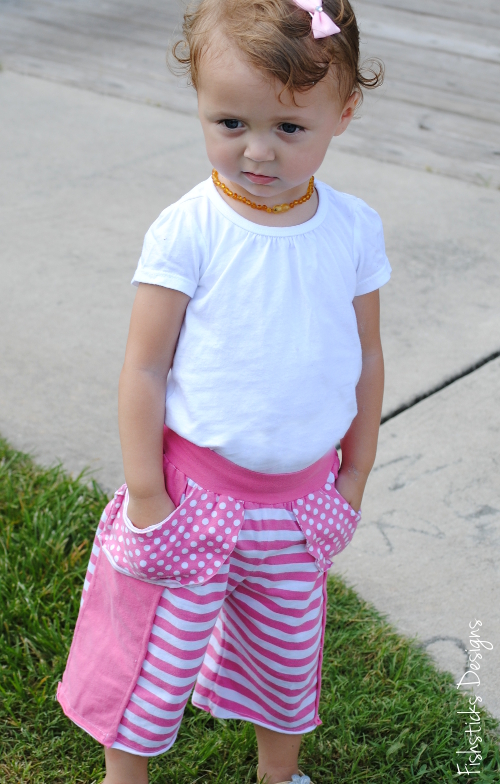
It’s the Beachcomber Dress!
Pattern #3 in this quartet of Jersey Love patterns is another little girl choice! The Beachcomber Dress is a casual, comfortable, playful dress that is perfect for digging her toes in the sand.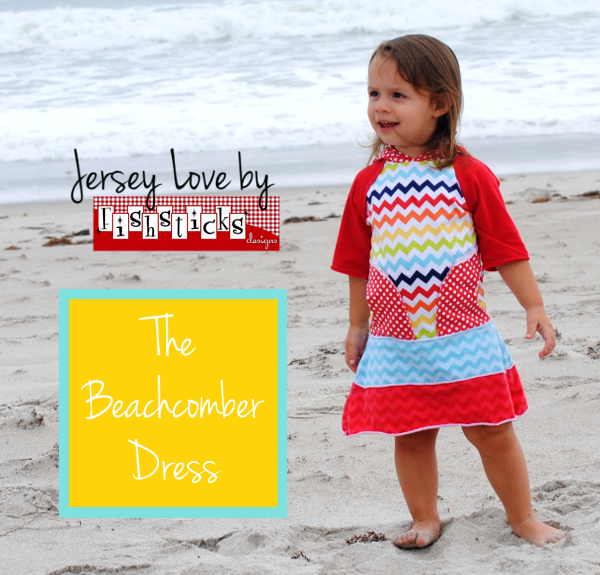 In sizes 12 months to 12, this hooded dress is designed to be sewn with stretch jersey or 100% cotton jersey.
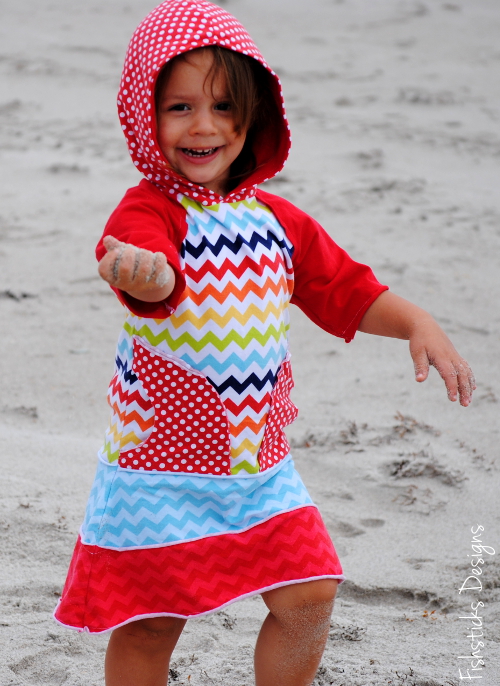 The Beachcomber Dress features a dropped waist, front pockets, a layered skirt and elbow-length raglan sleeves.
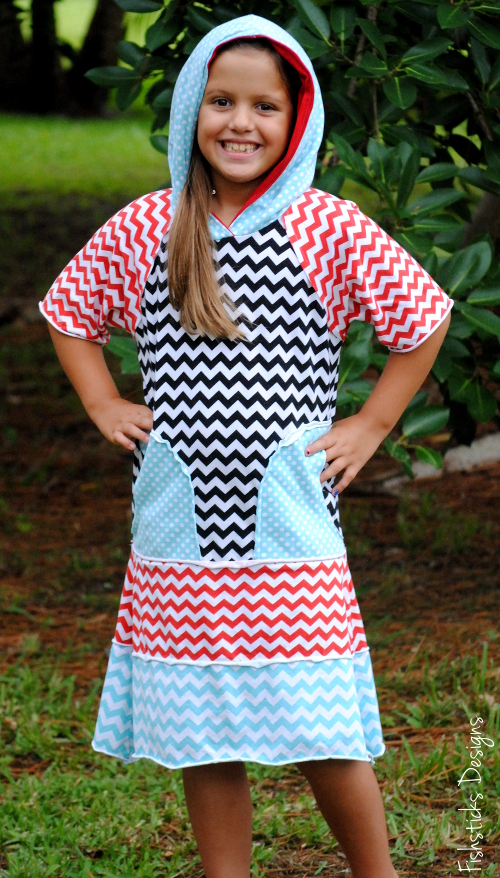 Like the rest of the patterns in this set, this dress shows off that great jersey curl on it’s raw edge seam allowances.
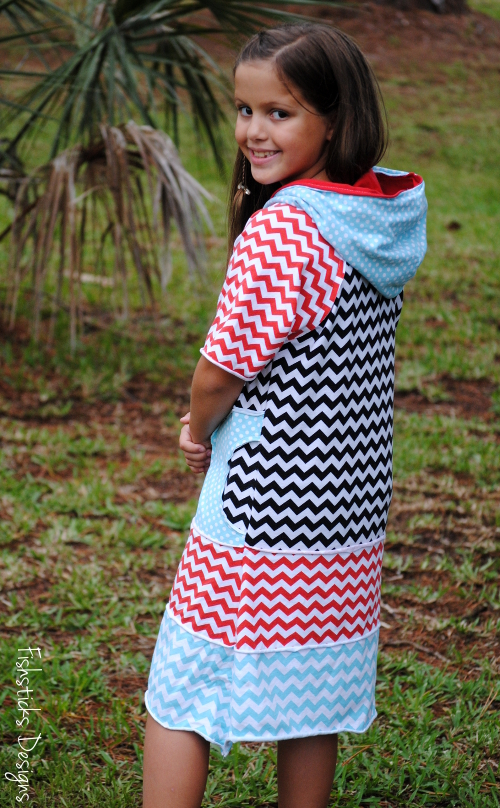 One more pattern left to reveal, and it’s great one that will work perfectly for boys and girls. All four patterns will be released tomorrow!
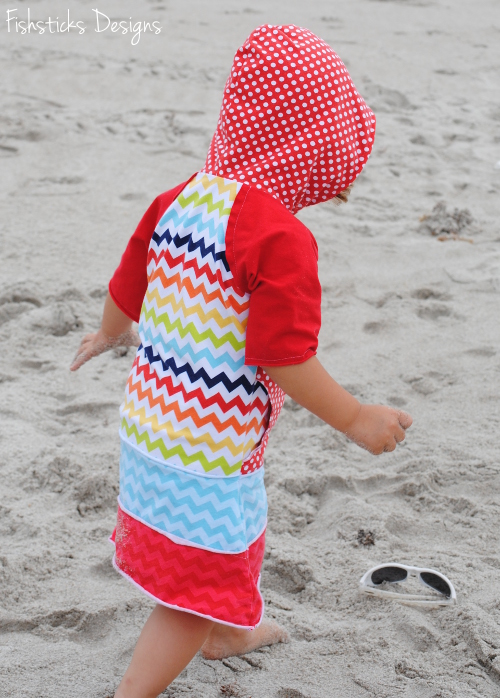
It’s Time to Meet the Carnival Skort!
Next in the Jersey Love series is the Carnival Skort! Little girls will be sure to love the playfulness of this skort while moms will appreciate both its style and its modesty. In sizes 12 months to 12, this cute little skort matches up a flared six-panel skirt with shorts that hide underneath. The Carnival Skort is sewn with a stretch jersey or ribbed knit (cotton/lycra or cotton/spandex) elastic-free waistband. The skirt and shorts can be sewn with any knit fabric, but jerseys are recommended for that great curl!
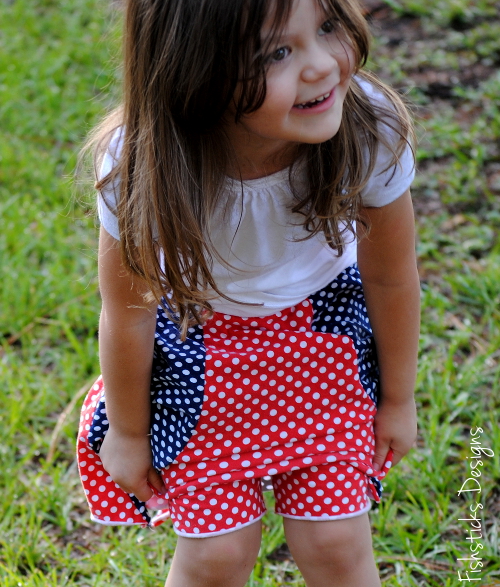 The Carnival Skort is a really quick sew, and it’s a great pattern for beginners who are nervous about sewing with knits. The skirt can be sewn with the raw edges of the panels on the right side . . .
  . . . or the raw edges hidden inside with the finished edges of the panels out. Both styles have a raw edge hem on both the skirt and the shorts.
 The Carnival Skort and the Downtown V-Neck and two other new patterns are set to be released on Friday! I’ll be sharing the other two patterns tomorrow. I can’t wait to hear what you think! (For more information about this series, check out the previous post: Introducing the Downtown V-Neck.)
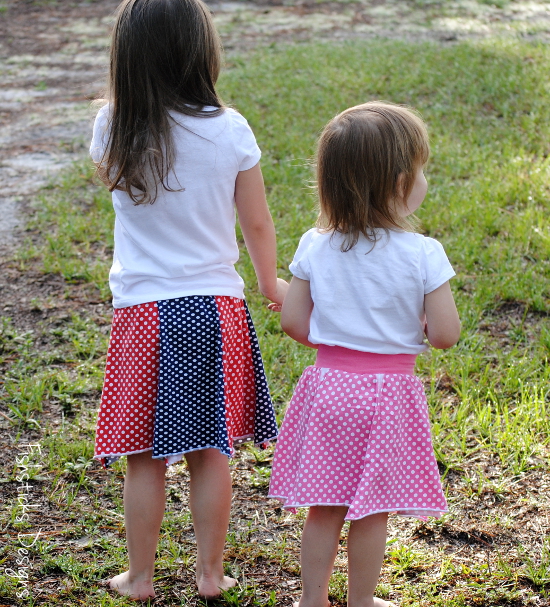
Introducing the Downtown V-Neck!
In just a few days, I’ll be releasing a set of four new patterns in a series called “Jersey Love”. Each of these patterns is designed to work perfectly with the designer stretch jerseys that are on the market now. (Each one also includes options for sewing with other knit fabrics, too.) I worked specifically with the beautiful new Riley Blake Designs stretch jerseys on these patterns, and I highly recommend them! There’s a huge selection, and they sew up beautifully! You can check them out right here: Riley Blake Knits.
First up is the Downtown V-Neck: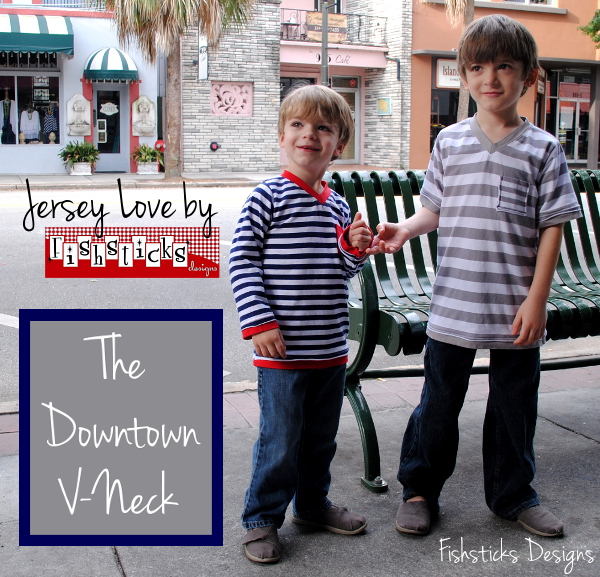 In sizes 12 months to 14, the Downtown V-Neck is the perfect casual, contemporary wardrobe staple for your little man! It’s at home whether his day takes him to a movie, dinner, church or the playground, or even all four.
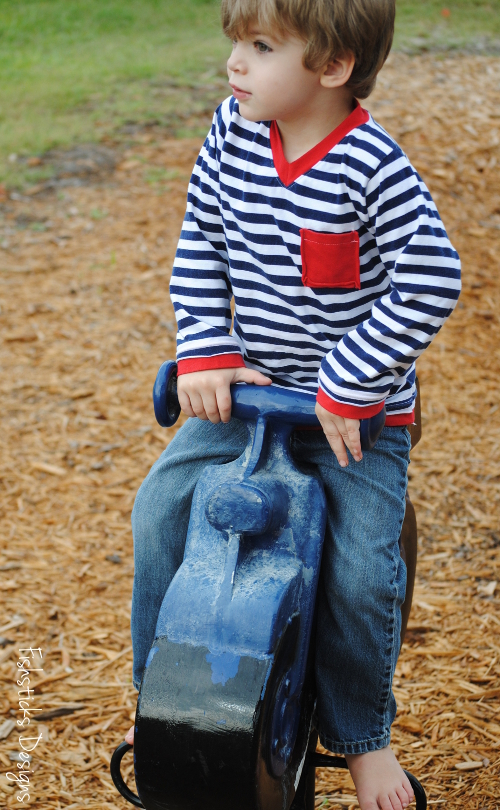 The Downtown V-Neck gives you the choice of short or long sleeves. No matter what the weather holds, you’ll be able to use this pattern all year long. You can also sew this top with stretch jersey or with cotton interlock.
 The Downtown V-Neck takes advantage of those curly jersey knit edges with raw edge finishes on the pocket and the hems. Those raw edges add some modern style and fun, as well.
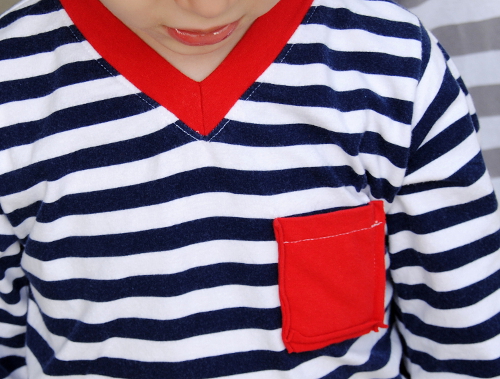
 The Downtown V-Neck and three other Jersey Love patterns are set to be released on Friday. I’ll be sharing the next pattern in the set late this afternoon!
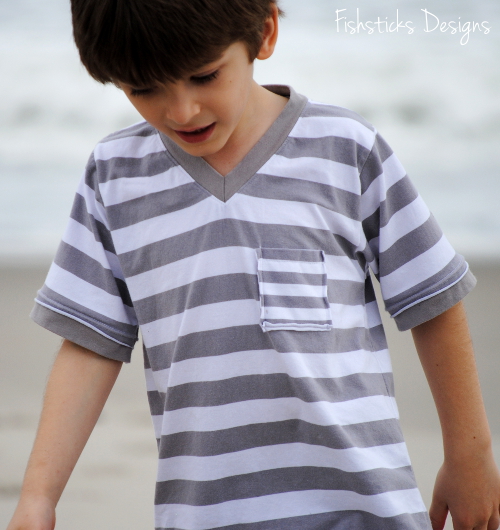
Boxer Briefs for My Little Guy
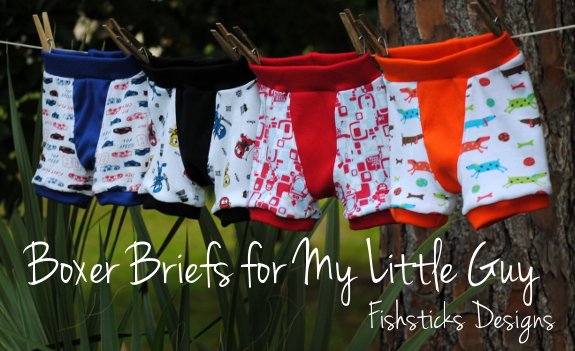 We’re pretty relaxed about learning to use the potty around here. I think having a big family and a busy schedule sort of leads to that. They all learn when they’re ready to learn. Charlie’s getting pretty close to making the transition to undies full-time so I thought some fun momma-made undies were in order!
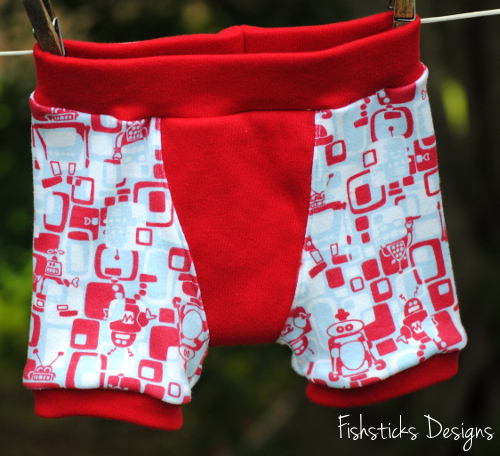 My Undercover Bottoms Boxer Briefs pattern is my boys’ favorite for comfortable underwear. (It also works great as PJ bottoms, and one of my customers just made it with swimsuit fabric for her daughter to wear with a rash guard at the pool!)
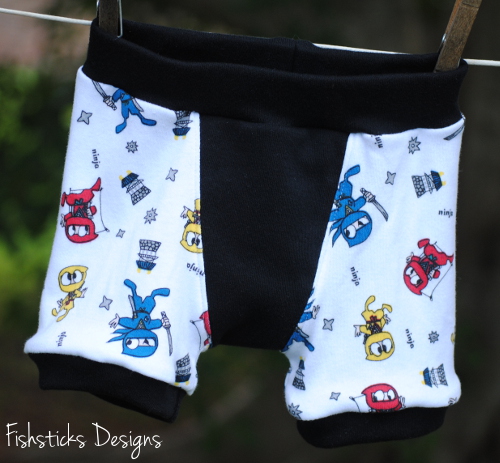 I made these without the optional fly opening, simply because they’re faster to sew that way, and Charlie doesn’t use it anyway. That built-in double-front layer is great, though, for little boys who still have occasional accidents. It also hides the seam between the front and back cod pieces which makes for more comfortable wear.
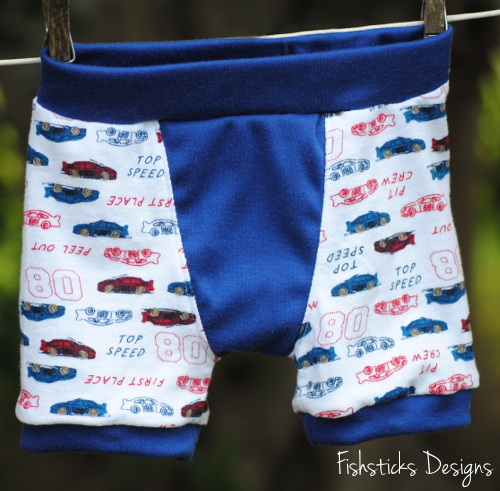 Charlie is really excited about these, and even for relaxed potty-learning, that is always a good thing! (Every mom knows that the more they like something the more likely they are to want to use it, right?)
 I’m adding these to the Summer Sewing for Family Project at Hopeful Threads. Kristy shared some fun pictures over there of the Buttons & Buckles Shortalls that she made for her little man last week, AND there’s a Fishsticks Designs Giveaway going on that you might want to check out, too! You still have some time to enter.
May Riley Blake Mystery Quilt Block – Selvage Spools
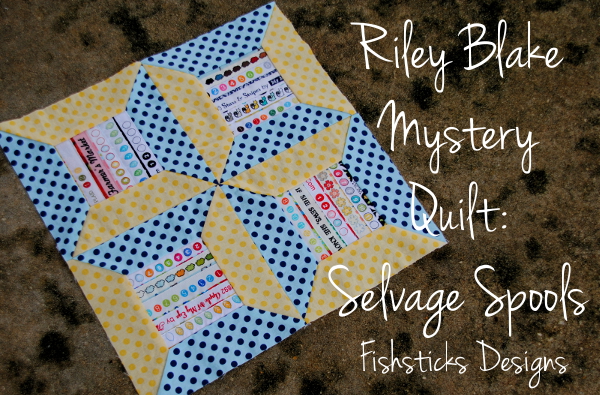 I’m almost caught up now! Woo-hoo! May’s Selvage Spool block is so cool, and the construction process was really fun!
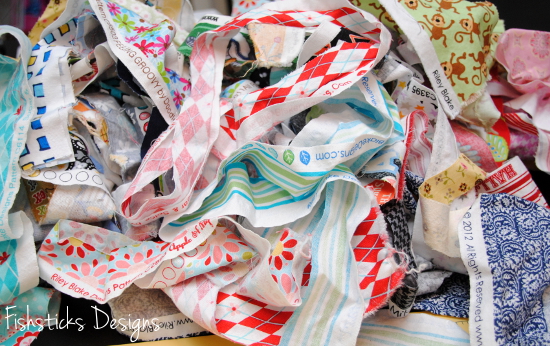 All those selvages and the blank solid squares waiting to be filled up were a little overwhelming, so I started by pulling out the selvage pieces that I knew wanted to use and cutting them down to a manageable size (4″). Before putting away the rest of the huge pile, I made a separate small pile of “maybes”. Once that was done, I was able to concentrate on arranging my selvages.
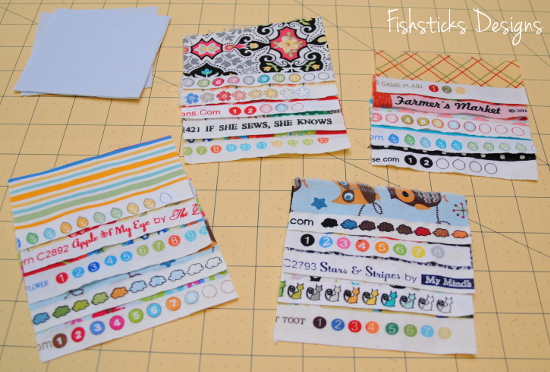 A little note here: the video for this block says to use a 3 1/2″ square, but the pdf says 3 1/4″. Your selvage square does need to be 3 1/2″ in order to get the correct finished size. Riley Blake is working on correcting the pdf. In the meantime, if you’re behind like me and still working on this block, be sure not to cut that square too small! You’ll also need to enlarge the spool end template. I did this by printing at 106%. My completed selvage spools came out with about 1/8″ to trim off and square up on each side.
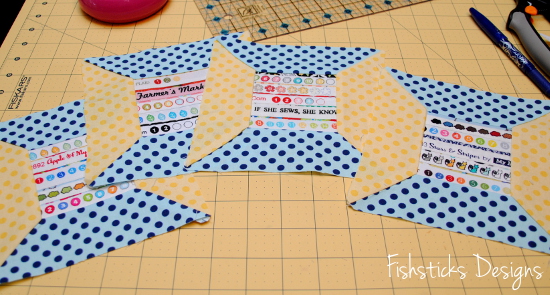 I think this block is my favorite so far! A whole quilt made up of these would be perfect for display in a sewing studio or as a gift for someone who loves sewing.
 Here’s my whole set so far. June’s block is another needle-turned applique. Should I just take a deep breath and actually try it this time? I suppose the worst that could happen is that I don’t like it, and then I at least tried it, right?
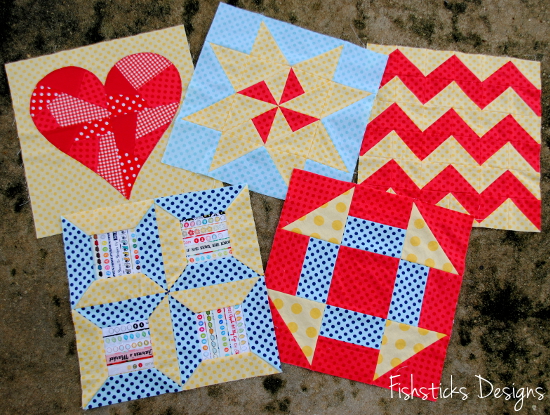
Hopeful Threads Family Month Guest Post
 I’m guest posting over at Hopeful Threads today! Come read my thoughts on creating for family, leaving a legacy and little imperfections: Family Month Guest Post.
The No-Buttonholes-Needed Drawstring Tutorial
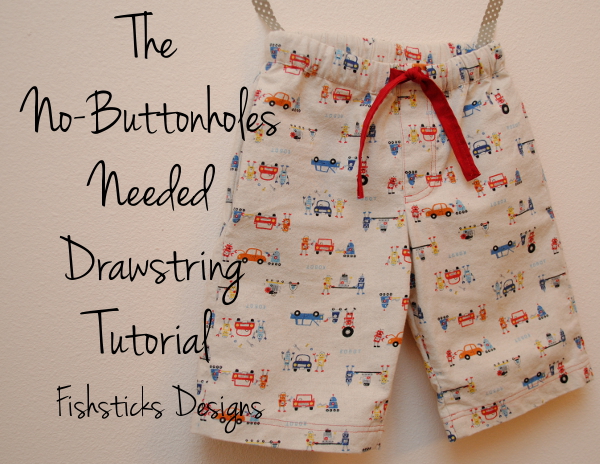 Ready to sew up some cute shorts for your little guys this weekend? As promised, here’s my No-Buttonholes-Needed Drawstring Tutorial so you can give your Mud Puddle Splashers that great boardshort look! (You can really use this tutorial with any pants pattern that uses 1″ elastic pulled into a channel that is created by folding over the top of the waist.) If you missed yesterday’s post, just click here to go back and see my cuties modeling their new shorts.
An important note here before we move on: please be careful to keep your drawstrings safe! On items sold for children here in the US, the law allows for a waist drawstring to extend only 3″ past the opening when the garment is expanded to it’s maximum width: CPSC on Drawstrings in Children’s Clothing. Also, always be sure to secure the drawstring by stitching across it at the back or side seams so that it cannot be pulled out. Finally, don’t tie knots or add toggles to the ends of your drawstring.
In this tutorial, we’ll be creating two separate channels, one on the inside for the elastic and one for the outside for your drawstring. This method does take a bit more time than just putting in a few buttonholes and feeding the elastic and drawstring through the same channel. It’s probably not something that I’d want to do every time, but it’s not difficult at all, and it adds a fun new design element to your shorts. (And, it’s a great option if your machine doesn’t have an automatic buttonholer!) Let’s get started!
To begin, you’re just going to follow the pattern instructions to completely assemble your shorts or pants except for the waistband. If you’re using the Mud Puddle Splashers pattern like I am here, skip the memory creases on the waistline.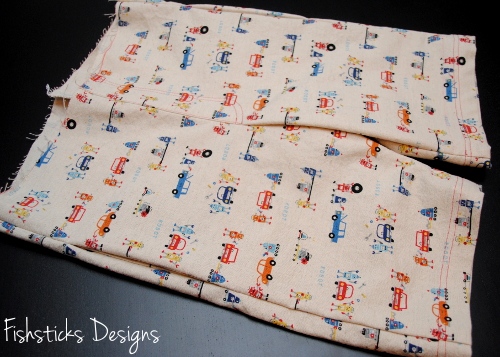 Measure the waist. (A flexible tape measure is probably a better choice for this, but mine has mysteriously disappeared.) The waistband on this pair of shorts measures about 26″ all the way around. Write this measurement down because you’ll use it again later to find the length of your drawstring.
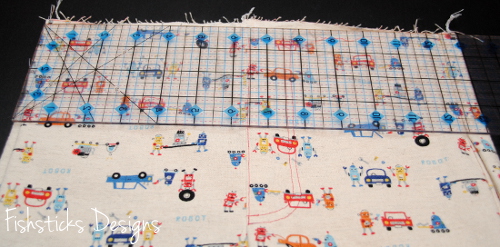 Cut a piece of fabric to make your waistband channel. This piece of fabric should measure 2″ x the measurement you just took of the waist of your pants.
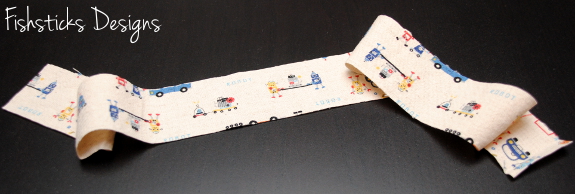 Fold in each short end 1/4″, then 1/4″ again. Press and stitch across to secure.
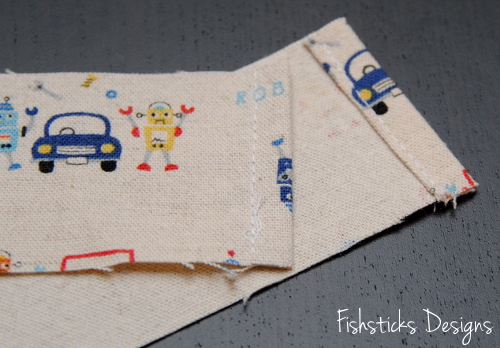 Fold up the bottom edge of the drawstring channel piece 1/4″ to the wrong side and press well all the way across. (Do not sew this down yet.)
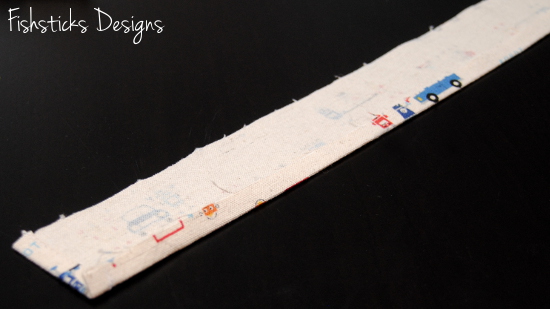 Fold the waistband of the pants down 1/4″ to the wrong side and press well all the way around. (Do not stitch this either.)
 Fold your drawstring channel piece in half the long way and find the center. (I generally just press down at the center quickly with my iron, but you can also mark the center with washable or disappearing marker.) Match the center of the drawstring channel up with the back center seam of the pant. Pin in place here, right sides together, with the folded edges of the drawstring channel and the folded edge of the waistband aligned.
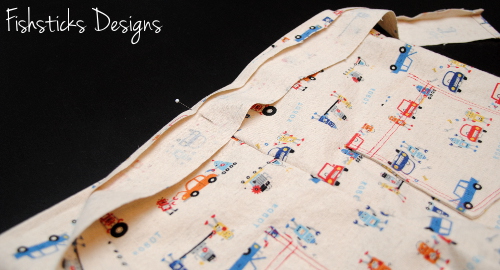 Wrap the drawstring channel around the front of the pants and pin it in place. (You only need a few pins for this step because you’re going to re-pin along the lower raw edge before sewing.) The front ends of the drawstring channel should fall about 1″ apart or 1/2″ from the center front seam of the pants. (Mine are a little further apart because my waistline measurement wasn’t as accurate as it would have been with a flexible tape measure.)
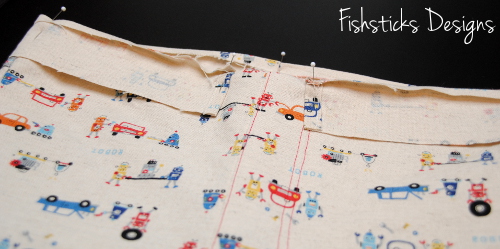 Pin the lower raw edge of the drawstring channel evenly all the way around the pants.
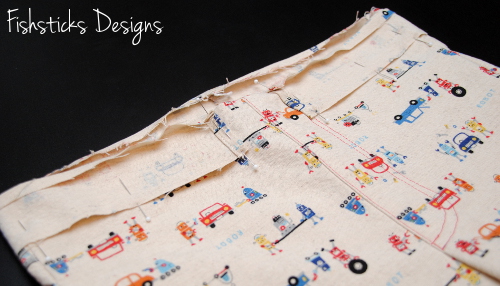 Stitch the lower edge of the drawstring channel in place 3/8″ from the raw edge as shown.
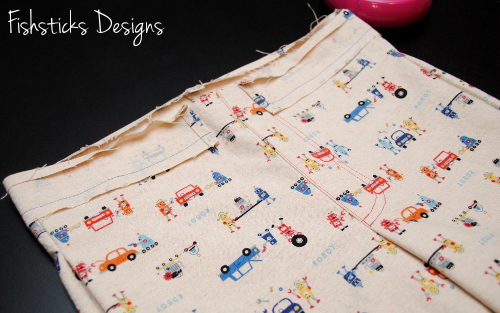 Fold the drawstring channel down away from the top of the waistband and press all the way around.
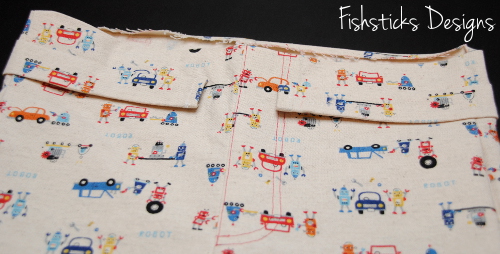 Fold the waistband down inside the pants. Fold the top 1/8″ of the drawstring channel to the inside, as well. This will make the bottom of the inside elastic channel fall slightly lower than the bottom edge of the drawstring channel, in turn making it much easier to catch both edges with one row of stitching. Press the waist really well before moving on.
 If you’re adding a size tag, now is the time to pin it in the back edge of the elastic channel. (I leave this pin in place and just sew over it.)
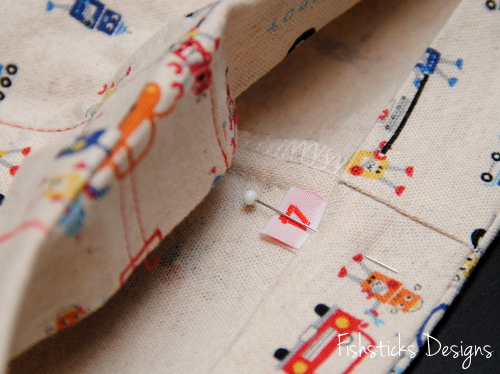 On the outside of the pants, pin the bottom edge of the drawstring channel and the bottom edge of the inside elastic channel in place all the way around. Feel through and make sure the the bottom edge of the elastic channel is falling slightly lower than the bottom edge of the drawstring channel.
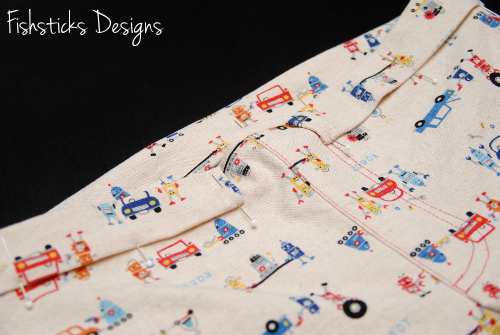 Stitch along the edge of the bottom of the drawstring channel catching the bottom edge of the elastic channel inside. You’ll be leaving the space between the ends of the drawstring channel open for now to insert the elastic. (If you plan to use a drawstring without elastic, you can go ahead and sew all the way across the front of the pants, closing up the elastic channel inside.)
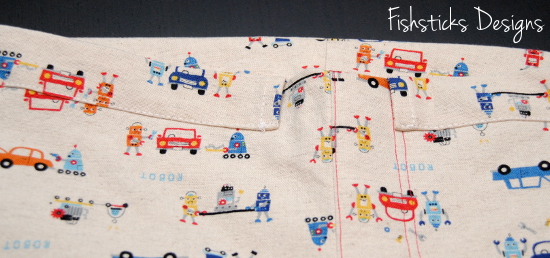 Insert elastic into the elastic channel on the inside of the pants according to the measurements given on your pattern. Sew the opening between the two ends of the drawstring channel shut.
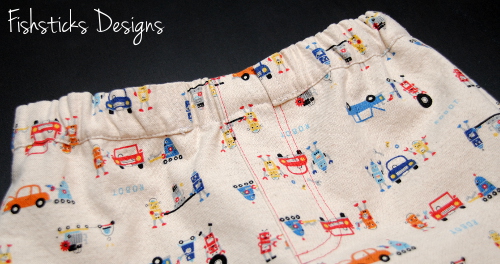 Now you’re ready to make your drawstring. You have a couple of options here. You can make a drawstring that goes all the way around the waistline. If you choose this option, you’ll cut one long length of fabric and finish both ends. In this tutorial, I’m going to show you how to make a drawstring with a small amount of elastic at the back. This will make it so that your child can pull the shorts on and off without having to untie them every time. (For larger sizes, you may have to increase the length of the elastic at the back so that pulling on and off is easy.)
The width of your drawstring pieces is going to be 1 3/4″. There’s a simple formula to figure out the length that you need your fabric. Feel free to skip the explanation and just use the formula below. Start with the measurement that you used for the length of your drawstring channel (the waist circumference)(26″, in my case), add 6″ for safe drawstring length, and add 1″ for 1/2″ seam allowance at each end. For a drawstring without elastic, this is the measurement that you’ll use. In my case, that would be 26″+6″+1″=33″. To create our drawstring with it’s elastic section, we’re going to divide that measurement in half for our two drawstring pieces (33″/2=16 1/2″). The elastic piece is going to add 2″ total, 1″ on each side, so I’m going to subtract another inch from that measurement (16 1/2″ – 1″ = 15 1/2″). Still with me?
THE FORMULA: Add 7″ to the waist circumference. Divide that measurement in half. Subtract 1″.
Cut two pieces 1 3/4″ x this measurement.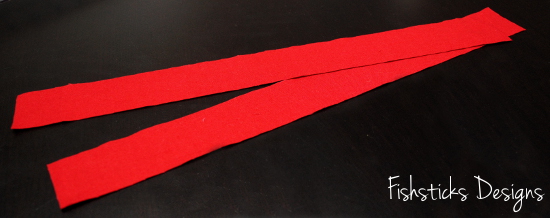 On both drawstring pieces, fold each long edge 1/4″ in to the wrong side and press well.
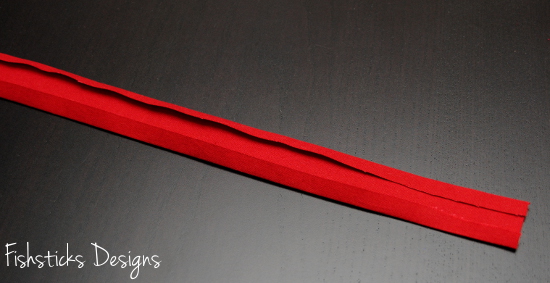 Fold one short end of each piece over so that the right sides are together. Pin and stitch across the folded end of each drawstring piece 1/2″ from the raw edge.
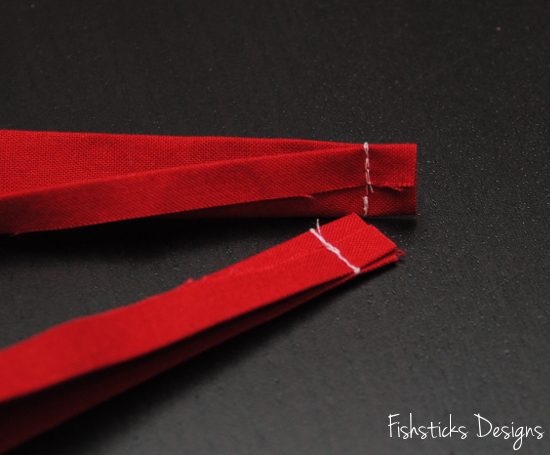 Turn the sewn ends so that the wrong sides are together.
 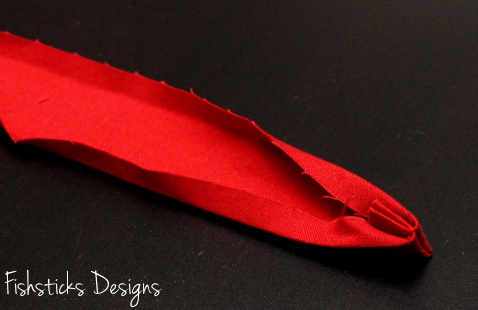 Tuck the raw edges neatly inside and press all the way up. Pin and topstitch the open long edge closed on both drawstring pieces.
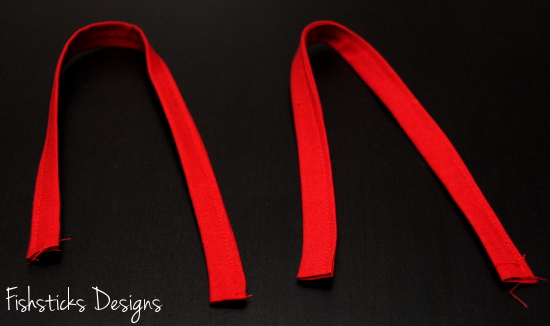 Cut one piece of 1″ elastic 4″ long.
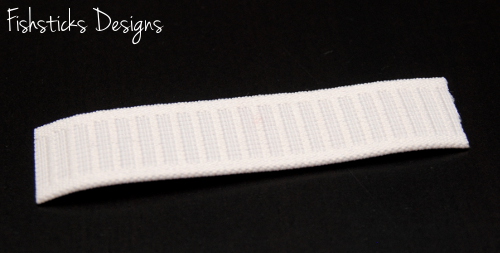 Overlap the raw edges of each drawstring piece 1″ on opposite sides of the elastic. Stitch in place.
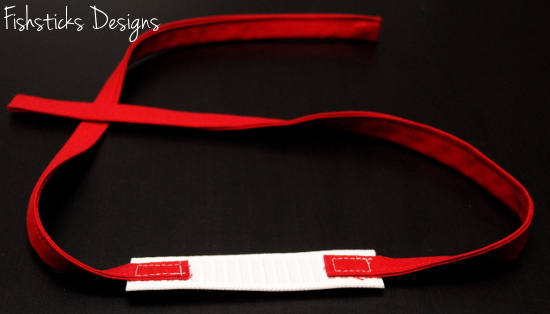 Pull the drawstring through the drawstring channel. Center the elastic piece at the back of the pants.
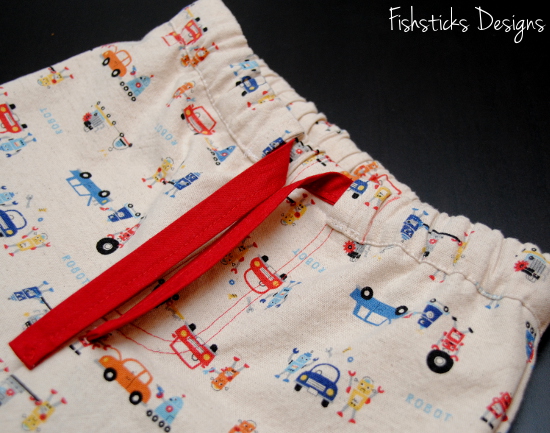 Stitch the drawstring in place at the back seam of the pants to keep it safely inside its channel.
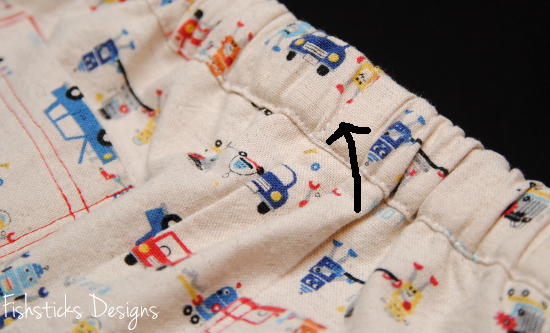 Tie up the drawstring, and you’re done!
 If you use this tutorial, I’d love to see! Feel free to add a link in the comments or add your picture to the Fishsticks Designs Flickr group!
Shorts on My Boys!
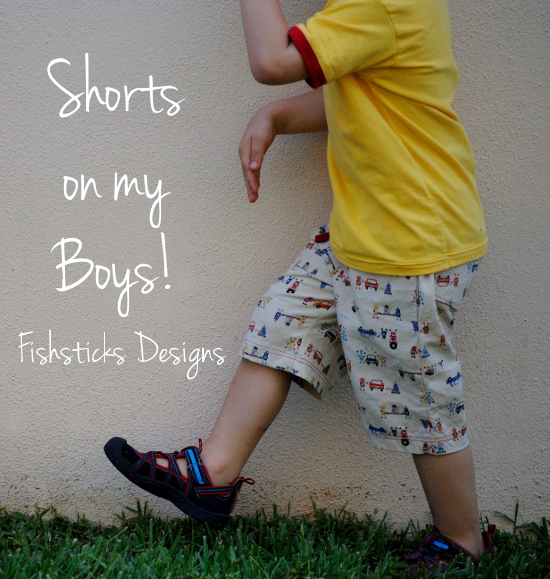 In case you haven’t heard, Shorts on the Line started this week, and I have been working on this idea that was rolling around in my head. Boardshort-style shorts are really popular this season for little guys–the ones that aren’t swimwear, but more like regular shorts with a drawstring. I’ve seen quite a few of them popping up here and there. I ran across these Mini Boden ones on Pinterest and fell in love!

Aren’t they so cute? (I actually just ordered this Railroad Denim from Fabric.com, and I hope to make a really close copy when it arrives!) It’s really not too difficult to add a drawstring to an elastic waist. You just stitch button holes or add grommets to the front of the elastic channel, but I had this idea for adding a little extra detail to the shorts and making a drawstring channel without buttonholes. It took a little work to figure out the best way to do it, but I’m really pleased with the result. What do you think?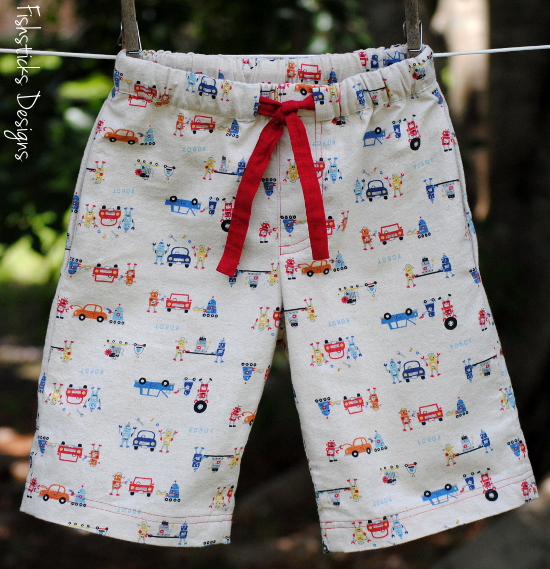 An important note here before we move on: Please be careful to keep your drawstrings safe! On items sold for children here in the US, the law allows for a waist drawstring to extend only 3″ past the opening when the garment is expanded to it’s maximum width: CPSC on Drawstrings in Children’s Clothing. Also, always be sure to secure the drawstring by stitching across it at the back or side seams so that it cannot be pulled out.
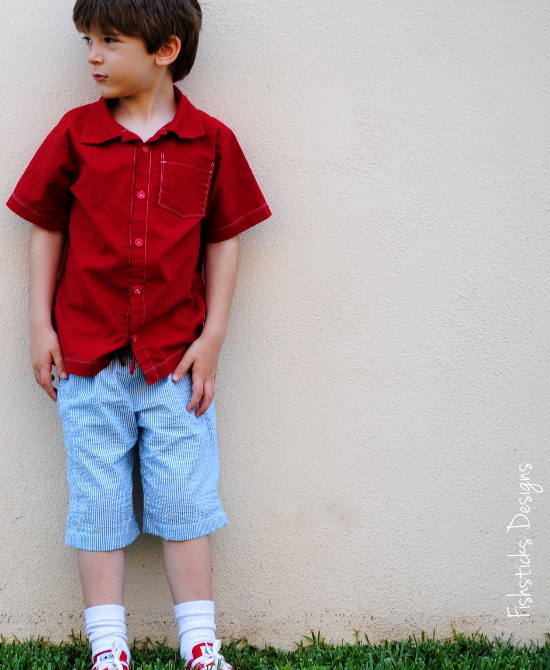 I used my Mud Puddle Splashers pattern as the base for these. It’s a good straightforward elastic waist pants pattern with a nice modern feel. Jamie’s shorts are made with some of that Robert Kaufman seersucker that I adore. (What am I going to do if they ever stop producing it?!) Charlie’s shorts are made from a super-cute Kokka linen print.
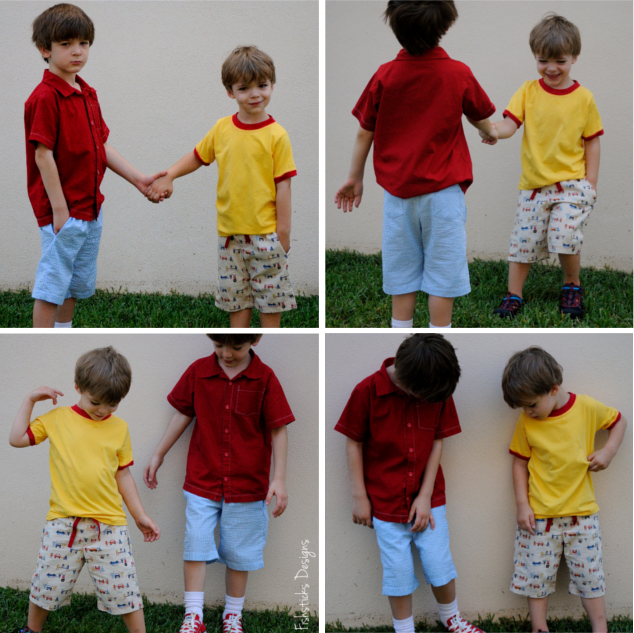 I took the boys out yesterday to do a little photo shoot at a local fountain. (I promised them smoothies if they were cooperative. Shhhh!) Something was up with my camera, though, and we only ended up with a few good pictures of the cute back pockets. (I suspect I accidentally changed a setting somewhere, and I cannot figure out what it is. Many of the photos are coming out grainy, and I’m having a hard time getting faces to focus. Even the today’s pictures are pretty icky. Suggestions are welcome!)
 So, how about a tutorial for adding a drawstring without buttonholes? Anyone interested? If all goes well, I should have it ready for you tomorrow!
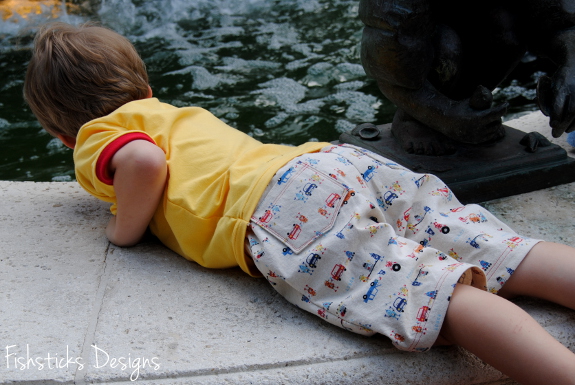 Until then, get some shorts cut out and start sewing! You can enter your shorts to win prizes, including Fishsticks patterns! All the details are right here: Shorts on the Line.
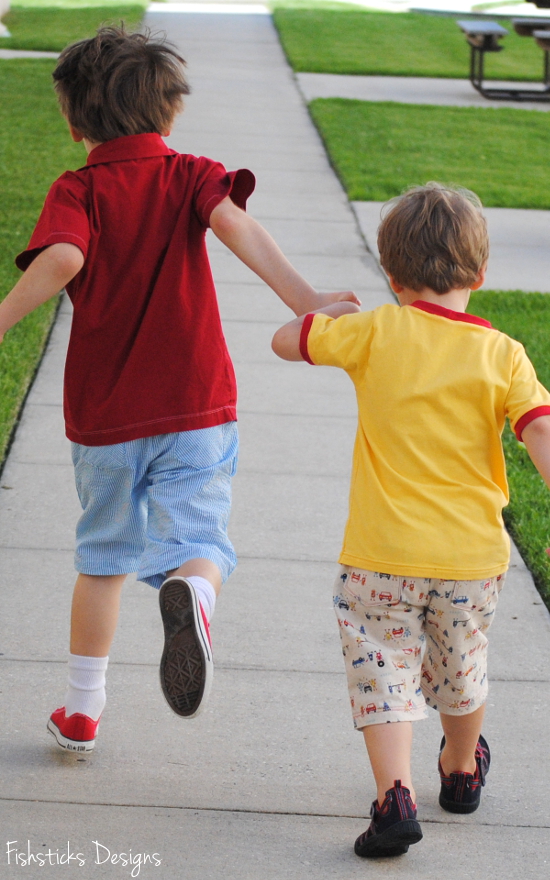 I’m also adding this project to the Hopeful Threads June project: Summer Sewing for Family! The boys are wearing all mama-made clothing–Jamie’s top is an Everyday Camp Shirt that I made last year, and Charlie’s yellow tee is a Charlie Tee that I whipped up yesterday morning to go with his robot shorts. (Pattern links are all in the right side bar.)

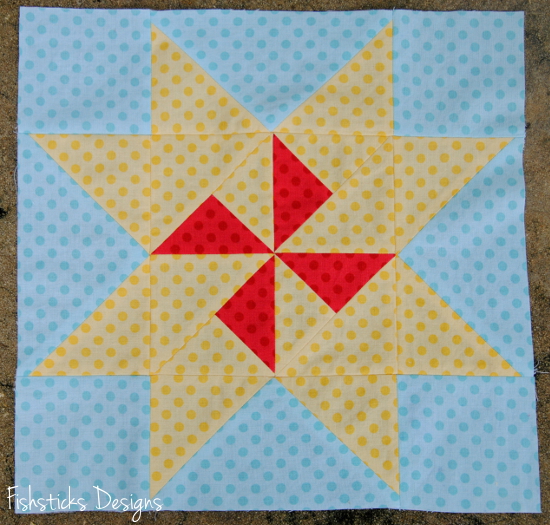
April Riley Blake Mystery Quilt Block – Sunshine
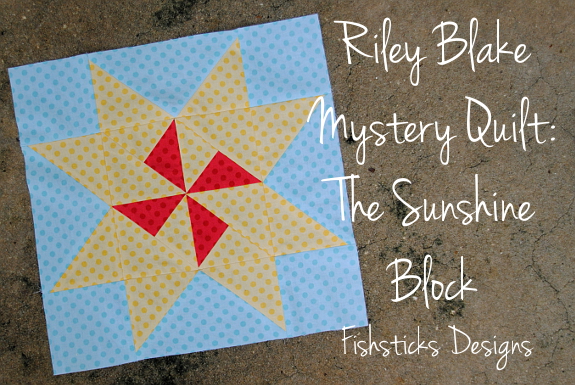 It’s catch-up time! I’ve fallen behind on my Mystery Quilt Blocks because I’ve been busy behind the scenes working on new patterns which should be ready very soon! I managed to get April’s Sunshine Block done over the weekend, though.
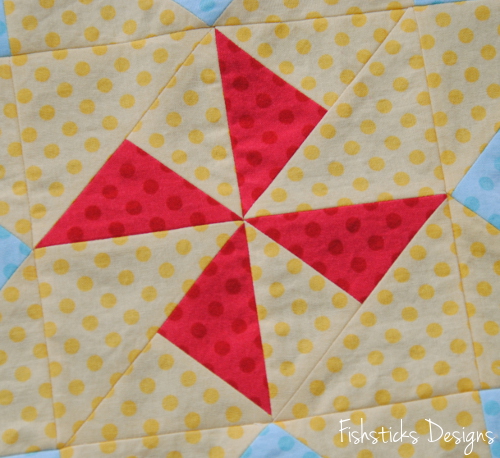 There are more half-square triangles in this one. Half-square triangles with smaller triangles mixed in to make up the center section. The four outside sections of the block are made up of flying geese. I used the same method that Bee in My Bonnet shares in her Easy Flying Geese Tutorial to sew those. I just increased the rectangle size to 3 1/2″ x 6 1/2″ and the squares to 3 1/2″ x 3 1/2″.
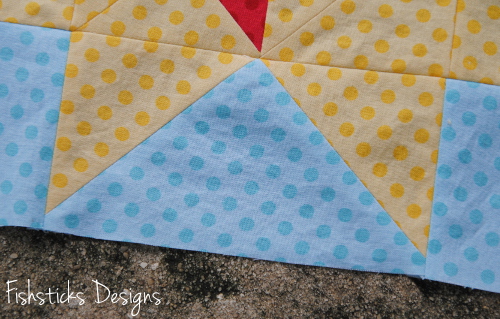 Here are all four blocks together:
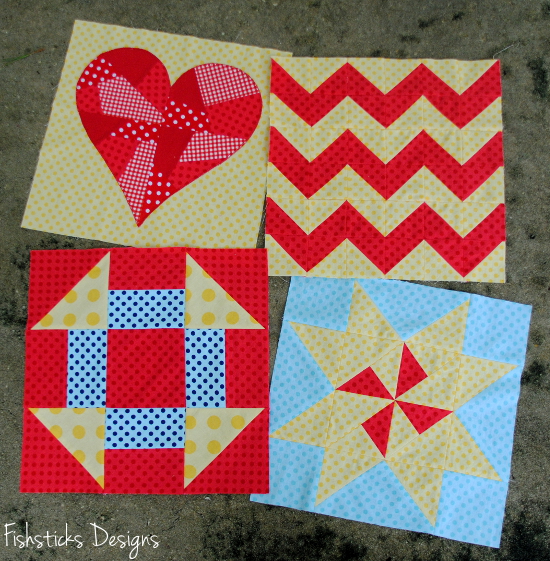 I’ll have to make time this week to dig through my selvage pile for May’s block which I’m hoping to get done next weekend. Once that’s done, I’ll be all caught up . . . as long as I can get June’s block done this month, too!