Samantha Joins in Selfish Sewing Week … Sort of
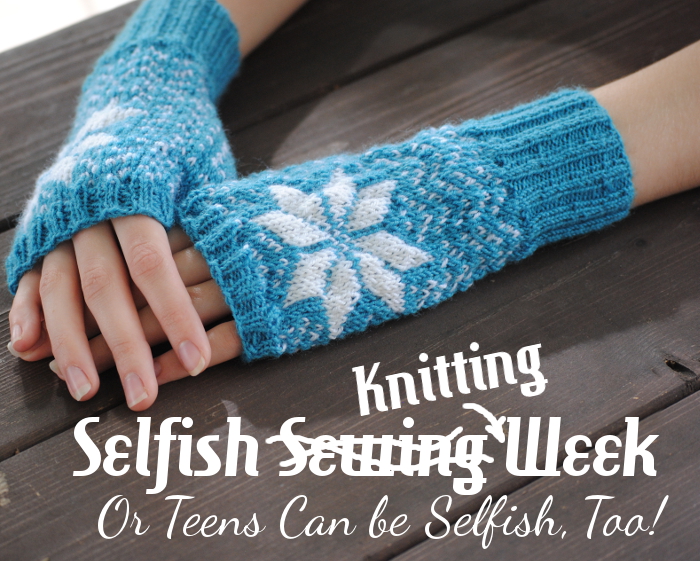 Selfish Sewing Week is in full swing, and I’m so sad that I don’t have time to sew something just for me! I’ve been sewing my little fingers off getting ready for Spring Quilt Market and while I won’t end up personally using much of what I’ve been sewing, it is definitely selfish (business-promoting) sewing! Since I’m in Market mode, I volunteered my amazing (and talented!) teenage daughter, Samantha, for this year’s Selfish Sewing Week post.
 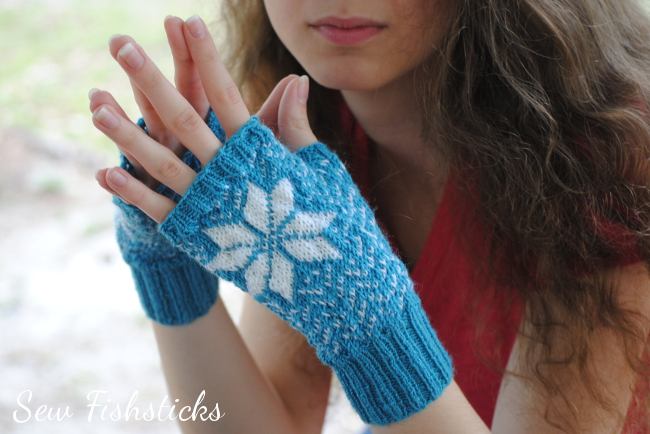 Samantha doesn’t really sew much, though. She knits … a whole lot! So, we temporarily turned Selfish Sewing Week into Selfish Knitting Week. This girl always has something on her needles, and it’s very often something for someone else. From hats and booties for the local women’s shelter to stuffed monsters for her baby brothers, she loves using her knitting skills to bless others. I had no problem, though, convincing her that she should take a little time to knit these handwarmers for herself!
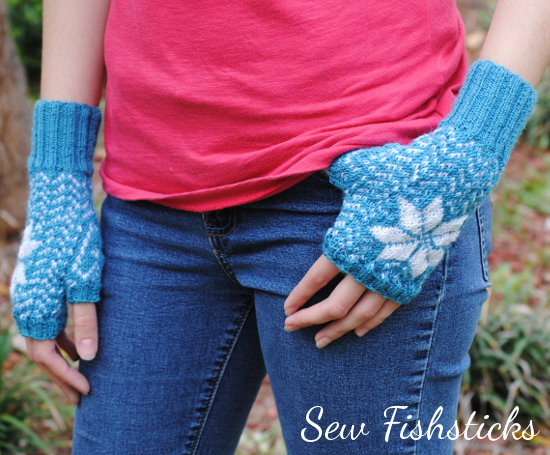 Because we live in Florida, there’s not much practical need for handwarmers, but Samantha wears them all the time anyway! They’re one of her favorite fashion statements. Really. I’m not just saying that for this post. I’m typing while watching her knit across the room, and she’s wearing another pair from her collection. She once spent weeks working out a pattern for Captain America handwarmers … she’s a self-pronounced geek, too, but that’s a different post. The Cozy Morning Mitts pattern from Nerdy Gerdy was right up her alley! She gives them a big thumbs up!
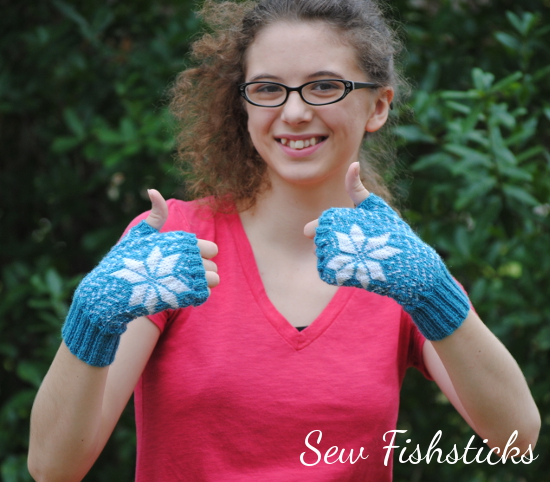 They work well for jazz hands …
 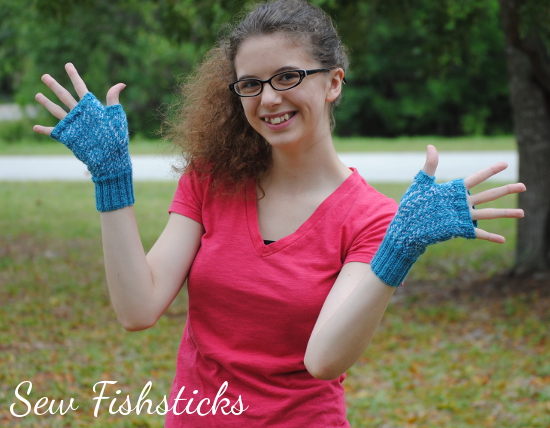 … a little drama …
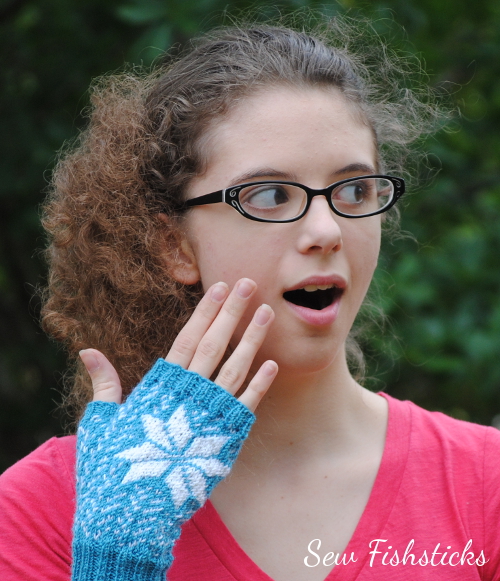 … making funny faces …
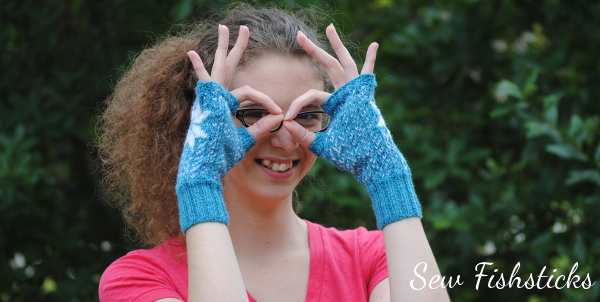 … even pretending that you’re a zombie. (She totally could not do that without laughing. She told me to just call her the laughing zombie.)
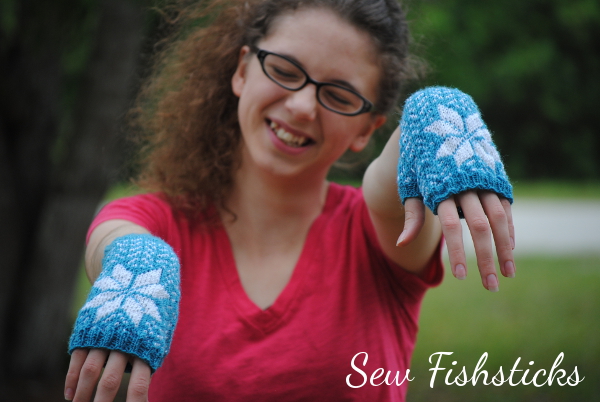 Gretchen, the designer behind Nerdy Gerdy Knitting Patterns, is one of my favorite people, so I love that not only do I get to show off my beautiful teenage daughter, but I get to showcase one of Gretchen’s patterns, too. Have you ever met someone online and wished that they lived next door to you? Gretchen is so like that. She lives with her farming husband and children on the most beautiful acreage in the midwest. I just want to climb into her blog pictures and spend the day. Oh, and her blog has the best name ever! You really have to check it out right here: He Sows and She Sews. It just so happens that Gretchen posted new pictures of her own pair of Cozy Morning Mitts a few days ago: Yarn Along. She gets to wear them for warmth and fashion!
Would you like a chance to win your own copy of the Cozy Morning Mitts pattern? How about a chance to win it plus a whole list of other selfish sewing (and knitting) patterns? Just scroll down to the bottom of this post and check out the Rafflecopter to enter.
I’m going to wrap up with this picture that takes my breath away. My sweet Samantha Grace — isn’t she beautiful? She’s that way inside and out.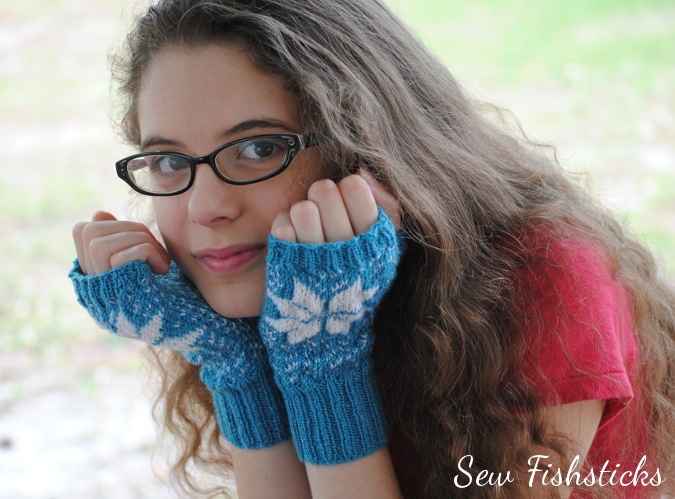 Now, go make something for yourself and join in the fun! Oh, and be sure to share what you’re making on Kollabora. (Not sure what Kollabora is? I’m still figuring it out myself, but you can read more about it from Rachael right here: SSW & the Kollabora How-To.) Check out these other bloggers who are joining in, too, and don’t forget to enter the drawing!
milkybeer · Behind the Hedgerow · jm_subrn · Sew What, Sherlock?
Lladybird · sew Amy sew · the Brodrick Design Studio · adirondack inspired
The Crooked Banana · Sewbon · Idle Fancy · girl like the sea
oona aloona · Lauren Dahl · verypurpleperson · la inglesita
Groovybaby…and mama · Buzzmills · La Pantigana · sew a straight line
Dandelion Drift · JustMeJay · B Yazoo · Disaster In A Dress
the quirky peach · Fishsticks Designs · Seamstress Erin · a happy stitch
Casa Crafty · Sarah Jane Sews · YoSaMi · Call Ajaire · miss matatabi
Around the Block with Patchwork Posse: Block #10
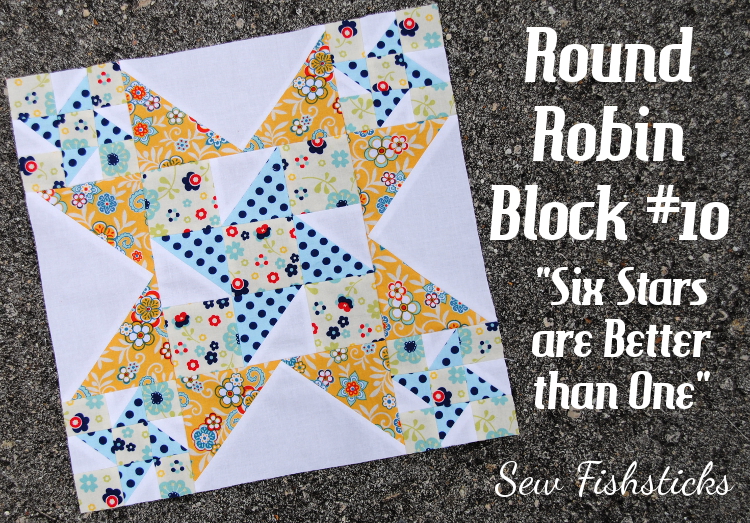 Wheeee! Only two more blocks to go! I think I’ve learned something new with every block in the Patchwork Posse Around the Block Round Robin, and this week was definitely not an exception. Remember how I said that last week’s block was a bit of a challenge? Well, this one was like climbing the quilting version of Mt. Everest! I’m only sort of kidding. Piecing together lots of tiny pieces stretches my attention span to its limits, and this block has 50 – five zero – pieces. I wondered aloud (meaning, I yelled from my sewing room), “Can you even fit 50 pieces into a 12″ block?!” But, look! I did it! AND, without a single seam rip! Isn’t it pretty?
The Six Stars are Better than One block was designed by Kate and Elizabeth from Seams Like a Dream, and while it is a challenging block, their instructions are really easy to follow. My favorite part is their Quick, No Waste Flying Geese method! It’s like magic!
Kids Clothes Week April 2014: The Second Half
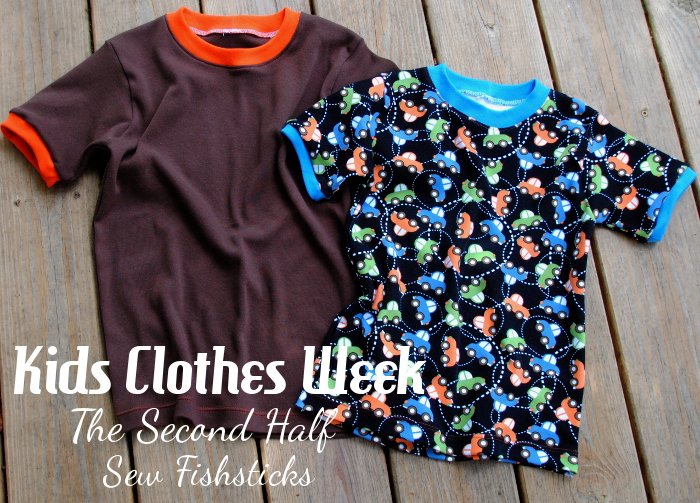 My spare sewing time ran really short over the weekend, so I cheated a bit and wrapped up my Kids Clothes Week sewing this morning! Shhhh … I didn’t do the Easter sewing that I mentioned in my last post. Instead, I opted for two really quick Charlie Ringer Tees! I finished shorts for my two little guys to go with these a few weeks ago, but since the shorts are from a not-yet-released pattern, modeled pictures will have to wait just a little bit.
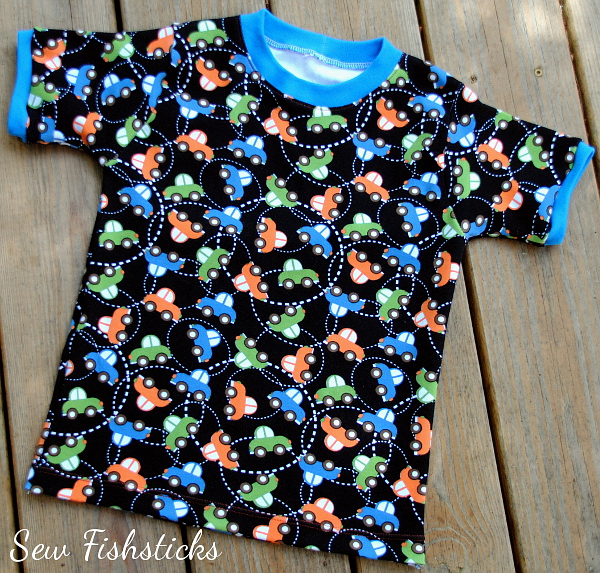 The Ringer Tee from the Charlie pattern is my go-to when I’m in a hurry. Because I serge most of it, it’s so fast! I only pop over to my sewing machine to hem the bottom of the front and back and topstitch the neckline. Everything else is done on the serger. (Of course, you don’t have to have a serger to sew this pattern. You can totally make it using your regular sewing machine!)
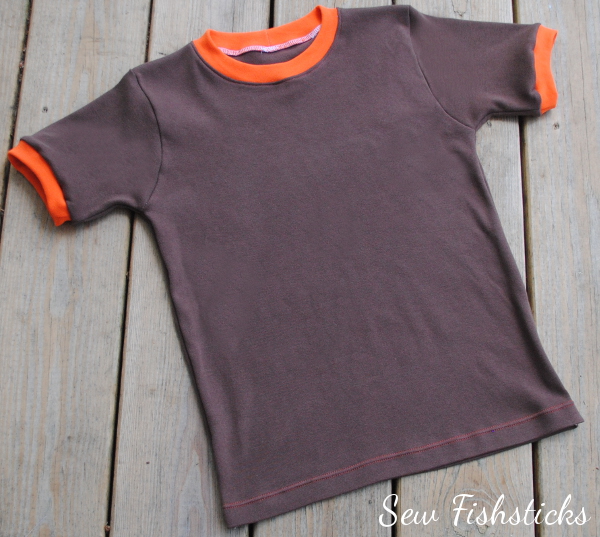 Kids Clothes Week netted us five pairs of boxer briefs and two tees. That’s not too bad for seven-ish hours of work, is it?
Kids Clothes Week April 2014: Tuesday & Wednesday
 I’m squeezing in time this week for Kids Clothes Week! Usually, when I join in, I plan what I want to sew and just do it, but this time, I’m working on new patterns and prepping for Quilt Market so I’m really just doing the suggested hour a day. I’m excited, too, to see how much I can do in just that much time! Tuesday’s and Wednesday’s hours combined were enough time for me to sew up all five pairs of the Undercover Bottoms Boxer Briefs that I cut out on Monday.
I had a little company this morning while I was working. I posted this picture on Instagram of Charlie and his “guys” hanging out on my sewing table: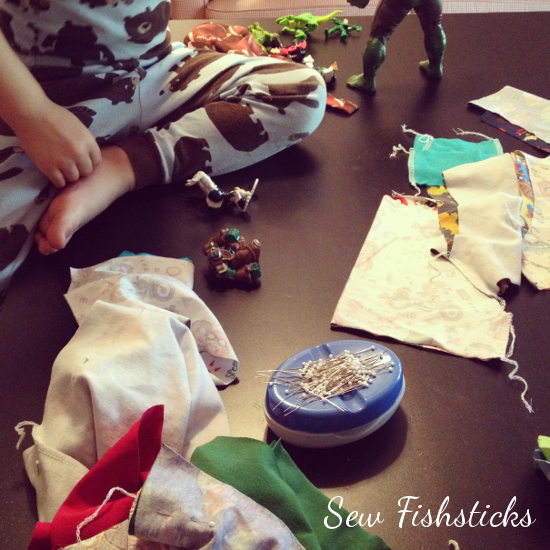 My kids don’t just have to be in the same room with me. They need to be as close as possible to me! It’s a good thing that it’s a big table.
I used the plain front option without a fly opening on these. It’s not as cute, but it’s faster and my boys don’t use the opening anyway. I also did the no-elastic waistband following the instructions that I added when I updated this pattern last month. Basically, you use a cotton/spandex blend fabric and cut the waistband a size smaller, then just stretch it to fit when you attach it. Voila! Super comfy undies that stay put – easy peasy!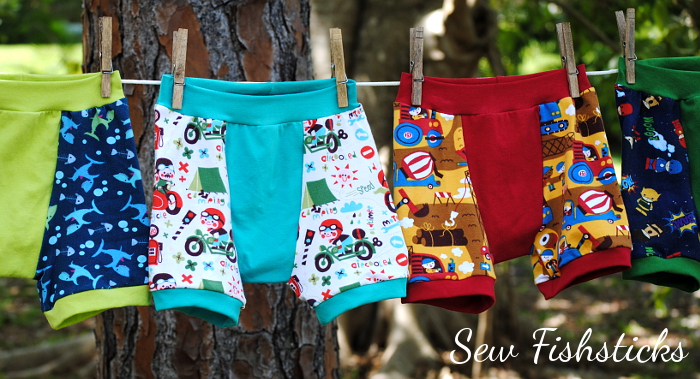 I was going to do a couple of tees for the boys with my remaining time, but since Easter is in less than two weeks, I think I might change my mind and sew up some Easter clothes instead!
Kids Clothes Week April 2014: Monday’s Prep Work
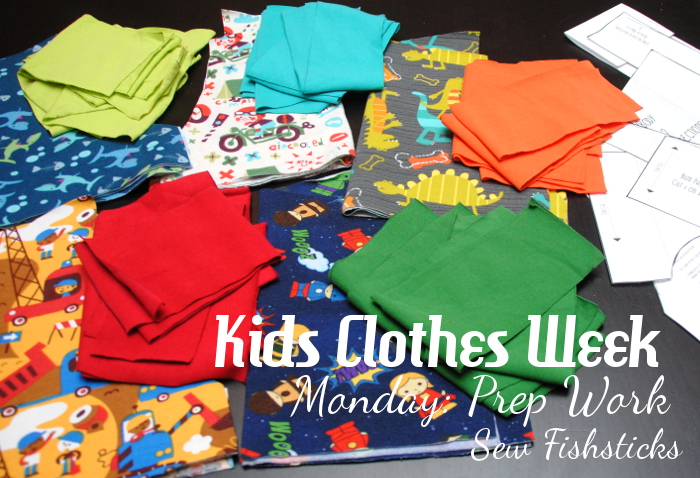 Kids Clothes Week starts today! Are you sewing along? There’s a theme this time, but you don’t have to follow the theme. My creative juices are all tied up in new pattern work right now, so my boys are getting some handmade basics this week, starting with Undercover Bottoms Boxer Briefs for Jamie. My first KCW hour was spent cutting out five new pairs!
If you’ve followed me for a little bit, you’ll probably recognize these fabrics from PJs and tank tops. I love how easily underwear uses up all those little knit pieces in my scrap pile!
Around the Block with Patchwork Posse: Block #9
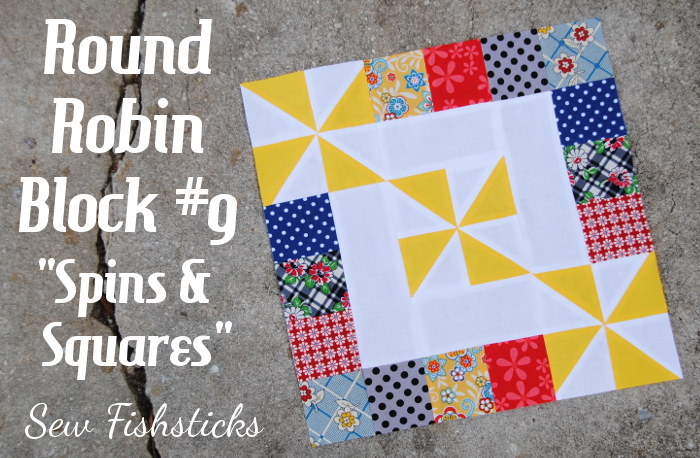 Quiet Sunday afternoons are perfect for catching up on sewing projects and prepping for others. I marked Block #9 in the Patchwork Posse Around the Block Round Robin off of my list this afternoon. This Spins & Squares Block from Crafty Tammie was a little more of a challenge than the last few blocks — a bit of seam-ripping was involved in getting those corners matched up. I’m really happy with the end result, though, and I loved being able to use up some tiny pieces. This is the first of these blocks that I incorporated some white into, and I really like it! I think I might have to mix some into the remaining blocks, too.
I’m also working on a few new patterns this weekend and cutting out some projects for Kids’ Clothes Week which starts tomorrow!
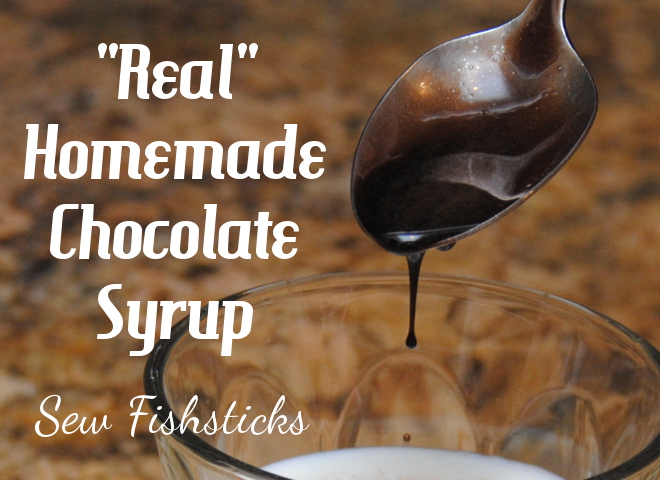
The Easiest Homemade {Real} Chocolate Syrup Ever
 It’s a little bit hard to actually call this a recipe since it’s really so simple, but when you’re a mom trying to find ways to incorporate real food in fun ways into a child’s diet, and you find a simple solution, you just have to share it!
My kids love chocolate milk. Most kids do, right? Those store-bought chocolate milks, though, are full of ingredients that we don’t feed our children, and the chocolate syrups are just as bad. There are quite a few coffee recipes out there that use cocoa (or cacao) and pure maple syrup, so I started experimenting one day, and this is the result — an amazingly simple chocolate syrup recipe with all real ingredients that mixes completely into milk (cow, almond, soy, coconut) and coffee, and it tops desserts beautifully, too!
Just two ingredients: dark cocoa or cacao powder and real maple syrup.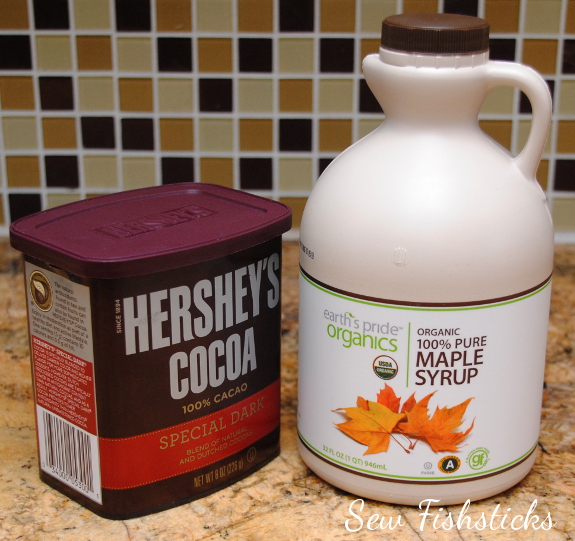 Measure 3/4 cup of maple syrup in a sauce pan, add 1 tablespoon of cocoa powder.
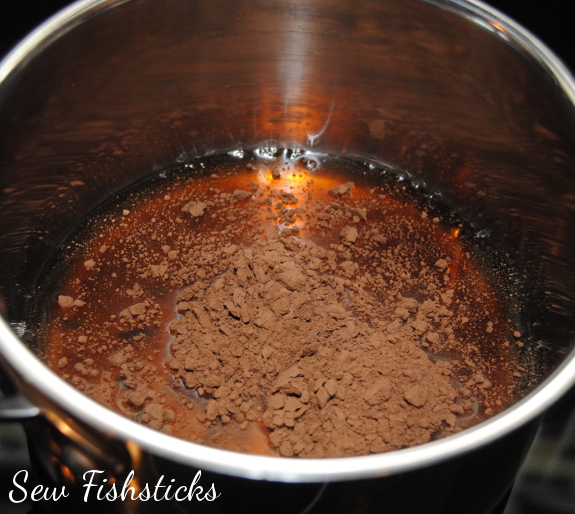 Heat it over medium heat while whisking until it’s just warm enough for all the powder to dissolve. Set it aside, and let it cool to room temperature.
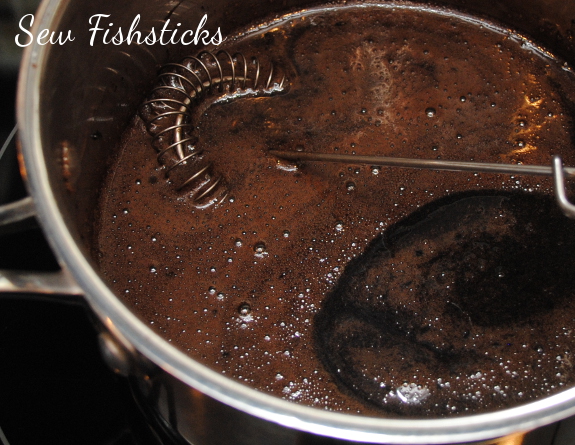 Pour it into a syrup jar or a squeeze bottle and keep it in the refrigerator door. (Our syrup jar came from Target.)
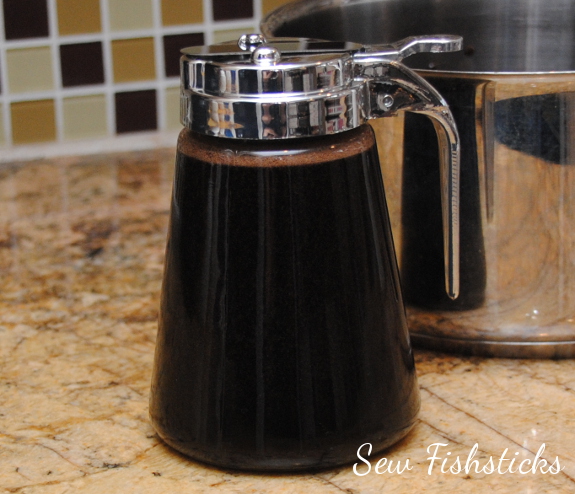 When you’re ready for chocolate milk, just pour the amount of syrup that you like into your glass of milk and mix it in.
 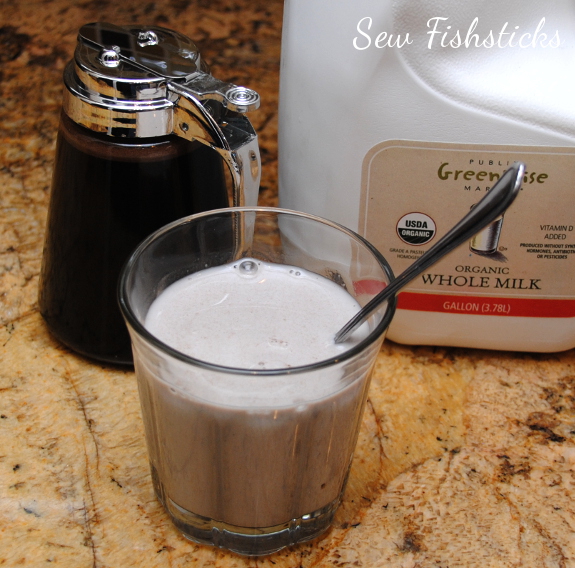 Or, if you have a craving for a coffee house mocha, brew up a cup of coffee and stir in some homemade chocolate syrup with your half and half. Yum!
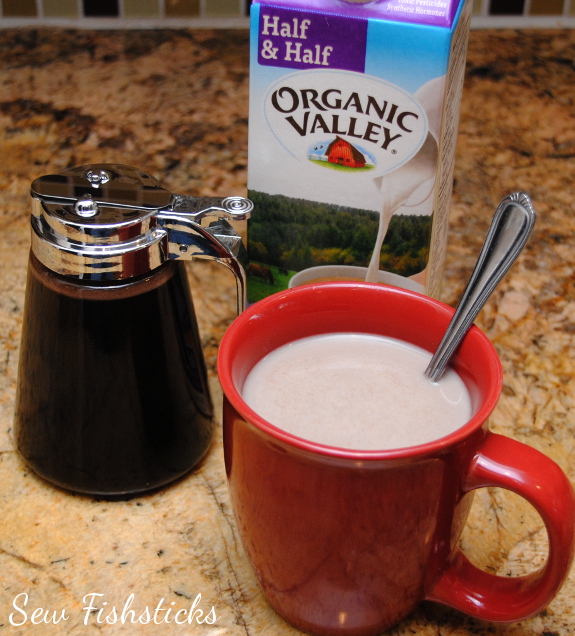 You can do all sorts of things with this syrup: serve it with chocolate chip pancakes, pour it on chocolate sundaes, drizzle it over chocolate cake. That’s a lot of chocolate, isn’t it? Can you ever really have too much?
Around the Block with Patchwork Posse: Block #8
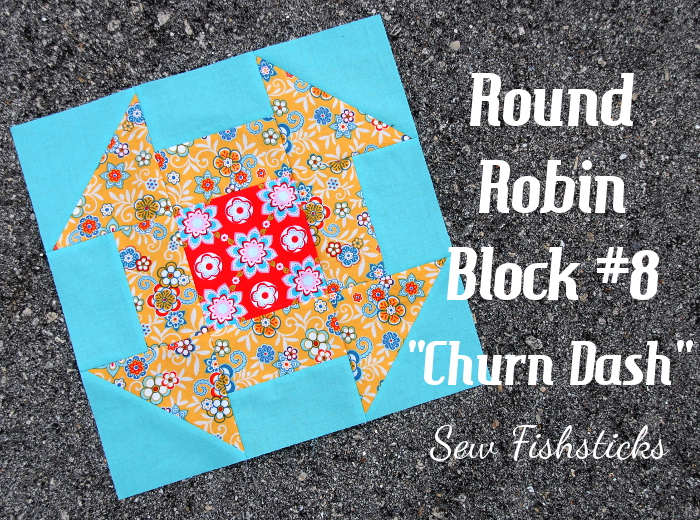 A whole week without blogging! It’s been quite a while since my blog posts were that far apart. I promise that I have been busy behind the scenes … working on PDF pattern updates, readying new patterns for testing, planning for Spring Quilt Market. I did find time for block #8 in the Patchwork Posse Around the Block Round Robin, though! This week’s block is a wonderful traditional one from A Quilting Life: the Churn Dash.
Around the Block with Patchwork Posse: Block #7
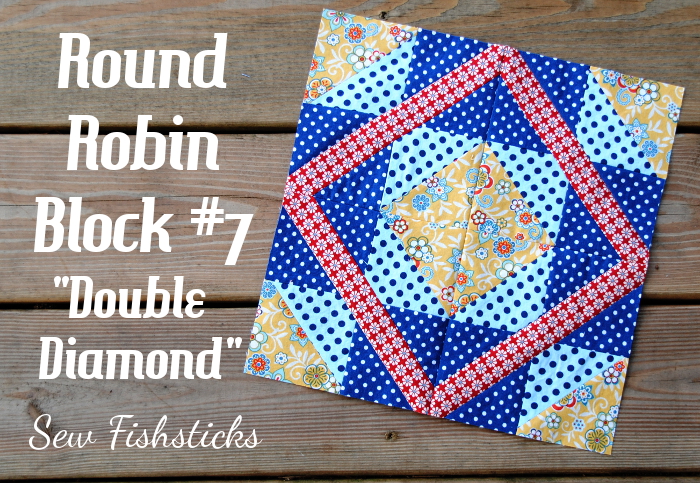 Yay! I’m over halfway through the Patchwork Posse Around the Block Round Robin. I think this is the longest that I’ve ever stuck with a quilt-block sew-along … only five more blocks to go!
This week’s block, The Double Diamond, was designed by Ellen of The Long Thread. This one was a bit of a challenge for me, but I made it through, and I adore how it turned out!

DIY Framed Fabric Bulletin Board
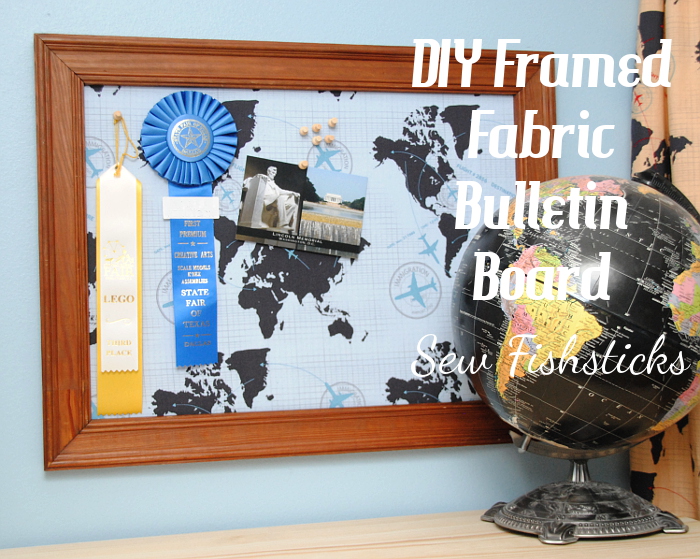 This is a simple and quick project that is as pretty as it is practical! It’s a great way to showcase a favorite piece of fabric, and you can make it any size you like. To see the one above in our newly re-decorated boys’ room, just click right here: All Around the World Boys’ Room.
The supply list:
a frame (We found ours at a thrift store.)
a piece of foam board slightly larger than the frame
a piece of fabric large enough to cover the the foam board and wrap around to the back
duct tape
picture hangers (I used D-ring hangers on ours.)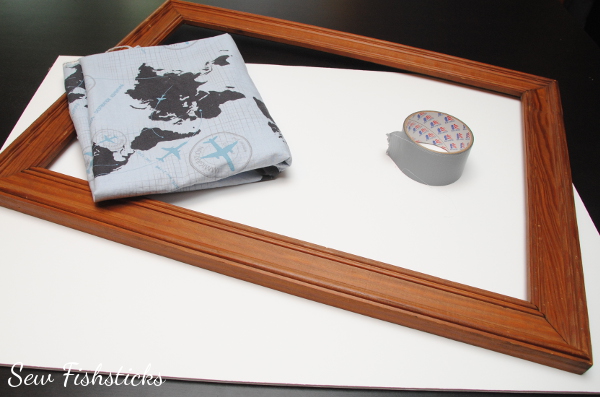 Slide your empty frame over the piece of foam board and shove the foam board tightly into one corner. One top and one side should be firmly up against the frame opening. Use a pencil to trace the other side and the bottom onto the the foam board. You’ll have to slide the pencil tip up under the edge of the frame opening and angle it slightly. You want the foam board to fit tightly into the frame so be sure to trace right up against the opening.
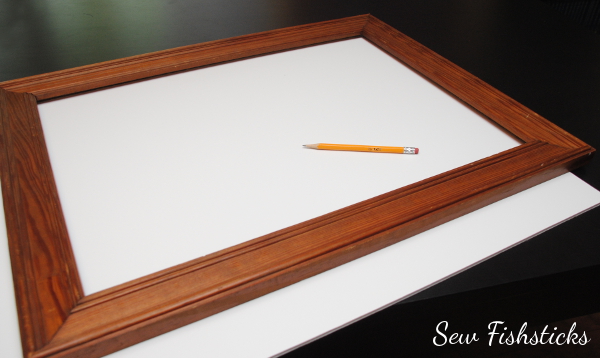 Remove the frame and use a craft knife and straight edge to cut the foam board along the lines you traced.
 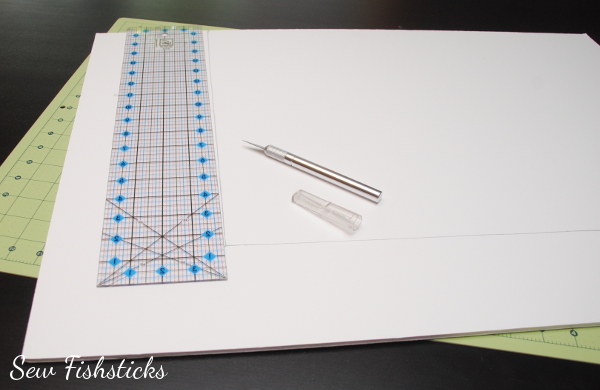 Once your foam board is cut, check the fit inside the back of the frame before moving on. The foam board should fit snugly inside the frame.
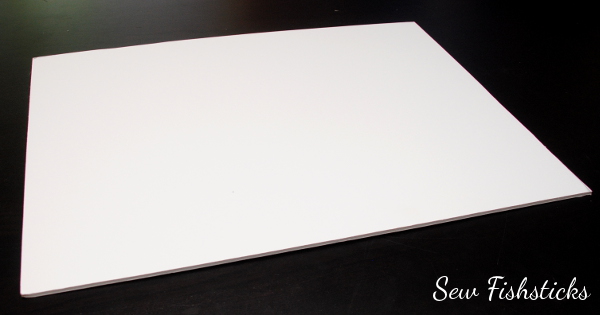 Trim your fabric so that you have at least a few inches to fold up and over on each side of your foam board piece.
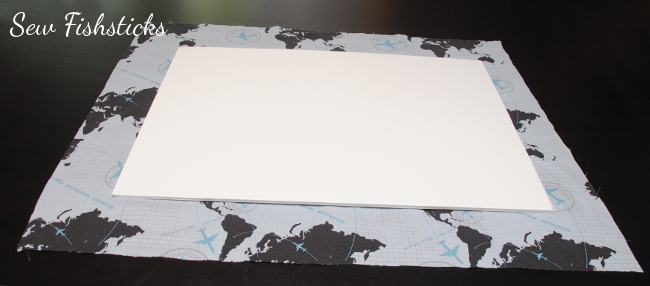 Spread your fabric out in front of you with the wrong side up. Center the cut piece of foam board on top of the fabric. Wrap one long edge up over the foam board and duct tape it in place. (I know it seems silly to use duct tape, but it works! And, it allows you to easily switch out the fabric whenever you’d like.) Wrap the other long edge up and tape it, too.
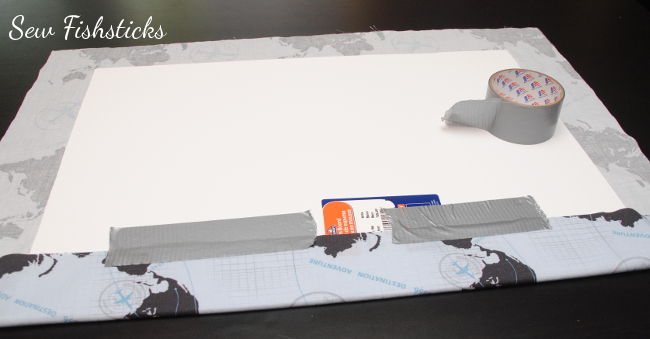 Wrap the short ends up just like you would wrap a gift and tape them in place, as well.
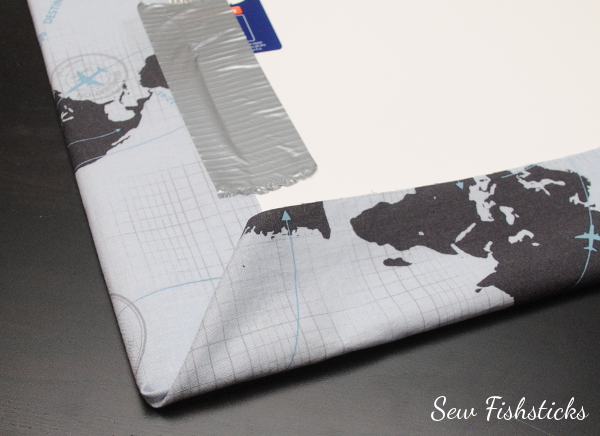 Make sure that your fabric is taped securely.
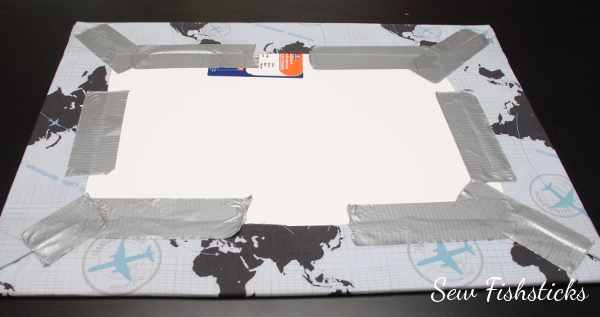 Press the fabric-wrapped foam board into the back of the frame. Attach hangers. Hang it up on the wall and display your treasures!
 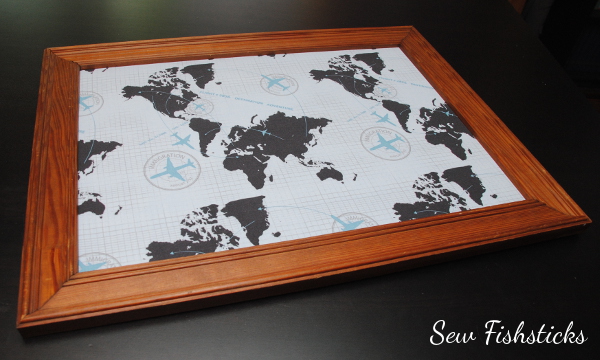 Do note that if you pin and unpin things on this board often, you may have to replace the foam board since the holes don’t self-heal. These bulletin boards have worked really well in our home, though, and I love how easy they are to switch out whenever the urge strikes!


