Family & Friends
Front Porch Decorating: the Good, the Bad & the What Were We Thinking?!
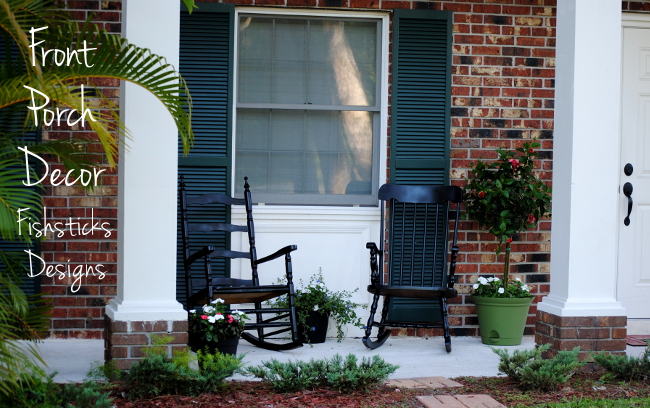 We’ve been doing some work around the outside of our house the last few weeks. I think the appearance of the outside of a home really sets a tone for visitors, and I want ours to be warm and pretty and welcoming, but still simple and uncluttered. We have this great front porch area that we weren’t using at all, and I loved the idea of putting rocking chairs out there. I didn’t have a huge budget for this project, though, and rocking chairs can be expensive. I searched Pinterest for ideas and ran across several photos of front porches adorned with mismatched rocking chairs that were painted to match. I LOVED the look! With that idea in mind, I set out on a hunt at our local thrift shops and on Craigslist for well-priced wood rocking chairs that I could paint to match.
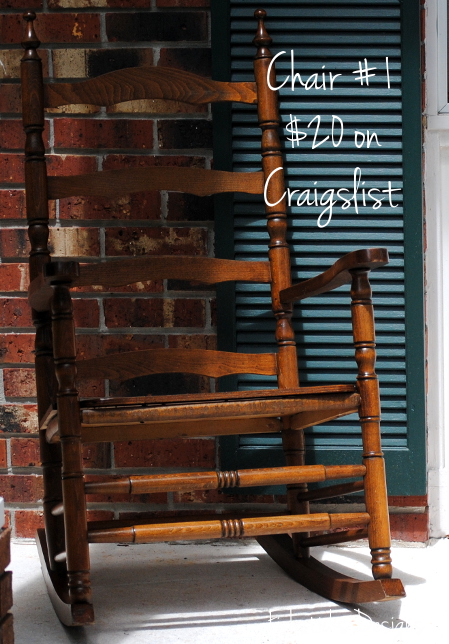 Rocking chair #1 is a Craigslist find. It was listed at $25, but I only had two $20 bills and the owner had no change, so it went home with me for $20! Score! I found rocking chair #2 in one of my favorite thrift shops, but it was priced at $75 . . . definitely more than I was willing to spend. As I was walking out of the store, though, I noticed that the day’s sales included a 50% discount on all furniture making this chair only $37.50. Woo-hoo!
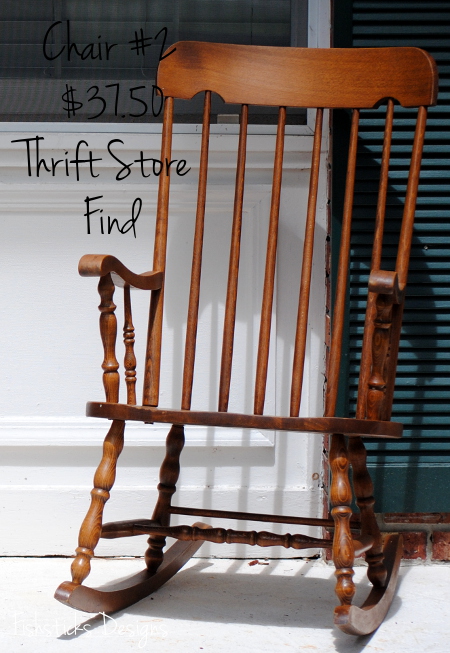 Both chairs had a similar wood stain, but I thought it looked dated, and since they’ll be outside, they needed some protection from the elements. This Rust-Oleum enamel spray paint looked like a good choice since it’s designed for use on wood or metal and for indoor or outdoor use.
 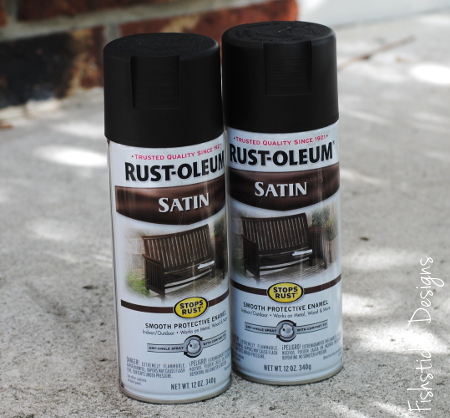 It was a bit windy the day that I set aside to do this project, so we pulled the van out of the garage, and my husband set up a tarp for me just inside. Things seemed to be going well until I realized that the bottoms of my bare feet were starting to stick to the tarp. Then I stepped off of the tarp and left a lovely black footprint on the garage floor! Eeek! I called for help and someone brought me an old pair of socks so that I could walk through the house to the kitchen sink. When none of my attempts to wash off the paint worked, my wonderful husband Googled a solution for me, but not until after he grabbed my phone and snapped a few pictures of me sitting on the kitchen counter with my black feet in the sink.
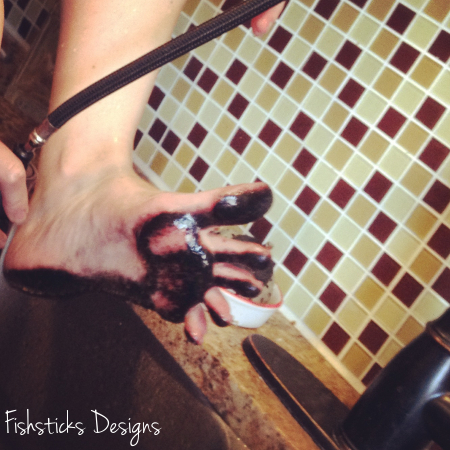 Sweet, huh? In case you’re wondering, olive oil is what did the trick. Even better than my temporarily painted feet, though, is my permanently painted garage floor. This definitely falls in the “What were we thinking?!” category. The over-spray from the spray paint coupled with the breeze coming in through the garage door sent a fine mist of paint through the entire garage. The only space that isn’t slightly gray now is the area where I had the tarp. Feel free to learn from my mistakes.
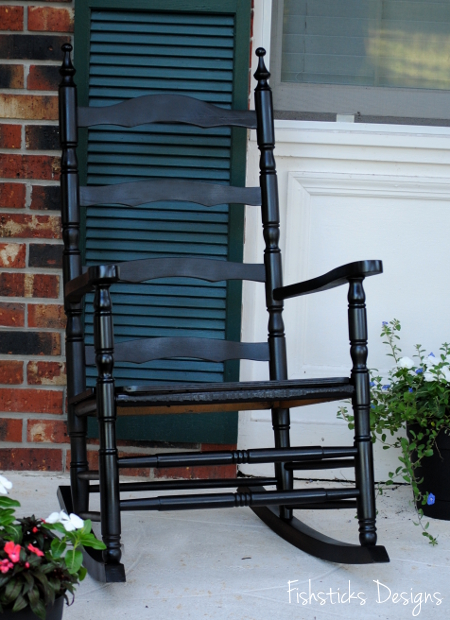 I did eventually end up with two beautifully updated black rocking chairs for my front porch! (I’m thinking, though, that my plan to add a few more may not ever happen!)
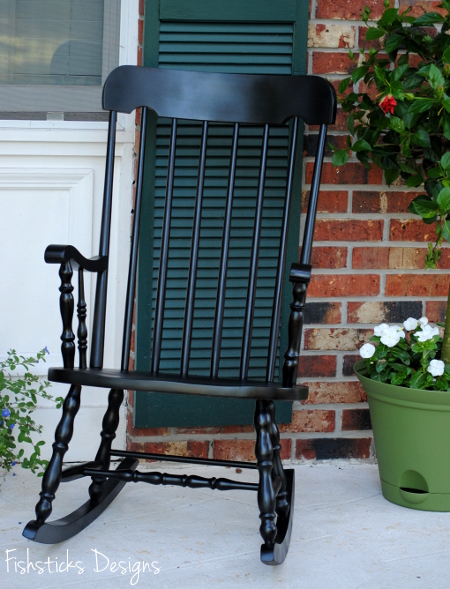 We added a few potted plants for a nice finishing touch, and our simply decorated porch is ready to welcome all of our guests. What do you think? Are you working on any outdoor projects this summer?
Katie’s 2nd Birthday Celebration
 Our sweet granddaughter, Katie, turned 2 on the 4th of July, and we got to host her second birthday party right here on Saturday! We kept it small and simple, but fun and pretty. (Two-year-olds don’t really remember their parties, but they will love seeing the pictures someday!)
 I took on the responsibility of baking the cupcakes and sewing Katie’s party dress, and true to my wait-to-the-last-minute-to-do-everything nature, I didn’t start on either until after dinner on Friday night. Only a few minutes into mixing together the cupcake batter, I reached up into the cabinet above my work space and knocked out a glass jar. In the instant following, I chose to save my darling six-year-old who was standing in the chair next to me, and I sacrificed my favorite vintage yellow Pyrex mixing bowl. (Yes, one of the mixing bowls that I was so worried about in our move: Settling In.)
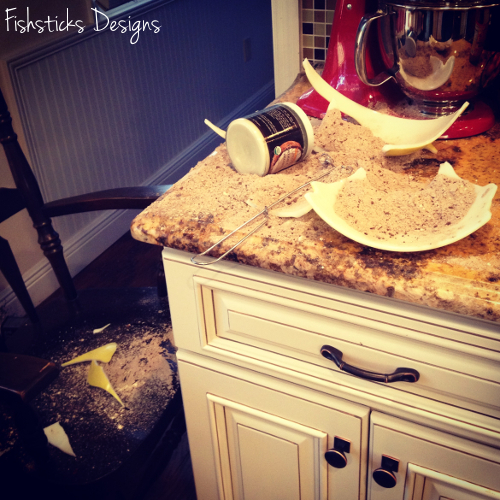 By the time the mess was cleaned up (Pyrex shards fly a long, long way!), and I was putting a new batch of cupcake batter into the oven, it was 8:00! And, I hadn’t even decided what exactly I was sewing! Thankfully, once I had a picture of what I wanted, it all came together quickly and beautifully.
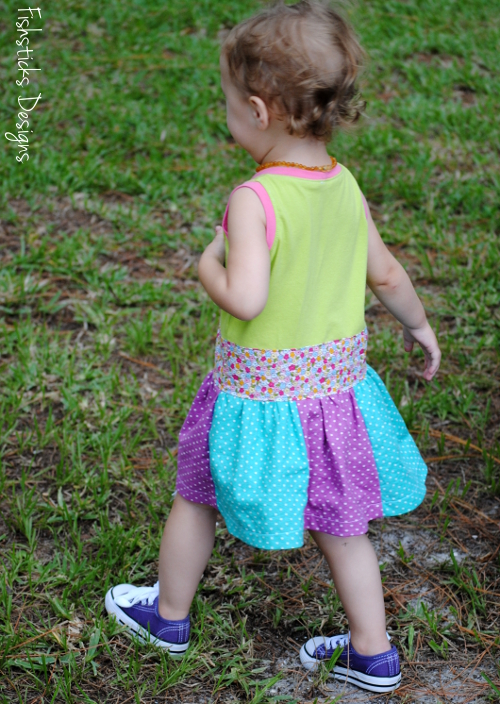 Morgan had asked for a polka-dotted tank-style dress in the colors that she’d picked out for the party decorations (colors which were chosen from Katie’s favorite cartoon, Dora the Explorer). A quick trip to Joanns on Friday morning turned up the three fabrics in the skirt and the trim pieces, and the buttons which look like they were made to go with the flower fabric! The fabrics in the knit bodice are those Riley Blake jerseys that I’m loving working with. I’m calling it the retro-modern Dora-ish party dress.
 As for the food, we served yummy, but not too unhealthy treats. I used this recipe for the cupcakes: Chocolate Gluten-Free Cupcakes, substituting coconut oil for the canola oil and whole husk psyllium for the xanthan gum. For the frosting, I made a standard butter-cream, and added natural pink food coloring using boiled raspberries! The raspberry flavor gave the frosting an amazing sweet-tart taste. Yum!
 We sprinkled a few mini-chocolate chips on the top of the frosting just for fun, and then left the almost-full bag of chocolate chips too close to a certain birthday girl.
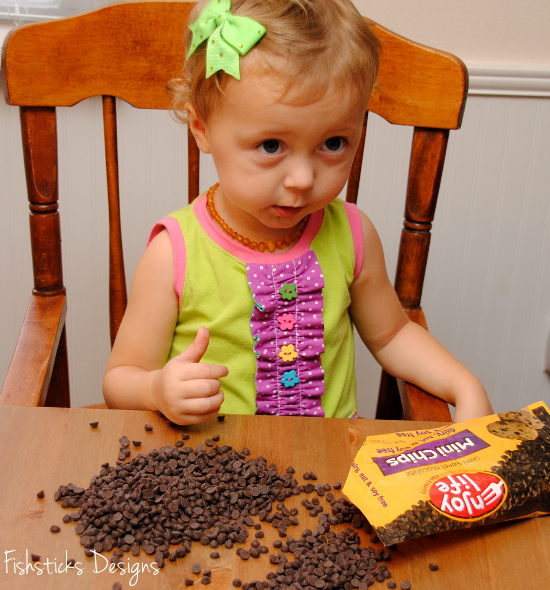 Other party fare included Unreal Unjunked candy-coated chocolates served in cute little snack cups, sliced strawberries, chocolate cookies, pink pomegranate chips and lemonade.
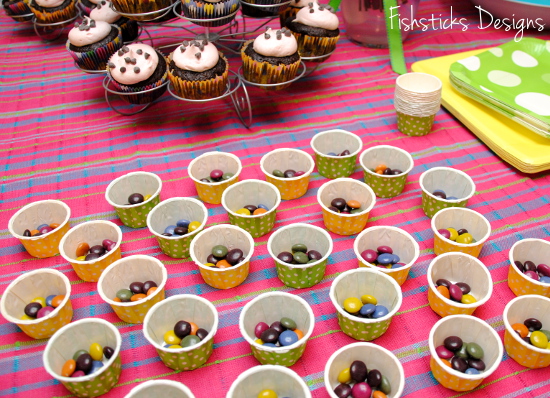 I also baked up a couple of loaves of Honey & Oat Gluten Free Bread which we sliced and served with honey butter (softened butter whipped with raw honey) and blackberry cream cheese (softened cream cheese whipped with no-sugar-added seedless blackberry jam).
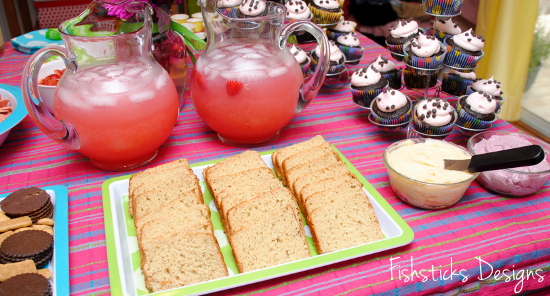 The kids all had a great time playing in the backyard on the swing and playground and blowing bubbles. Katie’s big brother, Austin, kept himself busy wiggling a tooth that wasn’t quite ready to come all the way out!
 Uncle Charlie got caught trying to open the presents and was not happy at all that I was taking his picture! (You can tell from this picture that the inside part of the party ended up taking place in my sewing studio. It was just the most convenient place since the sliding glass door to the backyard is right there.)
 Katie loved having everyone sing, “Happy Birthday” to her . . .
 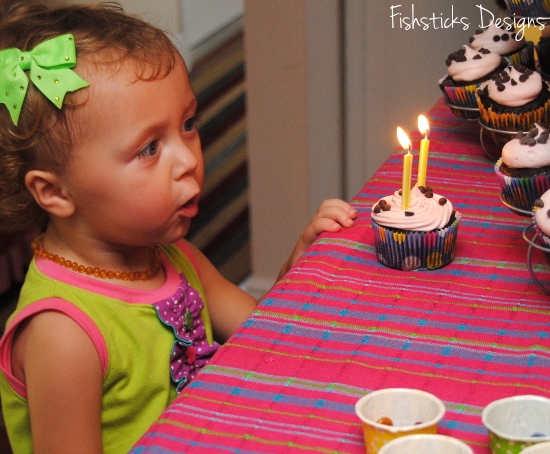 . . . but she couldn’t quite figure out how to blow out the candles by herself! It was okay, though, because Uncle Jamie jumped right in to help!
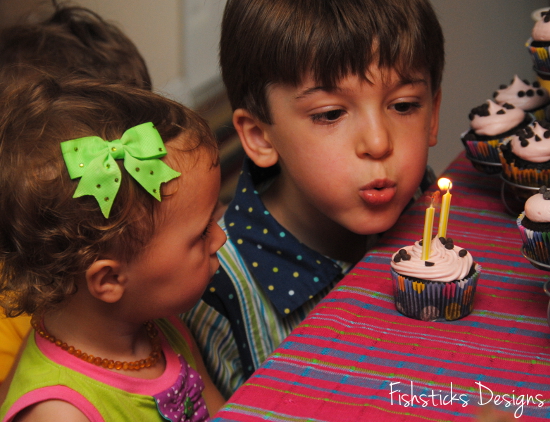
Updates & Randomness
 Thanks so much to all of you for your patience and encouragement during our few days of messiness while we transferred the site to our new host! We are all up and running now! There may still be a few glitches, but hopefully, we’ll work through them smoothly.
 If you’re a subscriber, you didn’t get this post because my subscriber list didn’t transfer over correctly. You should receive a new confirmation email tomorrow, and you’ll need to reconfirm your subscription to stay on the list. So sorry for that extra step, but I don’t want you to miss out on anything!
 The Sew Can She Crazy Quilt Sewalong started yesterday! Have you checked in to see what this week’s task is? Leigh and I are working on organizing and readying our scrap piles. We’ll be sharing them with you later this week.
 Kids Clothes Week starts tomorrow, and I’ve got some fun sewing planned for my little guys. Are you joining in? It’s not too late! Get your patterns and fabric ready and commit to spend at least one hour each day this week sewing for your children!
 Are you enjoying my random pictures? I can’t write a blog post without pictures, so I thought I’d throw in a little life randomness via Instagram pics! This last one needs a little explanation, though. My dear friend, Heather, and her family moved way (waaaaaaaay!) out into the country last month. The kids and I drove out to visit her and see their new house for the first time this past week. It was a lovely visit. The boys had a blast just being boys, and the girls enjoyed some sewing time. We left in the late afternoon, drove down her long driveway, took a right, and about 2 minutes later, Samantha said, “Is that an alligator?!” I glanced in the rearview mirror, and sure enough it was an alligator! An alligator on. the. side. of. the. road. just hanging out. I couldn’t drive away without making a u-turn and going back to take a picture. Who would believe that I just saw an alligator on the side of the road without a picture?! Moving to the country in Florida is just a little bit different than it is in other parts of the country.

Easter Pictures!
 I hope you were all blessed with a wonderful Easter Sunday! We enjoyed an amazing worship service, yummy food, great company and beautiful weather! I was up late two nights in a row last week sewing for our two little guys and our granddaughter. The boys ended up with khaki shorts that I ran out and grabbed at Target on Saturday night, and I was still sewing buttons on Charlie’s shirt about fifteen minutes before church started on Sunday morning! (We’re used-car shopping right now, and it takes so much time! We were out nearly all day on Saturday after spending hours of time researching for days ahead of time, and we still haven’t purchased anything. I’d really like the perfect van to just appear in our driveway so we can be done.)
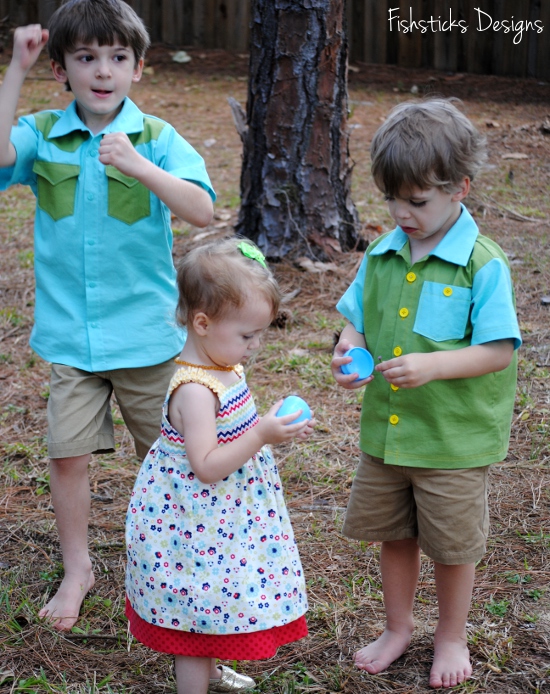
We went to the early service on Sunday morning, so we were all a little wrinkled by the time we got out to hunt eggs in the afternoon. You’ll just have to overlook the wrinkles. We also had no baskets, so the kids hunted with my reusable grocery bags! Katie’s dress is the Reversible Double-Layer Katie J. Jumper in Riley Blake Tone-on-Tone Dots and coordinates from Dress-up Days.
 Charlie got an Everyday Camp Shirt made with Timeless Treasures’ Soho Solids and yellow buttons! (Hmmm . . . how did I miss that dirty face? Just pretend that I washed it, and you can’t see that chocolate.)
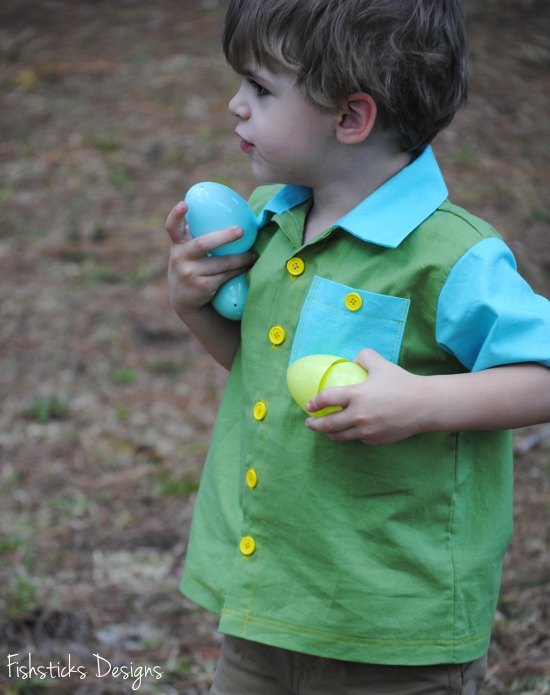 I’ll be back to share a little more about Charlie’s shirt later this week. It’s Button Week at Sew-vivor!
 Jamie’s shirt is a prototype of a new design that I’m working on. It’s a fun retro Western-style shirt.
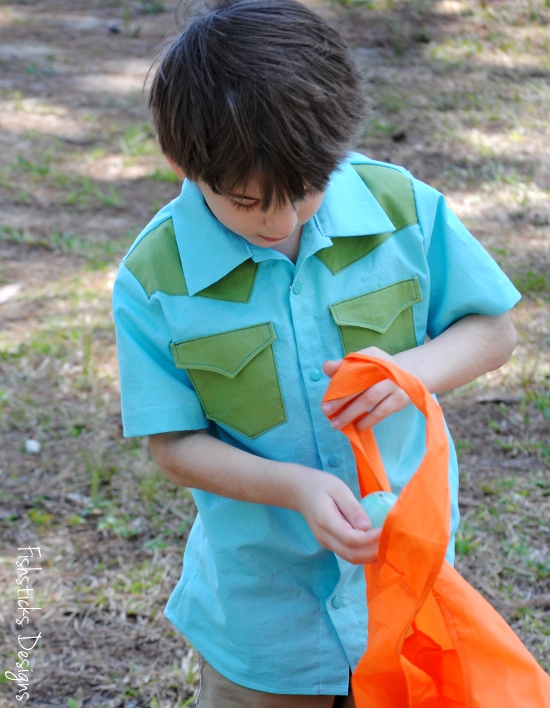 Those pocket flaps were supposed to get snaps, too, but church was starting without us! I love the shirt-tail hem on this one.
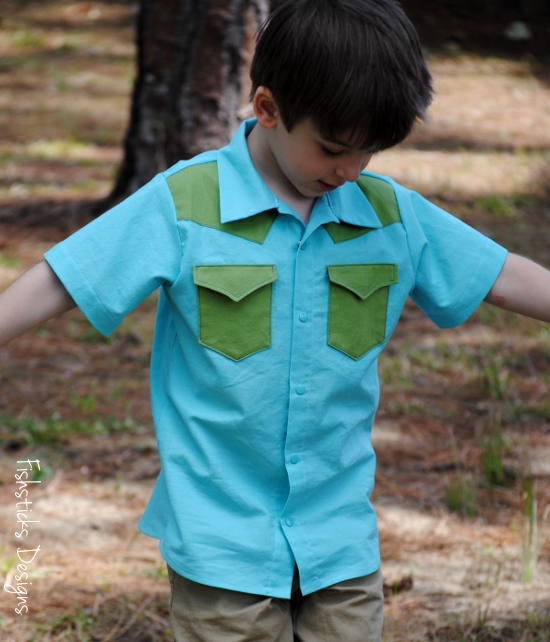 Ray and Samantha hid the eggs for us, including a few that they thought would be too high for the little ones to get to on their own.
 Bet you never knew that palm trees were made for climbing! (I certainly didn’t!)
 I attempted to get some pictures of the three little ones together.
 I also tried to get some pictures of Charlie and Jamie together.
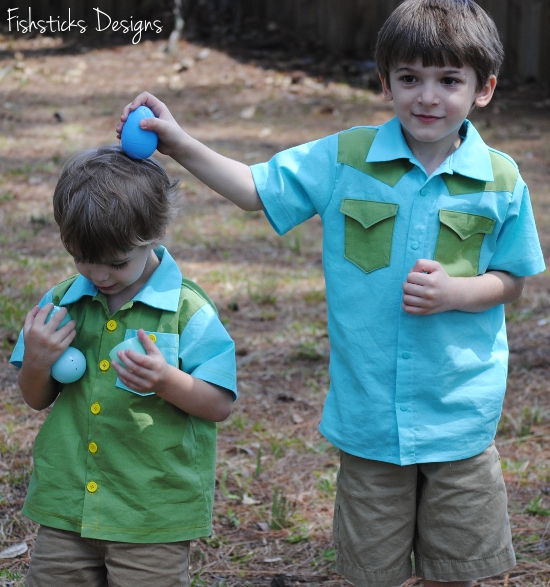 Maybe next year? I did get one really cute one of Jamie and Katie!
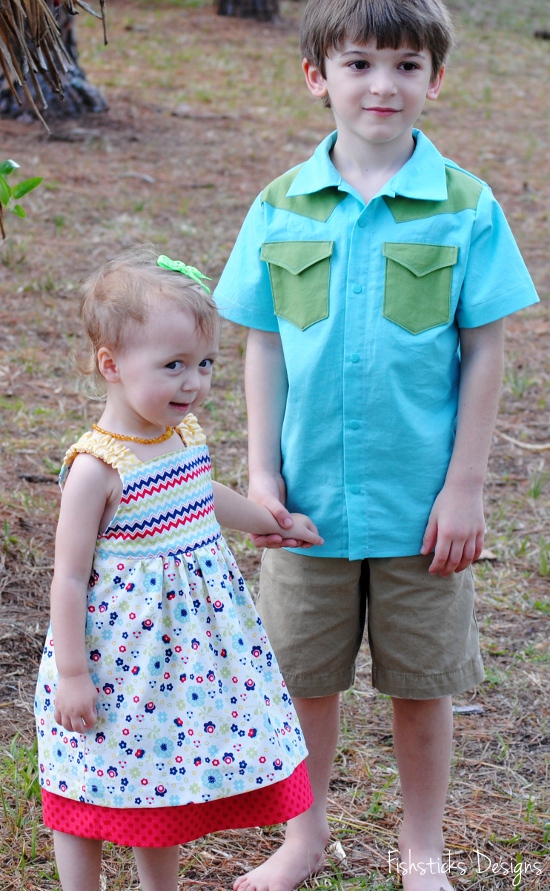 I’ll leave you with that! Happy Easter . . . a couple days late!
Samantha’s Apron!
 Samantha loves to help in the kitchen. Actually, she and Ray do a lot of the cooking around here together! She asked for an apron for her birthday this year. Her birthday was not quite two months ago. In my defense, though, I did take her fabric shopping on her birthday, and I took her out for lunch, coffee and book-shopping.
 She found an apron that she liked in the book, A is for Apron, by Nathalie Mornu.
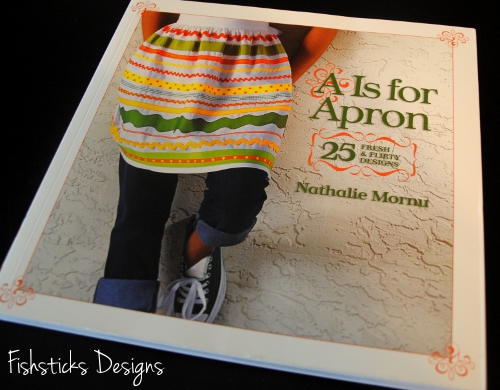 This is one of those books, though, that requires you to enlarge the patterns by 400%. I’m not totally sure how to do that. (I would love suggestions if anyone has done it!) Rather than try to enlarge the pattern, I just redrafted it, making a few little changes to make it exactly what Samantha wanted.
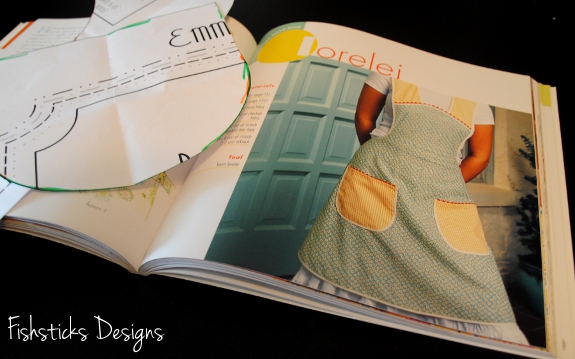 Samantha agreed to model the apron for me this morning. Can I just say how nice it is to photograph a cooperative model? She did roll her eyes a little when I handed her one of my vintage Pyrex bowls and a wooden spoon and suggested she pretend to bake cookies, but she went along with me.
 These fabrics are the ones that Samantha chose on our birthday fabric shopping trip. She loves aqua and red, and the vintage-style of the apron works beautifully with the fabrics.
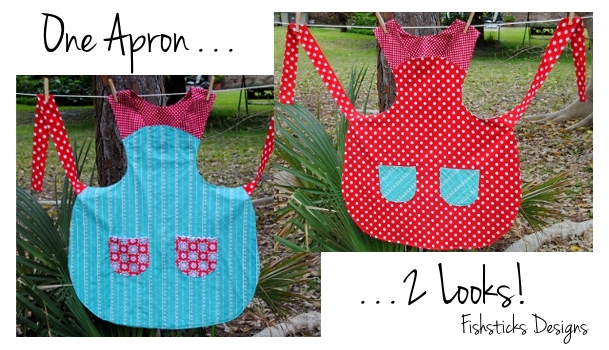
 The original apron from the book uses bias tape. I do not do bias tape. (It’s just evil . . . mean and evil.) So, I made the apron reversible! So much easier than sewing bias tape all the way around, and you get two looks in one!
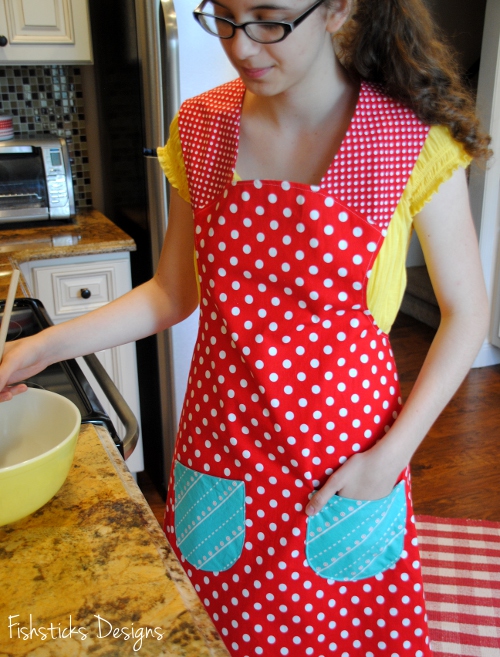 I love this pull-over collar. LOVE it! It’s so much less fussy than ties or D-rings.
 The rick-rack on these pockets was the first rick-rack that I ever sewed! I actually worked on these pockets at the Sewing Soiree a few weeks ago, and I secretly threw one of the first pockets that I cut out into the trash can after ripping it apart and sewing it back together so many times that it was going to fall apart. I just couldn’t seem to visualize the way to baste the rick-rack so that when I sewed the pockets and turned them, it would look nice. As you can see, I did finally get it! Yay!
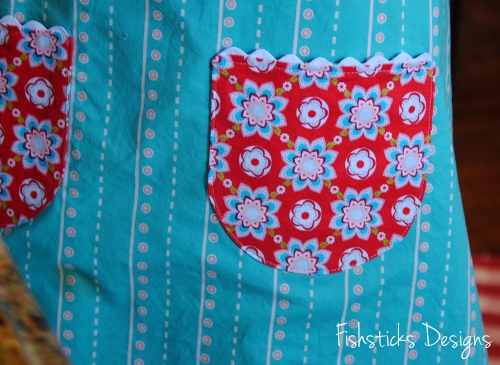 Samantha loves her apron! And she’s thrilled that I’ll actually allow her to use it now that I’ve photographed and blogged it. (Anyone else tell family members, “Here I sewed this for you, but you can’t have it until I get a chance to take pictures for my blog!”)
Hmmm . . . How long do you bake fake cookies? (I love this girl!)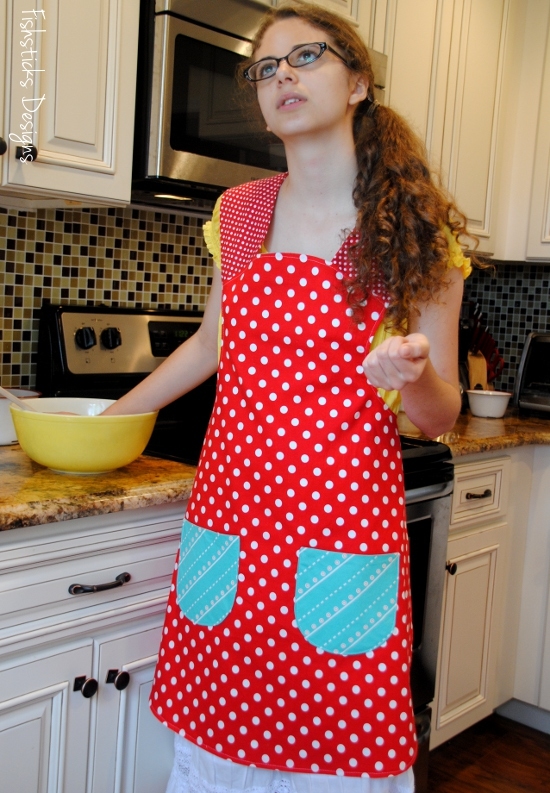
This Time it Really Was Blood
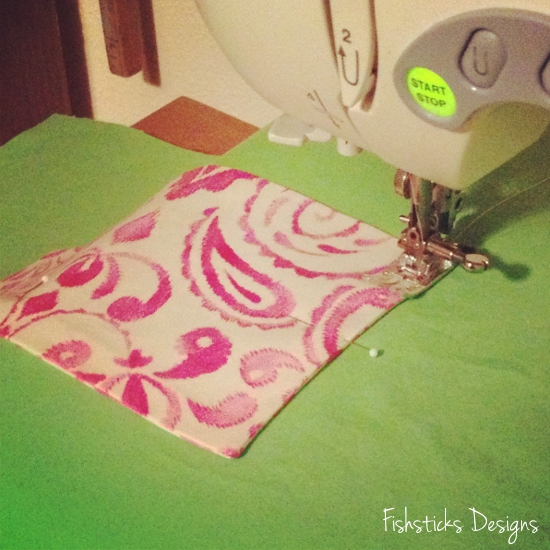
After last week’s nail polish scare, I couldn’t not post about last night’s adventure in parenting. This time there really was blood. (No gory pictures, I promise!) When I arrived home after several hours in the emergency room with my three-year-old daredevil, I found my sewing machine exactly as pictured above. Apparently, that’s exactly where I was in the process of sewing my Covert Robin project when I heard the scream. Oddly enough, the scream came from the six-year-old not from the little guy whose head was gashed open thanks to a pretty hard smack with the wooden tree-swing in our backyard.
He was so cute in his little hospital gown in the ER . . . at least until he got tired of sitting in a tiny room waiting. The staff was amazing, though, so I really can’t complain at all!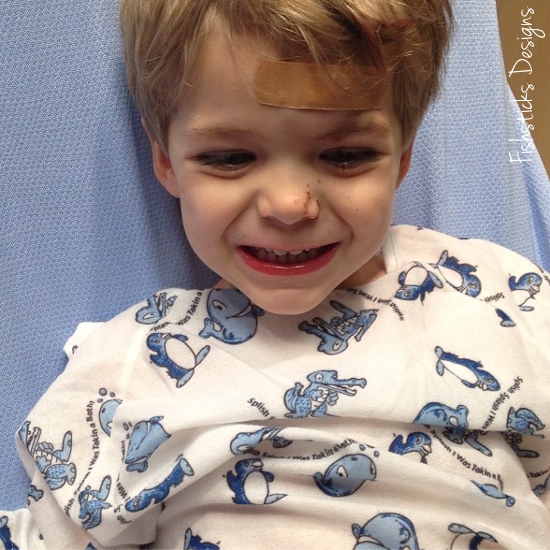 Charlie had a great nurse. He thought it was hilarious when he asked Charlie how old he was, and Charlie responded without skipping a beat, “14.” Really, he thought it was so funny, he brought other people to the room just to make them ask Charlie how old he was. Then he snickered and said, “He’s a little small for his age.”
The funniest part of the whole night for me was when the doctor looked down at Charlie’s big toe as he was finishing up the stitches and asked, “Did you get blood on your toe? Oh, no. That’s nail polish. Did your sister paint your toe?” “Nope. Me did it.” Three stitches and a good night’s sleep, and we’re all good to go. He’s actually hanging out with me right now in our church’s coffee shop while I blog and his older brother and sister attend their homeschool co-op writing class.
 Here’s another little peek at that Covert Robin project. I finished it up this morning! I have a few more little things to add, and it will be off to it’s secret recipient next week. Do you have any sewing plans for the weekend?
At Least It’s Not Blood
Yesterday was one of those days. You know the kind, right? One of those days when things just don’t go as you planned, but you love life anyway? My naptime plans yesterday included a blog post about my living room floor cushions (the ones that you can see up in my new blog banner above) and finishing up the tutorial that I should be posting right now. Around 1:30, I went to put Charlie, who couldn’t have been out of my view for more than two minutes, down for nap. I came around the corner, though, to find him standing on the staircase covered in what most definitely looked like blood! I think all moms know that rush of adrenaline that pours uncontrollably through your body when you see a sight like that. “Charlie! Is that blood?” He was remarkably calm for it to be blood, but he could have just been in shock, right? “No.” “What is it?!” “I don’t know.” “Where did you get it?” At this point, I realized that it most definitely did not smell like blood. “I don’t know.” “Show me where you got this.” Nail polish. Bright cherry red nail polish. All over the master bathroom. Tile. Counter. Faucet. Toilet. Cabinets. Rug. And, of course, all over Charlie. At least it wasn’t blood, right? Time to find a better place for the nail polish.

He did do a fairly good job of painting his big toenail, didn’t he? So, I spent naptime cleaning up Charlie and then cleaning up nail polish. It takes forever to remove bright red nail polish from a bathroom, by the way. It did come off of almost everything, though. Only the rug went into the garbage. It did not come off of Charlie very well, however. There will be a little bit of photo-editing involved with that tutorial so that no one thinks my little guy is covered in blood. Which, by the way, I am still very thankful it was not!
In other exciting news, the Fishsticks Designs Facebook page hit a huge milestone last night! I posted this photo to my Instagram and my personal FB page just before dinner:
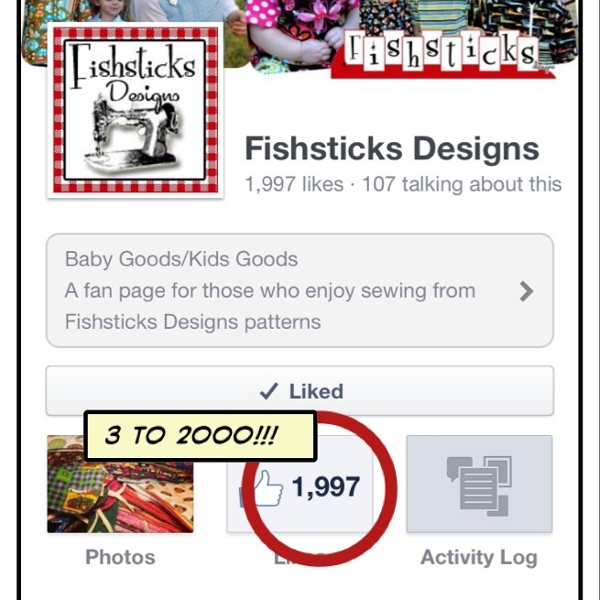
And with the help of a few sweet friends, including Kristy at Hopeful Threads and Leigh at Rooibos Mom, this is where we are this morning!
I think a celebration of some sort is in order! I’m working on something for next week! In the meantime, barring any unforeseen nail polish incidents, that little boys’ Easter tutorial is coming this afternoon.
Adding a bit of an update here since this topic of little ones getting into things that can cause them harm is so important: We choose to purchase products that are as safe as possible, including all of our cleaners and cosmetics. It’s important to do that, especially when you have small children in your home. It’s impossible to have your eyes on your child every second. Things like deodorant, toothpaste, perfume, nail polish — those things that we use everyday can be dangerous for our little ones. It’s important to keep these things up high where children can’t reach them, but children are resourceful. If a natural non-toxic option is available, I’m always going to choose it. When my child gets out of my site for a few minutes and paints his toenail and drips polish on the cabinets, toilet and tile in the process, I don’t want to have to worry about anything more than cleaning up the mess.
A Sewing Soiree!
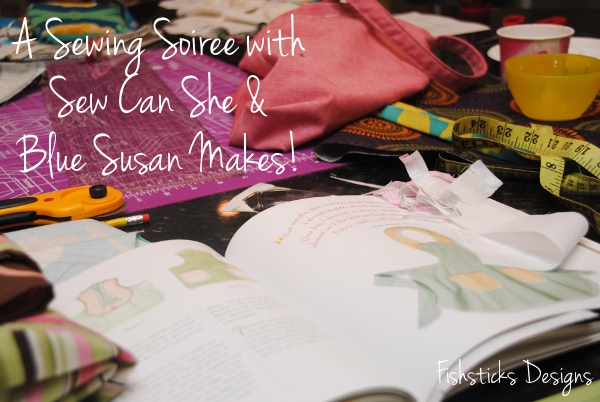 Oh, my! I had so much fun on Friday night! Sarah of Blue Susan Makes and Caroline of Sew Can She invited me to join them for their first Sewing Soiree!
Sarah taught the group how to make her Simple Tote. Caroline brought along some sewing toys for us to play with, including this very cool digital Slice cutter!
 The whole house was buzzing with shared tips and guidance, the humming of over a dozen busy sewing machines, the snipping of scissors and the steaming of irons.
  There was a beautiful spread of yummy treats and some great door prizes! Everyone who came got to take home a little gift bag with a fat quarter, ribbon and a presser foot guide from Sew Can She! (I just saw that Sarah is giving away a goodie bag AND a beautiful set of handmade pot holders over at Blue Susan Makes this week! Go enter and join in on a little bit of the fun!)
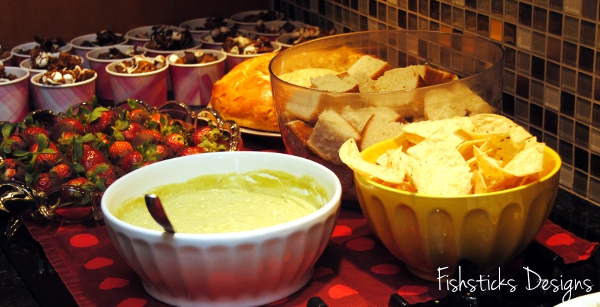 We chatted and sewed and ate and laughed and had a blast! I can’t wait to do it again!
Handmade Decor: Handmade with History
 I’ve been sharing the pieces that make up the TV gallery wall in our livingroom over the last few weeks, and I’m wrapping things up today with a couple of handmade things that I didn’t make myself. Ray and I ran across this set of six Bicentennial embroidery pieces in a thrift store many years ago, and we couldn’t pass them up. We’re always drawn in by patriotic handmade pieces, especially pieces as beautifully done as these.
 All six designs were framed in these plastic wood-look frames, and they’ve been displayed here and there around our various homes since we purchased them. I finally decided, though, that it was time for the outdated frames to go.
 The backs of a few of the pieces were inscribed with the name of the embroiderer and the date that they were done. I was curious, so I Googled her name and found a Catherine Bischoffberger who was born about 1914 and lived in Kings, New York when the 1940 census was taken.
  I have no idea, of course, if it’s the same Catherine Bischoffberger, but it’s possible since she would have been about 61 in 1975. I love decorating our home with pieces that have a story, but I’ll admit that it saddens me sometimes to run across things like this in a thrift store. I wonder what happened to her family. What would lead them to give up a treasure like this? I can almost see her rocking in a comfortable chair, cup of tea by her side, needle in hand, hour after hour, pouring herself into these beauties. I hope that she would be glad to know how much I enjoy looking at her work each day, how much I appreciate the time and the skill put into each piece. I wish I could ask her why she made them. Did she make them purely for love of country? Were they a gift for someone? One thing, I know for sure, she probably never imagined that someone someday would be sharing pictures of them on something called a blog on this thing known as the Internet!
 A few of you have pointed out the vintage Chinese Checkers board in the upper left-hand corner of the wall. That was a thrift store find, as well. I like the bit of whimsy that it adds to the gallery.
 The last handmade piece is this sweet drawing that I commissioned Samantha to complete for me. A few months back, we ran across a restored Chevy Nomad in a parking lot, and she snapped a picture with plans to sketch it later. When I asked her to draw something for me, she went right to that picture and asked what I thought. I think it’s perfect!
 And, that wraps up this wall, for now. I’d love to switch out the slightly cheesy “F” picture for something different, but I’m still looking for the perfect replacement. I think it needs something else, too, on the credenza to the right of the box. Something tall and red, maybe? Like a tall candle stick or a bird cage? I’ll let you know when I run across whatever it is!
 If you haven’t yet, be sure to click over to yesterday’s post and enter the It’s a Snap Source Giveaway!
Project Run & Play: Signature Style with Superhero Appeal

The final Project Run & Play theme is Your Signature Style. As the weeks have come and gone, I’ve pondered what my “signature style” is and wondered what I could sew that would show it. The whole series flew by, though, and as usual, it was the last minute. There was no time left to think, only time to sew! Yesterday was Charlie’s third birthday, and since he was the recipient of this week’s sewing, I let him make the major design decisions.
Is that a superhero hiding behind that palm tree? Could it possibly be Captain America?!
  Charlie loves superheroes, especially The Avengers, or “The Avengers Assemble” as he calls them. His current favorite happens to be Cap’n ‘Merica!
 As I mentioned, time was short, so I grabbed two patterns that I know are quick and trustworthy — for the top, my Charlie Tee & Hoodie and for the bottom, my soon-to-be-re-released Mud Puddle Splashers. I wondered aloud as I was tracing Captain America’s shirt design onto my Charlie Tee pattern, how I was going to spin this as my signature style. Suddenly, I realized, though, that this is my signature style! In creating this outfit, I followed my normal routine: grab a pattern that you know and love, evaluate the needs and desires of the wearer, choose a few little extras, use what you have available (fabric, time, equipment) and create something practical and fun.
 The shirt was pieced together using the colorblocking method that I mentioned in Week 2. It just took a few more pieces than usual. I cut the red and white stripes at the bottom longer than I needed them to be, pieced them together, then cut the curve at the top before cutting the matching top piece. I used the ringer sleeves and the hood from the Charlie pattern, partially to add some character to the top, but also because I broke my walking foot last week. (I managed the hems on the shirt and the shorts without a walking foot, but there was no way I was going to try topstitching a neckline without one!)
 It was nearing 10:15 on Monday evening, and I’d promised myself that I’d be in bed by midnight, so the shorts got the Naptime Knit Mud Puddle Splashers treatment. I did add back pockets, but rather than turn and topstitch them, I trimmed off the seam allowance and just folded them wrong sides together. It’s interlock knit, so the edges aren’t going to fray, and that raw-edge look works great for little boys. (Why, yes! Yes, I did make TWO pairs of red shorts for Charlie during this PR&P series! I wondered for about half a second if I should, but red works well for him, so they’ll get plenty of wear.)
 Happy Birthday, Charlie! Oh, those eyes. Of course I’m biased, but aren’t they amazing? (I considered virtually cleaning up the bruise between his eyes and removing the grass from his hair, but this is so very Charlie! He’s not quite ready to save the world, but he works hard at conquering his own backyard.)
 Before I wrap up this post, I have to share one more little thing. I mentioned in yesterday’s post that I had to clean up a cake disaster, and I’m a little bit impressed with how it turned out. You won’t find me posting pictures of cakes here very often. I can sew really well, but cake decorating is not my thing. HOWEVER . . . I think this one might be encouraging to other harried moms like me.
I tried out a new cake recipe yesterday, and it was incredibly yummy: Paleo Chocolate Birthday Cake. The problem arose when I realized that I’d failed to remember to put parchment paper in the pans before pouring the cake batter into them. This is what I found myself faced with:
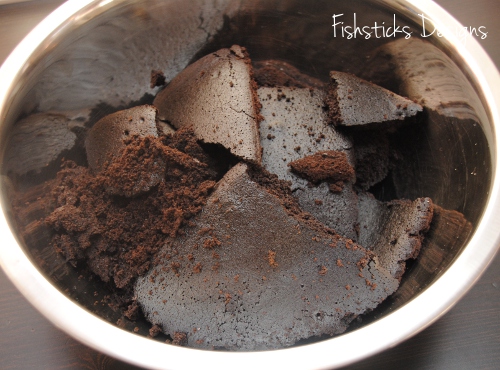 Not pretty, huh? Well, what’s a creative mother of a little boy who loves Captain America to do when she’s faced with a bowl full of broken cake? Why, build a cake mountain, of course! And, let everyone think that’s what she meant to do from the start!

Oh, the blueberries? Charlie not only loves Captain America, but he also loves blueberries. He’s been insisting for weeks that his cake had to be chocolate with chocolate frosting and blueberries. So there you go!


